10
|
hinkley.com
INSTALLING THE BLADES
INSTALLING THE MONTING PLATE
NOTE:
Cordless power screwdrivers are
NOT
recommended,
as they usually strip the heads of the screws and
usually will not fully compress the lock washers on
the motor screws. Use a large flat blade screwdriver
for final tightening to fully compress the washers. This
will help ensure proper alignment of the blades and
noise-free, wobble-free running.
1
2
3
NOTE:
Be sure the power is off before installing.
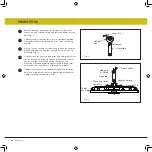
Remove one of the three screws on the mounting hub
located on the fan motor. Loosen the other 2 screws. (Do
not remove) (Fig. 2)
Place the key holes on the rubber gasket and adapter plate
over the 2 screws previously loosened, turn the adapter
plate until it locks in place at the narrow section of the key
holes. Secure by tightening the 2 screws previously
loosened and the one previously removed.
Raise the bottom cover against the adapter plate with 2
screws until snug.
Restore power is ready for operation.
Fig. 2
Fig. 1
Screws
Screws
1
2
3
Mounting Hub
(bottom of motor)
Adapter
Plate
Bottom Cover
Rubber Gasket
4
Blades
Screws
Fiber Washers
Insert the blade through the slot on the housing. Align the
holes on the blade and the fan motor assembly and
secure with the fiber washers and blade attachment
screws.
Make sure screws are TIGHT! Loose motor screws can
contribute to unnecessary hum during operation.
Repeat procedure for remaining blades.


