HIKVISION DS-9616NI-I8 Quick Start Manual Download Page 4


  1 

C O N N E C T   D E V I C E S  


1.


Connect AC power cord to the NVR. 

2.


Connect NVR to LAN using Cat 5e cable. 

3.


Connect video monitor(s) to NVR using HDMI and/or VGA cables, as appropriate. 

4.


Connect mouse to USB port (wireless mouse can be used in lieu of included mouse). 

  2 

S T A R T   T H E   N V R  


1.


Plug AC power cord into grounded wall outlet (line conditioning UPS is recommended).   

2.


Turn power switch on. Power indicator LED will turn 

GREEN

  3 

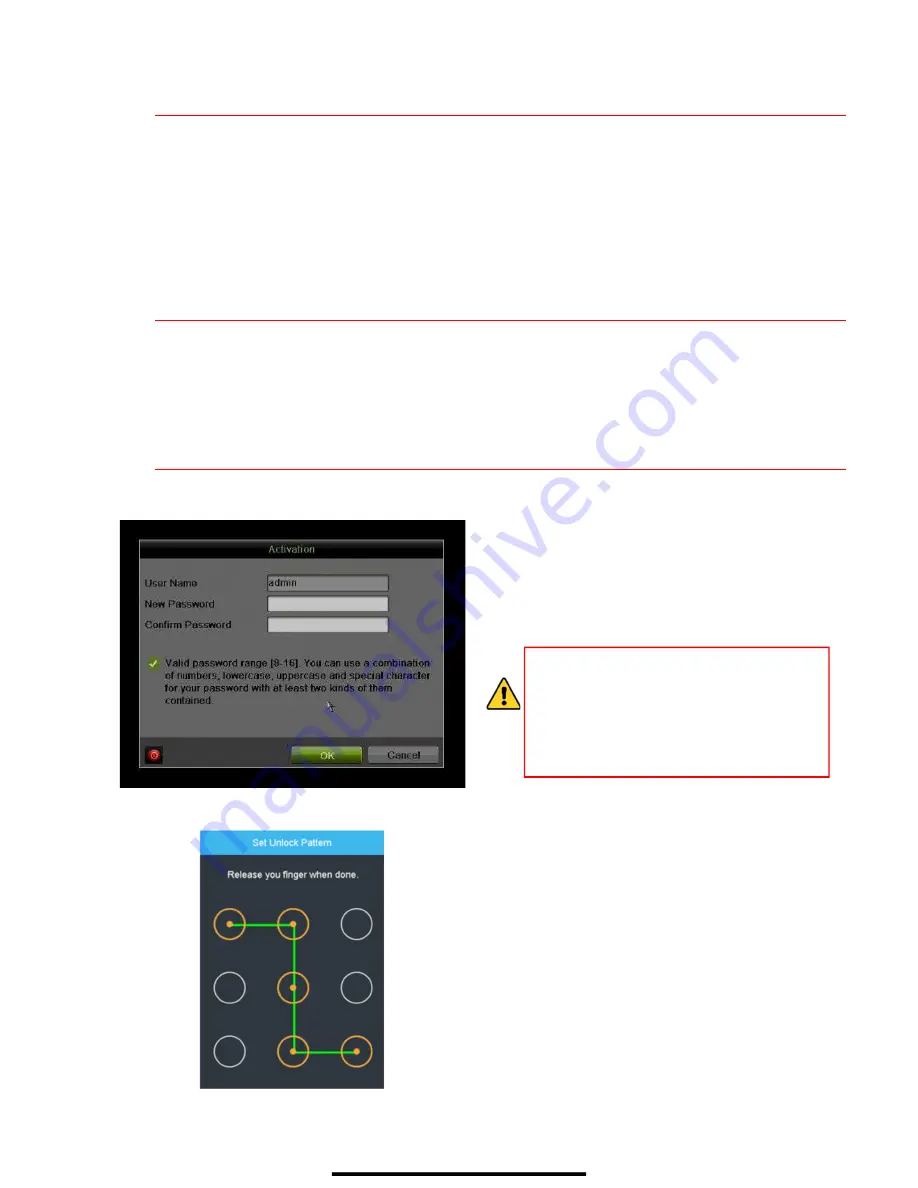
L O C A L   A C T I V A T I O N  


System access requires a secure, user-assigned password. 


Set Admin Password


First-time access requires user to create an 

admin password.   
1.


Input same password in 

Create New 

Password

 and 

Confirm New Password


text fields. 

Strong Password REQUIRED 

Password must contain 8 to 16 characters, 

combining numbers, lower and upper case 

letters, and special characters. At least two 

types of the above-mentioned characters are 

required. Also, reset password regularly. 

2.


Click 

OK

 to activate the device. 


Set Unlock Pattern


Admin user will be prompted to configure an 

unlock pattern for login in place of a password.   
1.


Hold down left mouse button and draw a 

pattern by connecting at least four dots on 

the screen, with each dot connected only 

once). Release mouse button when done. 

2.


Draw the same pattern again to confirm it. 

NOTE:

  If you forget pattern, select Switch 

User to display normal login box. 


Log In (Unlock Pattern)


1.


Draw the unlock pattern to unlock system. 


Summary of Contents for DS-9616NI-I8

Page 1: ...peration of this equipment in a residential area is likely to cause harmful interference in which case the user will be required to correct the interference at his own expense FCC Conditions This devi...

Page 2: ...your box NVR Mouse Remote AC Cord HDD Screws w Batteries Installed HDD HDD Cables Ear Mounts HDD Rails QSG DVD ROM Installed Installed Installed M E N U T R E E Use this menu tree to navigate the embe...

Page 3: ...lows blue when device is on red when powered off and in standby mode R E A R P A NE L Figure 2 DS 9616NI I8 Rear Panel No Name Description 1 Audio In RCA connector for audio input 2 RS 232 Interface C...

Page 4: ...put same password in Create New Password and Confirm New Password text fields Strong Password REQUIRED Password must contain 8 to 16 characters combining numbers lower and upper case letters and speci...

Page 5: ...V E I F N E E D E D The system is set up to record upon power up and will beep and display Do you want to initialize drive prompt if the hard drives are not initialized 1 Go to MENU SYSTEM CONFIGURATI...

Page 6: ...t to the cameras LAN 5 Uncheck the Enable DHCP checkbox 6 Set the IPv4 network IP address subnet mask and default gateway to match the IP subnet of the cameras 7 Use the pull down Select NIC menu to s...

Page 7: ...s responsible for Web browser log in RTSP PORT is responsible for video audio streaming NOTE The HTTP port server port and RTSP can be changed to avoid conflicts with the ISP or if multiple devices ar...

Page 8: ...e s video stream on the Hik Connect mobile app or iVMS 4500 mobile app you must add the device 1 Login to Hik Connect mobile app with your user name e mail or mobile number and password 2 On the Home...

Page 9: ...Add IP Camera Custom window 2 Enter the camera s IP address and other information as required 3 Press the Add button to add the camera IP Camera Management Icons Icon Explanation Icon Explanation Edi...

Page 10: ...MOTION DETECTION under the Type pull down menu 3 Use cursor to select days will turn blue continuous or yellow event motion detect or deselect days will turn gray off the calendar days you wish to rec...

Page 11: ...the image that will be sensitive to motion 6 Click the Settings Set button to configure Arming Schedule when detection is enabled and Linkage Actions what action s to take when motion is detected CAM...

Page 12: ...motion by default Higher frame rates require more storage but allows better slow motion playback Max Bitrate Mode chooses between pre set bitrate values and customized values General setting is defau...

Page 13: ...ys that contain recordings will be blue if recording was continuous only or yellow if all or part of the day was event recording 4 Press PLAY 5 Click within the timeline to jump to desired time PLAYBA...

Page 14: ...mportant video is not lost or destroyed Choose Recorded Video Clips To Back Up 1 Connect a USB flash drive HDD or DVD writer to an available USB port this step is mandatory 2 Go to MENU PLAYBACK 3 Sel...

Page 15: ...choose video clip s to back up and click Export button 6 Choose backup device USB flash drive USB HDD or DVD writer 7 Click Export to check backup choose recorded file in Export interface and click b...

Page 16: ...on Canada 4485 Dobrin St Laurent Quebec Canada H4R 2L8 Telephone 1 909 895 0400 Toll Free in USA 1 866 200 6690 E Mail sales usa hikvision com www hikvision com 2017 Hikvision USA Inc All Rights Reser...

Reviews: