background image


  15


B A C K   U P   V I D E O   R E C O R D I N G S   A N D   C L I P S

  ( c o n t i n u e d )


Hikvision USA Inc.

, 18639 Railroad St., City of Industry, CA 91748, USA 

Hikvision Canada, 4485 Dobrin, St-Laurent, Quebec, Canada, H4R 2L8 

Telephone: +1-909-895-0400 • Toll Free in USA: +1-866-200-6690 

E-Mail: [email protected] • www.hikvision.com 

© 2017 Hikvision USA Inc. • All Rights Reserved 
Specifications subject to change without notice. QSG DS-90xxHUHI-F8/N 040517NA 
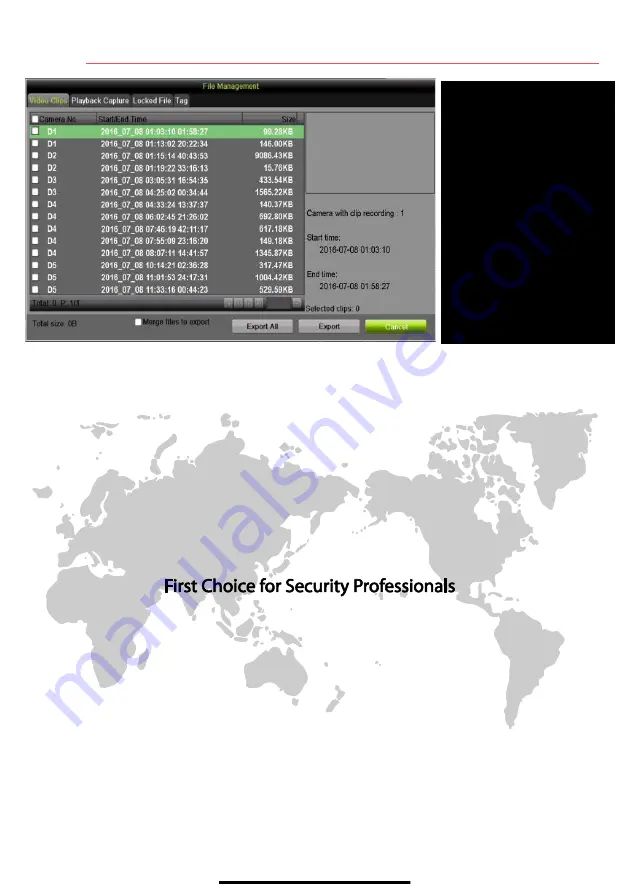


VIDEO CLIPS LIST 

Select desired clips to export 



EXPORT BUTTONS   

Save clips to USB device






Summary of Contents for DS-9008HUHI-F8/N

Page 1: ...pplied accessories too are marked with CE and comply therefore with the applicable harmonized European standards listed under the EMC Directive 2004 108 EC the RoHS Directive 2011 65 EU 2012 19 EU WEEE Directive Products marked with this symbol cannot be disposed of as unsorted municipal waste in the European Union For proper recycling return this product to your local supplier upon the purchase o...

Page 2: ...etwork connection is functioning properly 2 IR Sensor For remote control 3 Front Panel Lock Locks access to hard drives 4 DVD Bay For DVD drive 5 Number Buttons To enter numbers 6 USB Ports Connects USB mouse or USB flash memory devices 7 Function Buttons Use to access device functions 8 Direction Buttons Move up down left right 9 Enter Confirms menu selection Ticks checkbox fields In Playback mod...

Page 3: ...13 Video In BNC connectors for video input 14 USB Interface Connect to USB mouse or USB flash memory devices 15 Video Out BNC connector for video output 16 HDMI1 HDMI video output connector 17 VGA DB 15 connector for VGA output to display local video output and menu 18 LAN1 Connector for LAN Local Area Network 19 Alarm In Connectors for alarm inputs 20 Ground Connect before powering up 1 C O N N E...

Page 4: ... 2 Medium Fair DVRs will accept password Password contains two types of characters neither number lower case letter nor number upper case letter and is at least eight characters Level 3 Strong DVRs will accept password Password contains more than three types of characters and is at least eight characters NOTE 1 The strength level indicator colors can vary by activation process model number and dev...

Page 5: ...r to identify the machine e g Jones Home PO3243 5 Double click on the new folder to switch to that location for saving 6 Click the Export button to export the GUID file to the USB flash disk System will show the saved GUID file NOTE First nine digits after GUID_ is serial number of unit from which GUID was exported Digits after serial number are date of export If multiple GUIDs exist for same unit...

Page 6: ...K GENERAL 2 Use pull down Working Mode menu to select Multi address 3 Use the pull down Select NIC menu to select the network interface card you want to configure as the camera LAN LAN 1 or LAN 2 4 Use the pull down Default Route menu to select the NIC that is to connect to the cameras LAN 5 Uncheck the Enable DHCP checkbox DATE TIME Date and time settings TIME ZONE Time zone and daylight savings ...

Page 7: ...er assigning the IP information click the More Settings tab The More Settings tab contains the ports that need to be forwarded for remote access SERVER PORT is responsible for the mobile app and client software log in HTTP PORT is responsible for Web browser log in RTSP PORT is responsible for video audio streaming NOTE The HTTP port server port and RTSP port can be changed to avoid conflicts with...

Page 8: ...Internet See the User Manual 1 Enable Hik Connect P2P on the DVR 1 Go to Main Menu System Configuration Network Platform Access 2 Check the Enable checkbox 3 Server Address must be dev hik connect com If not check the Custom checkbox and type dev hik connect com 4 Click the Apply button Status will change to Online if all settings are correct 5 Note the Serial Number and Verification Code shown he...

Page 9: ...a Camera disconnected click icon to get camera s exception information Delete the IP camera Play connected camera s live video Camera connected 11A D D A N A L O G C A ME R A S Adding Analog Cameras 1 Connect analog camera s to the Video In BNC connectors Enabling Analog Cameras 1 Analog cameras are enabled by default no further action is required Disabling Analog Cameras NOTE An additional IP cam...

Page 10: ...CORDING CONFIGURATION SCHEDULE 2 Choose CONTINUOUS or EVENT MOTION DETECTION under the Type pull down menu 3 Use cursor to select days will turn blue continuous or yellow event motion detect or deselect days will turn gray off the calendar days you wish to record 4 Apply time settings as desired 5 Press APPLY Icons in the upper right of screen show each camera s record and alarm status Alarm video...

Page 11: ...e image that will be sensitive to motion 6 Click the Settings Set button to configure Arming Schedule when detection is enabled and Linkage Actions what action s to take when motion is detected CAMERA Select camera ENABLE MOTION DETECTION Click to enable disable MOTION GRID Draw area that will detect motion SENSITIVITY Set green squares for sensitivity in example sensitivity is 3 SETTINGS SET Armi...

Page 12: ...uous and 15 fps motion by default Higher frame rates require more storage but allow better slow motion playback Max Bitrate Mode chooses between pre set bitrate values and customized values General setting is default Max Bitrate kbps is chosen bitrate for streaming video Adjust to meet or exceed the rate recommended by the system for the chosen parameters Max Bitrate Recommended is impacted by res...

Page 13: ... from the menu on the right of the screen 3 Select the desired date days that contain recordings will be blue if recording was continuous only or yellow if all or part of the day was event recording 4 Press PLAY 5 Click within the timeline to jump to desired time SUBSTREAM TAB CAMERA Select STREAM TYPE Select RESOLUTION Up to 4CIF VIDEO QUALITY green squares sets quality example is 3 PRE RECORD Se...

Page 14: ...ideo is not lost or destroyed Choose Recorded Video Clips to Back Up 1 Connect a USB flash drive HDD or DVD writer to an available USB port this step is mandatory 2 Go to MENU PLAYBACK 3 Select cameras for playback 4 Select the date and beginning time of the incident 5 Click START CLIPPING button 6 Select the ending time of the incident PLAYBACK TYPE MENU Select type of record to play FULL SCREEN ...

Page 15: ...Video Clips 1 Connect a USB flash drive HDD or DVD writer to an available USB port 2 Click on the File Management button to display the File Management window 3 In the File Management window choose video clip s to back up and click Export button 4 Choose backup device USB flash drive USB HDD or DVD writer 5 Click Export to check backup choose recorded file in Export interface and click button CAME...

Page 16: ...a 4485 Dobrin St Laurent Quebec Canada H4R 2L8 Telephone 1 909 895 0400 Toll Free in USA 1 866 200 6690 E Mail sales usa hikvision com www hikvision com 2017 Hikvision USA Inc All Rights Reserved Specifications subject to change without notice QSG DS 90xxHUHI F8 N 040517NA VIDEO CLIPS LIST Select desired clips to export EXPORT BUTTONS Save clips to USB device ...

Reviews: