


User Manual of DS-9000/9100/9600 Series DVR
19
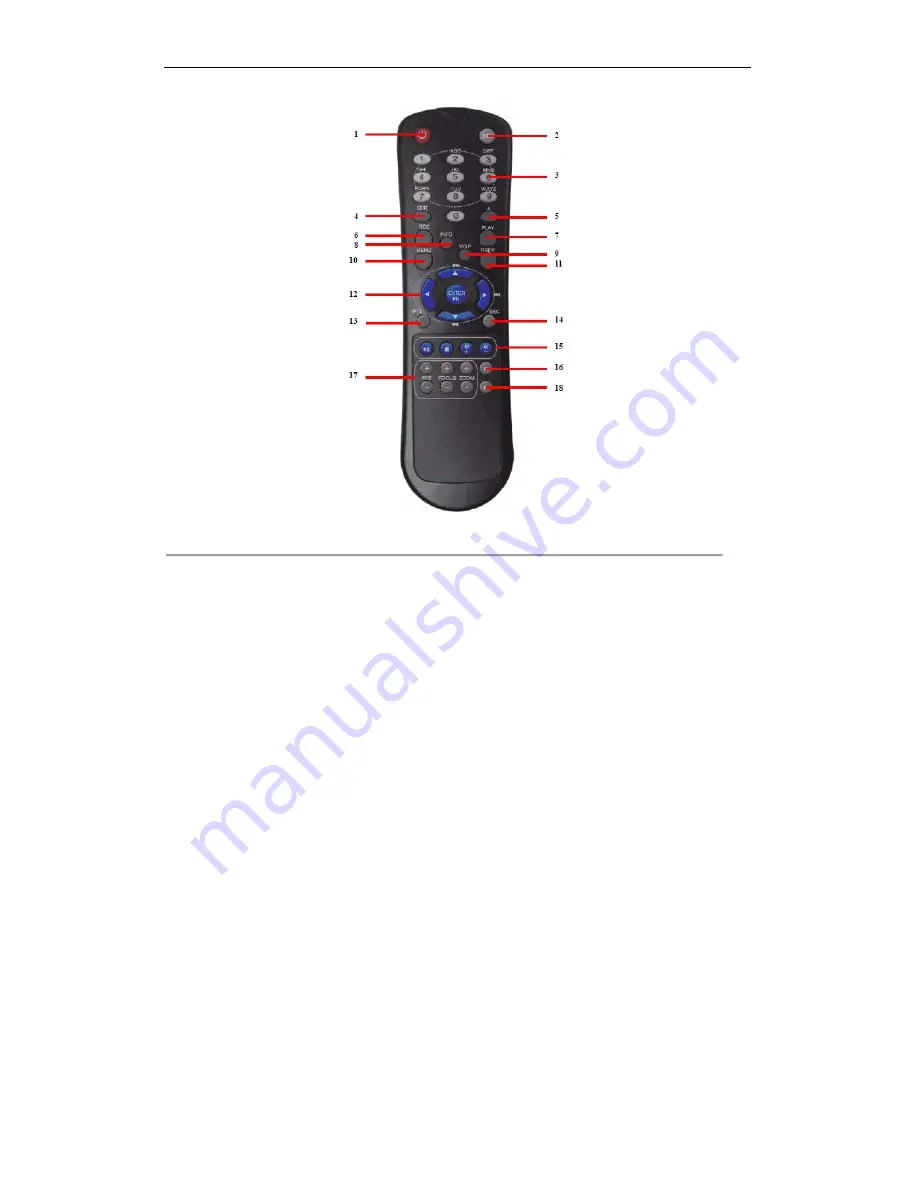
Figure 8. IR Remote Control
The keys on the remote control closely resemble the ones found on the front panel, including:
1.
POWER Button:
Same as POWER button on front panel.
2.
DEV Button:
Enables/Disables Remote Control.
3.
Alphanumeric Buttons:
Same as Alphanumeric buttons on front panel.
4.
EDIT Button:
Same as EDIT/IRIS+ button on front panel.
5.
A Button:
Same as A/FOCUS+ button on front panel.
6.
REC Button:
Same as REC/SHOT button on front panel.
7.
PLAY Button:
Same as PLAY/AUTO button on front panel.
8.
INFO Button:
Same as ZOOM+ button on front panel.
9.
VOIP Button:
Same as MAIN/SPOT/ZOOM- button on front panel.
10.
MENU Button:
Same as MENU/WIPER button on front panel.
11.
PREV Button:
Same as PREV/FOCUS- button on front panel.
12.
DIRECTION/ENTER Buttons:
Same as DIRECTION/ENTER buttons on front panel.
13.
PTZ Button:
Same as PTZ/IRIS- button on front panel.
14.
ESC Button:
Same as ESC button on front panel.
15.
RESERVED:
Reserved.
16.
F1 Button:
Same as F1/LIGHT button on front panel.
17.
PTZ CONTROL Buttons:
Buttons to adjust the iris, focus and zoom of a PTZ camera.
18.
F2 Button:
Same as F2/AUX button on front panel.
Aim the remote control at the IR receiver located at the front of the unit to test operation. If there is no response:
1.
Using the front control panel or the mouse, go into Menu > Settings > General > More Settings.
2.
Check and remember DVR ID#. The default ID# is 255. This ID# is valid for all IR controls.
3.
Press the DEV button on the remote.
4.
Enter the DVR ID# from step 2.
5.
Press the ENTER button on the remote.
If the Status indicator on the front panel turns blue, the remote control is operating properly. If the Status indicator
does not turn blue and there is still no response from the remote, please check the following:
1.
Batteries are installed correctly and the polarities of the batteries are not reversed.
2.
Batteries are fresh and not out of charge.
3.
IR receiver is not obstructed.
Summary of Contents for DS-9000 Series
Page 1: ...DS 9000 9100 9600 Series DVR USER MANUAL Version 1 3 1 ...
Page 11: ...User Manual of DS 9000 9100 9600 Series DVR 10 C H A P T E R 1 Introduction ...
Page 24: ...User Manual of DS 9000 9100 9600 Series DVR 23 C H A P T E R 2 Getting Started ...
Page 32: ...User Manual of DS 9000 9100 9600 Series DVR 31 C H A P T E R 3 Live View ...
Page 38: ...User Manual of DS 9000 9100 9600 Series DVR 37 C H A P T E R 4 Record Settings ...
Page 46: ...User Manual of DS 9000 9100 9600 Series DVR 45 C H A P T E R 5 Playback ...
Page 53: ...User Manual of DS 9000 9100 9600 Series DVR 52 Figure 14 Digital Zoom Area Selection ...
Page 54: ...User Manual of DS 9000 9100 9600 Series DVR 53 C H A P T E R 6 Backup ...
Page 60: ...User Manual of DS 9000 9100 9600 Series DVR 59 C H A P T E R 7 Alarm Settings ...
Page 76: ...User Manual of DS 9000 9100 9600 Series DVR 75 C H A P T E R 8 Network Settings ...
Page 87: ...User Manual of DS 9000 9100 9600 Series DVR 86 C H A P T E R 9 PTZ Controls ...
Page 93: ...User Manual of DS 9000 9100 9600 Series DVR 92 C H A P T E R 1 0 Camera Management ...
Page 99: ...User Manual of DS 9000 9100 9600 Series DVR 98 C H A P T E R 1 1 RAID Configuration ...
Page 113: ...User Manual of DS 9000 9100 9600 Series DVR 112 C H A P T E R 1 2 HDD Management ...
Page 120: ...User Manual of DS 9000 9100 9600 Series DVR 119 C H A P T E R 1 3 DVR Management ...
Page 132: ...User Manual of DS 9000 9100 9600 Series DVR 131 C H A P T E R 1 4 Appendix ...


