


12
S E T U P R E C O R D I N G
( c o n t i n u e d )
-
Max Bitrate (kbps)
is the chosen bitrate for streaming the video. Max Bitrate should be
adjusted to meet or exceed the rate recommended by the system for the chosen
parameters.
-
Max Bitrate Recommended
is impacted by resolution, quality, and framerate.
-
Record Audio
turns on audio recording (requires external mic or camera w/built in mic.
-
Video Stream
determines which stream is recorded. Leave at default (Main Stream).
•
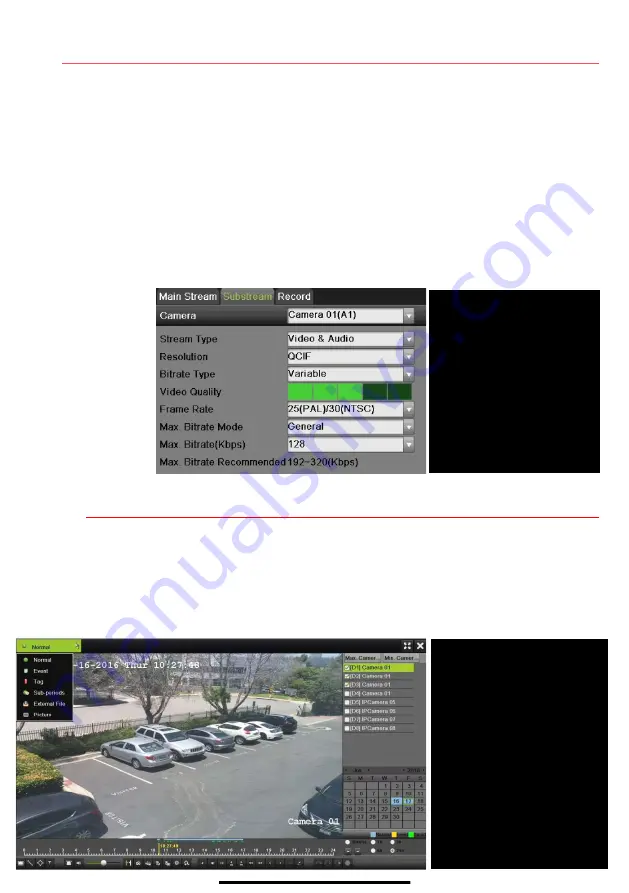
Substream
1.
Go to RECORDING CONFIGURATION > RECORD QUALITY > SUBSTREAM to set up
the
Sub Stream
to stream to mobile devices and display multiple cameras locally.
NOTE:
If the upload speed is not sufficient, lower the frame rate, bitrate,
and or resolution for more fluent mobile viewing.
13
P L A Y B A C K R E C O R D E D V I D E O
1.
Go to MENU > PLAYBACK.
2.
Select the desired camera(s) from the menu on the right of the screen.
3.
Select date (days w/recordings will be blue if continuous only or yellow if all/part of day was event).
4.
Press
PLAY
.
5.
Click within the timeline to jump to desired time.
PLAYBACK TYPE MENU
Select type of record to play
FULL SCREEN
Goes to full screen for multiple
channel playback
PLAY/STOP
Begin playback (toggles between
Play and Stop)
CAMERA LIST
Select camera(s) to play back
CALENDAR
Select date to play back
TIMELINE
Click on timeline to jump to
desired playback time
SUBSTREAM TAB
Select
CAMERA
Select
camera
STREAM TYPE
Select
choice
RESOLUTION
Can go up only to 4CIF
VIDEO QUALITY
Select number of green squares
to set quality (in example,
sensitivity is set to 3)


