background image

User Manual of DS-6700 Series Audio/Video Encoder 

43 


Figure 7.19 Set HDD Property     


Notes:


1.


Please refer to the User Manual of IP SAN/NAS for the creation of File Path in the network management. 

2.


Up to 8 NAS disks or IP SAN disk can be connected to the DS-6700.   

7.3.7 Configuring SNMP Settings   

Simple Network Management Protocol (SNMP) is an Internet-standard protocol for managing devices on IP 

networks

You can use SNMP to get camera status, parameters and alarm related information.   

Before you start:   

Before setting the SNMP, please download the SNMP software and manage to receive the device information via 

SNMP port. By setting the Trap Address, the device can send the alarm event and exception messages to the 

surveillance center. 

Note:

 The SNMP version you select should be the same as that of the SNMP software. 

Steps: 

1.


Click 

Remote Configuration >


Network Settings >SNMP 

to enter the SNMP settings interface.   

2.


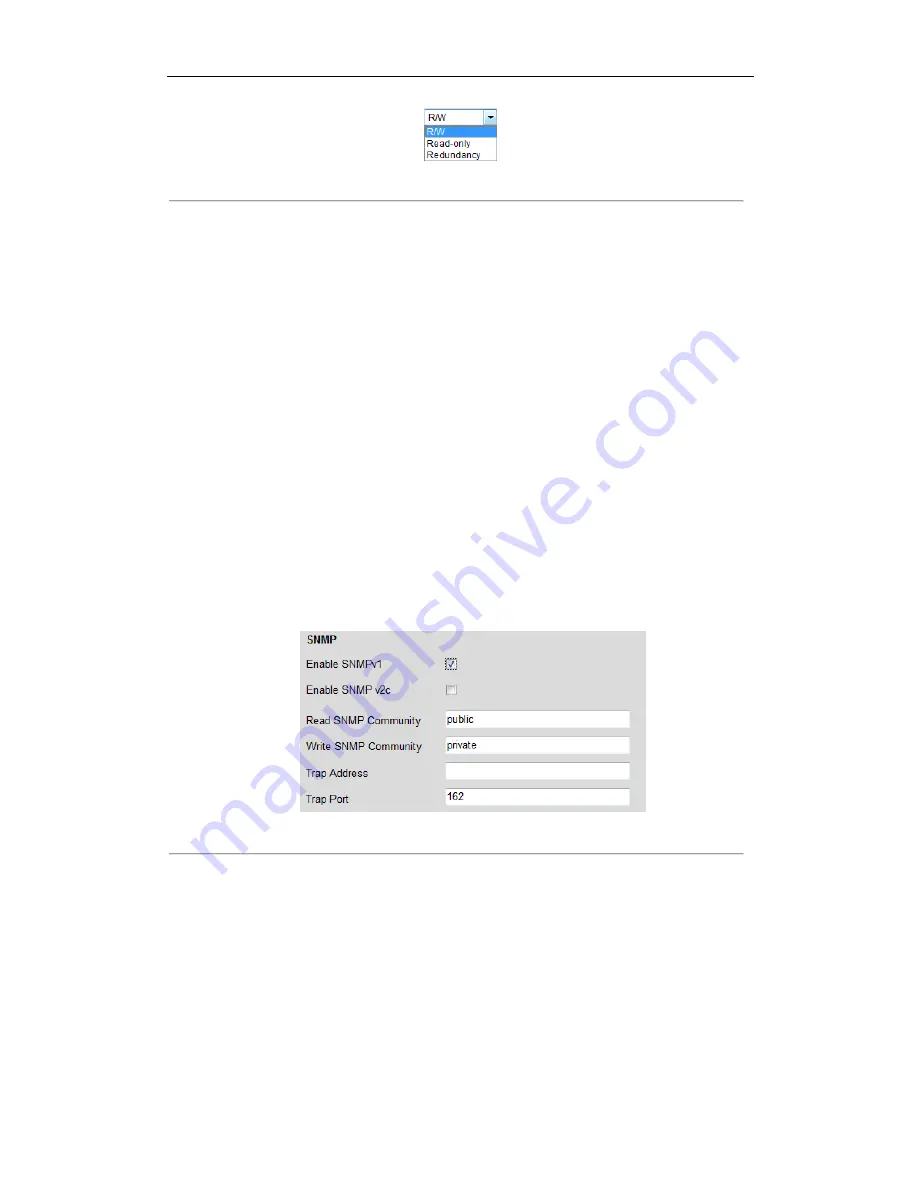
Check the checkbox to enable SNMP v1 or SNMP v2c, and configure the read SNMP community (default: 

public), write SNMP community (default: private), tap address (default: empty) and trap port (default: 162). 

You can also enable both SNMP v1 and SNMP v2c.   


Figure 7.20 SNMP Settings (1)     


3.


When the SNMPv3 is enabled, you can configure the read username (default: public).   

Note

:


By default settings, the SNMPv1, SNMP v2c and SNMPv3 are disabled. 


4.


Select the security level to “no auth, no priv”, “auth, no priv”, “no auth, priv” or “auth, priv”.   

Summary of Contents for DS-6701HFI

Page 1: ...User Manual of DS 6700 Series Network Audio Video Encoder Network Audio Video Encoder User Manual V1 1 0 UD 6L0202D1098A01 ...

Page 2: ...T LIMITATION THE IMPLIED WARRANTIES OF MERCHANTABILITY AND FITNESS FOR A PARTICULAR PURPOSE REGARDING THE HIKVISION SOFTWARE HIKVISION DOES NOT WARRANT GUARANTEE OR MAKE ANY REPRESENTATIONS REGARDING THE USE OR THE RESULTS OF THE USE OF THE HIKVISION SOFTWARE IN TERMS OF ITS CORRECTNESS ACCURACY RELIABILITY CURRENTNESS OR OTHERWISE THE ENTIRE RISK AS TO THE RESULTS AND PERFORMANCE OF THE HIKVISION...

Page 3: ...interference received including interference that may cause undesired operation EU Conformity Statement This product and if applicable the supplied accessories too are marked with CE and comply therefore with the applicable harmonized European standards listed under the Low Voltage Directive 2006 95 EC the EMC Directive 2004 108 EC the RoHS Directive 2011 65 EU 2012 19 EU WEEE directive Products m...

Page 4: ...oltage mismatch Please make sure the Encoder work in the allowed range of temperature and humidity Please keep the device horizontal and avoid the installation under severe vibration environment The dust board will cause a short circuit after damping Please dedust regularly for the board connector chassis fan with brush Improper use or replacement of the battery may result in hazard of explosion R...

Page 5: ...1Searching Active Devices Online 17 3 2Modifying Network Parameters 18 Chapter 4 Access to DS 6700 by Client Software 20 4 1 Starting iVMS 4200 Client Software 20 4 2 Accessing to DS 6700 20 4 2 1 Adding Device 21 4 2 2 Starting Live View 22 Chapter 5 Access to DS 6700 by WEB Browser 24 5 1 Installing Web Components 24 5 2 Main Page 26 Chapter 6 Live View 27 6 1 Starting Live View 27 6 2 Capturing...

Page 6: ...onfiguring FTP Settings 45 7 3 10 Configuring SOCKS Settings 46 7 3 11 Configuring UPnPTM Settings 47 7 3 12 Configuring HTTPSSettings 48 7 3 13 Configuring BonjourSettings 49 7 3 14 Configuring IP Address Filter 50 7 3 15 Configuring Multicast Address 51 Chapter 8 Camera Settings 52 8 1 Configuring OSD Settings 52 8 1 1 Configuring Display Settings 52 8 1 2 Configuring Text Overlay 53 8 2 Configu...

Page 7: ...tings 68 9 2 Configuring Scheduled Record Capture 69 Chapter 10 Playback 73 Chapter 11 Managing User Accounts 75 11 1 Adding a User 75 11 2 Modifying a User 76 11 3 Deleting a User 77 Chapter 12 Log Search and Maintenance 78 12 1 Log Search 78 12 2 Viewing Device Information 79 12 3 Maintenance 79 12 3 1 Restarting the Device 80 12 3 2 Restoring Default Settings 80 12 3 3 Importing Exporting Confi...

Page 8: ...S 6704HFI SATA DS 6708HFI SATA DS 6716HFI SATA DS 6701HWI SATA DS 6704HWI SATA DS 6708HWI SATA DS 6716HWI SATA Description DS 6700HFI Series 1 4 8 16 video inputs support up to 4CIF resolution 1 microSD card can be connected to DS 6701 6704HFI for local recording DS 6700HFI SATA Series 1 4 8 16 video inputs support up to 4CIF resolution 1 SATA HDD can be connected with up to 4TB capacity for local...

Page 9: ...cameras through network Two way audio and single directional broadcasting Transmission via RS 232 and RS 485 transparent channel Note DS 6701HFI HWI model provides no RS 232 interface Access to Internet by PPPoE method and support Peanut Hull DynDNS HiDDNS etc Set time by NTP Connectable with network HDD in NAS IPSAN mode Send email by SMTP protocol and support attachment of captured JPEG image an...

Page 10: ...s and system resources of device in case of exceptions detected the device will be automatically rebooted Firmware watchdog for inspecting the firmware of device in case of exceptions in system task scheduling the device will be automatically rebooted Logs The system logs can be classified into the operation logs alarm logs exception logs and information logs User may search and view all recorded ...

Page 11: ... on light in orange when the SD card is inserted 2 VIDEO IN BNC connector for video input 3 LINE IN 3 5mm interface for two way audio input or audio input connect to audio input device or active pick up microphone etc 4 AUDIO OUT 3 5mm interface connect to audio output device e g loudspeaker etc 5 microSD microSD interface for data storage 6 Reset Restore the factory default settings by holding th...

Page 12: ...en the SD card is inserted 2 LINE IN 3 5mm two way audio input interface connect to active pick up microphone etc 3 AUDIO OUT 3 5mm interface connect to audio output device e g loudspeaker etc 4 VIDEO IN BNC interface for video input 5 AUDIO IN Line input interface for audio input DS 6708 6716 and DS 6701 6704 6708 6716 SATA 1 2 3 Figure 2 3 Front Panel of DS 6708 and DS 6701 6704 6708 SATA 1 2 3 ...

Page 13: ...ing 3 Blinks at higher frequency when the data for transmitting receiving is larger 2 2 Rear Panel DS 6701HWI HFI Figure 2 5 Rear Panel of DS 6701HWI HFI Table 2 4 Rear Panel of DS 6701HWI HFI Item Description 1 ALARM IN OUT Relay alarm input output Note The alarm output terminal provides no JP2 pin 2 RS 485 RS 485 serial interface connect to pan tilt unit speed dome etc 3 LAN 10M 100Mbps adaptive...

Page 14: ...e RESET button for more than 15 seconds after the device is turned on 6 microSD microSD interface for data storage 7 LAN 10M 100Mbps adaptive Ethernet interface PoE The right LED indicator lights in green when the network cable is connected and the left LED indicator blinks in orange when data is transmitting receiving 8 DC12V 12V DC power supply 9 GND Grounding Note The DS 6701HWI HFI and DS 6704...

Page 15: ...RM IN Relay alarm input 9 ALARM OUT Relay alarm output 10 DC12V 12V DC power supply 11 GND Grounding DS 6716HWI HFI SATA Figure 2 8 Rear Panel of DS 6716HWI HFI SATA Table 2 7 Rear Panel of DS 6716HWI HFI SATA Item Description 1 VIDEO IN BNC connectors for video input 2 LINE IN 3 5mm two way audio interface connect to active pick up microphone etc 3 AUDIO OUT 3 5mm audio output interface connect t...

Page 16: ...e relay input port of the Encoder should be set to NC mode Figure 2 9 Alarm Input Connections for Emerson Alarm Alarm input connections for Normal Alarm Encoder Figure 2 10 Alarm Input Connections for Normal Alarm 2 3 2 Alarm Output Connections DS 6700 supports the open close relay input as the alarm output mode The alarm input can be selected to NO or NC Different alarm output connection methods ...

Page 17: ...t connections of JJ1 shown above For DC load JJ1can be safely used both in NC and NO methods and it is recommended to use within the limit of 12V 1A For external AC input JJ1 must be open The motherboard provides two jumpers each corresponding to one alarm output And both of two jumpers are factory set to be connected ...

Page 18: ... to tell the procedures of using the SADP software to find and configure the IP address and other parameters of the device Note For the first time user the default user name of DS 6700 is admin and password is 12345 And the default IP address is 192 0 0 64 3 1 Searching Active Devices Online Search online devices automatically Click to run the SADP software and it will automatically search the onl...

Page 19: ... You can click or on each column heading to order the information you can click to expand the device table and hide the network parameter panel on the right side or click to show the network parameter panel 3 2 Modifying Network Parameters Steps 1 Select the device to be modified in the device list and the network parameters of the device will be displayed in the Modify Network Parameters panel on...

Page 20: ...User Manual of DS 6700 Series Audio Video Encoder 19 Figure 3 2 Modify Network Parameters ...

Page 21: ...er 4 1 Starting iVMS 4200 Client Software Install the iVMS 4200 software on your PC according to the prompts For the first time to use the iVMS 4200 software you need to register a super user for login Figure 4 1 Register User Enter the super user name password and confirm the password in the dialog box and click Register Then you can log in as the super user Note Enter Space and TAB keys are inva...

Page 22: ... then input the IP address port number default 8000 login User Name default admin and Password default 12345 of the device Note If you check the Private Domain Mode checkbox you can add the device by IP server or HiDDNS You can also click the Show online devices icon to search the online devices All the online devices will show in the list Click to select the online device you want to add and then...

Page 23: ...22 Figure 4 4 Search Online Devices 4 Click Add to add the device 5 The successfully added device s will be displayed on the device list Figure 4 5 List of Added Devices 4 2 2 Starting Live View Click Control Panel Main View to enter the Live View page ...

Page 24: ... on the toolbar to operate in the live view mode e g capture picture start stop recording two way audio PTZ control with PTZ camera connected to the encoder digital zoom open close audio play back video files etc Note Please refer to the User Manual of iVMS 4200 Client Software for the detailed information ...

Page 25: ...he password is 12345 The factory default IP address of the device is 192 0 0 64 5 1 Installing Web Components Steps 1 Open WEB browser input the IP address of DS 6700 e g http 192 0 0 64 and then press the Enter key on PC The system then will display the login interface Note When the HTTPS feature is enabled the system will use the HTTPS login mode e g https 192 0 0 64 by default when you input th...

Page 26: ...wnload and Install Plug in 2 Click Run or Save on the pop up warning message box Figure 5 3 Run Web Components 3 Click Next on the pop up Setup dialog box Figure 5 4 Click Next 4 When the installation completes click Finish to finish the installation of Web Components ...

Page 27: ...g and Configuration page respectively Device List Display the connected encoder and its channels Window division 1 4 division display mode Live Video Window Display the live video of the current camera Toolbar Realize functions in live view mode e g live view capture recording audio on off two way audio etc PTZ Control Realize PTZ control of the camera supports PTZ function and the lighter and wip...

Page 28: ...ng window by clicking the mouse 2 Double click a camera from the device list to start the live view Figure 6 1 Start Live View 3 You can click the button on the toolbar to start the live view of all cameras on the device list Refer to the following table for the description of buttons on the live view window Table 6 1 Description of Toolbar Icon Description Select the window division mode Start St...

Page 29: ...n 5 Setting the OSD text on live video on Section 8 1 Configuring OSD Settings 6 2 Capturing Picture In live view mode click the button on the toolbar to capture the live pictures When the picture is captured the following pop up message box will appear at the lower right corner Figure 6 2 Picture Capture Succeeded Notes 1 The saving path for the captured pictures can be set at the Configuration L...

Page 30: ...er right bottom left bottom right on the display window when the mouse is located in the relative positions Click on the directional buttons to control the pan tilt movement Figure 6 4 PTZ Control Panel Click the zoom iris focus buttons to realize lens control Refer to the following table for description of PTZ control buttons Table 6 2 Description of PTZ Control Buttons Button Description Zoom in...

Page 31: ...r left Tilt the camera up or down Zoom in or out Refocus the lens 3 Click the icon to finish the setting of current preset Note Up to 256 presets are configurable depending on the PTZ protocol applied Calling a Preset This feature enables the camera to point to a specified preset scene when an event takes place For the pre defined preset you can call it at any time to the desired preset scene In l...

Page 32: ...1 In the live view interface click the button on the bottom right corner to spread the Video Parameters Setting interface Figure 6 8 Video Parameters Settings 2 Select the mode according to different light conditions Four modes are selectable Standard in general lighting conditions default Indoor the image is relatively smoother Outdoor the image is relatively clearer and sharper The degree of con...

Page 33: ...udio Video Encoder 32 4 Move the slider to set the sharpness to 0 15 and the denoising level to 0 3 The default value is 3 for the sharpness and 1 for the denoising level Note You can click the button to restore the default settings ...

Page 34: ...f the main stream and sub stream respectively Image Size Select the window division view mode to 4 3 16 9 or Auto fill Record File Size Select the size of packed video files during manual recording to 256M 512M or 1G Live View Performance Set the live viewing performance to Least Delay Balanced delay and fluency or Best Fluency Save record files to Set the saving path for the manually recorded vid...

Page 35: ...ng Time Sync by NTP Server A Network Time Protocol NTP Server can be configured on your device to ensure the accuracy of system date time If the device is connected to a Dynamic Host Configuration Protocol DHCP network that has time server properties configured the camera will synchronize automatically with the time server Enable the NTP function by checking the checkbox and configure the followin...

Page 36: ... by Manually Enable the Manual Time Sync function and then click the icon to set the system time from the pop up calendar You can click the icon to quickly select the time Figure 7 5 Time Sync by Manually You can also check the checkbox of Sync with computer time to synchronize the time with the local PC 4 Click the Save button to save the settings 7 3 Network Settings 7 3 1 Configuring TCP IP Set...

Page 37: ...ve the above settings 7 3 2 Configuring Port Settings Purpose You can set the port No of the encoder e g HTTP port RTSP port and HTTPS port Steps 1 Click Remote Configuration Network Settings Port to enter the Port Settings interface Figure 7 8 Port Settings 2 Set the HTTP port RTSP port and HTTPS port of the camera HTTP Port The default port number is 80 RTSP Port The default port number is 554 H...

Page 38: ...nter Server Address for DynDNS e g members dyndns org 2 In the Device Domain Name text field enter the domain obtained from the DynDNS website 3 Enter the User Name and Password registered in the DynDNS website 4 Click Save to save the settings Figure 7 10 DynDNS Settings IPServer 1 Enter Server Address for IPServer 2 Click Save to save the settings Note For the IP Server You have to apply a stati...

Page 39: ...DDNS server www hik online com 2 Enter the Domain name of the device You can register the alias of the device domain name in the HiDDNS server first and then enter the alias to the domain name in the encoder you can also enter the domain name directly on the encoder to create a new one Note If a new alias of the device domain name is defined in the encoder it will replace the old one registered on...

Page 40: ...on to all designated receivers if an alarm event is detected e g motion detection event video loss tamper proof etc Before you start 1 Before configuring the Email settings the device must be connected to a local area network LAN that maintains an SMTP mail server The network must also be connected to either an intranet or the Internet depending on the location of the e mail accounts to which you ...

Page 41: ...ed for SMTP is 25 Enable SSL Click the checkbox to enable SSL if required by the SMTP server When the SSL is enabled the default TCP IP port used for SMTP is 465 Interval The interval refers to the time between two actions of sending attached pictures Attached Image Check the checkbox of Attached Image if you want to send email with attached alarm images Sender The name of sender Sender s Address ...

Page 42: ... proof Alarm and Section 8 4 5 Handling Exception 7 3 6 Adding Network Disk For DS 6700HWI HFI models you must configure the network disk before operating the recording playback or log searching For other models with SATA disks connected the configuration of network disk is selectable Before you start 1 The network storage device is available within the network and is properly connected 2 The netw...

Page 43: ...ID is user defined during creating the iSCSI volume of the network storage 4 Click the Save button to add the configured network disk 5 Initialize the added network disk 1 Click Remote Configuration HDD Management to enter the HDD settings menu on which you can view the capacity free space status type and property of the added network disk 2 If the status of the network disk is Uninitialized selec...

Page 44: ...a SNMP port By setting the Trap Address the device can send the alarm event and exception messages to the surveillance center Note The SNMP version you select should be the same as that of the SNMP software Steps 1 Click Remote Configuration Network Settings SNMP to enter the SNMP settings interface 2 Check the checkbox to enable SNMP v1 or SNMP v2c and configure the read SNMP community default pu...

Page 45: ...ve to save the above settings 7 3 8 Configuring QoS Settings Purpose QoS Quality of Service can help solve the network delay and network congestion by configuring the priority of data sending The use of a QoS aware network can prioritize traffic and thus allow critical flows to be served before flows with lesser priority The encoder can mark the data packets for video audio event alarm and managem...

Page 46: ...range of the DSCP is 0 63 The higher DSCP value indicates higher priority level 4 Click Save to save the settings Note It will ask you to reboot the device to activate the settings 7 3 9 Configuring FTP Settings Purpose The captured pictures can be uploaded to FTP server Steps 1 Click Remote Configuration Network Settings FTP to enter the FTP Settings interface Figure 7 23 FTP Settings 2 Check the...

Page 47: ...ed on a local network behind a firewall and Email notifications FTP uploads alarms and such need to be sent to a destination outside the local network such as the Internet The SOCKS4 and SOCKS5 are supported of which the SOCKS5 additionally provides authentication so only authorized users may access a server Steps 1 Click Remote Configuration Network Settings SOCKS to enter the SOCKS Settings inte...

Page 48: ...ce should be in the same network segment as that of the LAN IP address of the router Steps 1 Click Remote Configuration Network Settings NAT to enter the NAT settings interface 2 Check the checkbox to enable the UPnPTM function 3 Select the Port Mapping Mode to Auto or Manual When you select Auto the mapping ports can be automatically assigned by the router When you select Manual you should contin...

Page 49: ...ure Socket Layer SSL or Transport Layer Security TLS HTTPS provides authentication of the web site and associated web server that one is communicating with and create a secure channel over an insecure network HTTPS URLs begin with https and use port 443 by default Steps 1 Click Remote Configuration Network Settings HTTPS to enter the HTTPS settings interface 2 Create the self signed certificate or...

Page 50: ... the device 3 When you have successfully created and installed the certificate check the checkbox to enable the HTTPS function Note After the HTTPS feature is enabled the system will use the HTTPS login mode by default when you input the IP address e g https 192 0 0 64 You can also input http IP address index asp e g http 192 0 0 64 index asp if you want to use HTTP mode to log into the device 7 3...

Page 51: ...dress Filter Up to 256 IP address can be added to the list allowed forbidden by Web Browser Steps 1 Click Remote Configuration Network Settings IPAddress Filter to enter the IP address filter settings interface Figure 7 30 IP Address Filter Settings 2 Check the checkbox of Enable IP Address Filter 3 Select the filter type of IP address to Allowed or Forbidden 4 Click the Add button to add the IP a...

Page 52: ...ough network A multicast address spans the Class D IP range of 224 0 0 0 to 239 255 255 255 It is recommended to use the IP address ranging from 239 252 0 0 to 239 255 255 255 Steps 1 Click Remote Configuration Network Settings Advanced to enter the multicast address settings interface Figure 7 32 Multicast Address Settings 2 Enter the multicast address in the text filed 3 Click Save to save the s...

Page 53: ... enter the Display Settings interface Camera 01 Figure 8 1 Display Settings 2 Select the camera from the drop down list 3 Edit the camera name in the text field of Camera Name Figure 8 2 Edit Camera Name 4 Select the display of camera name date or week by checking the checkboxes if required 5 Set the time format date format and OSD display mode by selecting option from the drop down list 6 On the ...

Page 54: ...8 Click Save to validate the above settings 8 1 2 Configuring Text Overlay Steps 1 Click the Remote Configuration Camera Settings Text Overlay Settings to enter the Text Overlay Settings interface 2 Select the camera from the drop down list 3 Edit the user defined text content Click the checkbox in the text box below and then input the characters Up to 8 character strings can be edited 4 Click Sav...

Page 55: ...rlay Settings 6 If you want to copy the text overlay settings of the current camera to other cameras spread the Copy to Camera panel and select the camera s to copy or click Select All to select all cameras Figure 8 6 Text Overlay Settings 7 Click Save to activate the above settings ...

Page 56: ...recorded only when the Video Type is Video Audio Resolution Select the resolution of the video input Bitrate Type Select the bitrate type to constant or variable Video Quality When bitrate type is selected to Variable 6 levels of video quality can be configured Frame Rate Set the frame rate to 1 30 fps The frame rate used to describe the frequency at which a video stream is updated is measured in ...

Page 57: ...r Steps 1 Click Remote Configuration Camera Settings Snapshot to enter the Snapshot settings interface Figure 8 9 Snapshot Settings 2 Select the channel No from which the pictures to be captured 3 Configure the timing snapshot and the event triggered snapshot parameters including the format resolution quality and the interval between two snapshots 4 Select the channel s you want to copy the same s...

Page 58: ...r proof and Exception And the alarm events can trigger the alarm actions such as Notify Surveillance Center Send Email and Trigger Alarm Output 8 4 1 Configuring Motion Detection Motion detection is a feature which can alert the personnel and record the video for the motion occurred in the surveillance scene Steps 1 Set the Motion Detection Area Steps 1 Click Remote Configuration Camera Settings M...

Page 59: ...drawing You can click the button to clear all areas 6 Move the slide bar to set the sensitivity of the camera Figure 8 11 Motion Detection Area Settings 7 Click Save button to save the settings 2 Set the Arming Schedule for Motion Detection Steps 1 Click the Arming Time tab Figure 8 12 Motion Detection Arming Time Settings 2 Click the Edit button to edit the arming schedule ...

Page 60: ... when you have enabled holiday schedule in Holiday settings 3 Choose the day you want to set the arming schedule 4 Click the button to set the time period for the arming schedule 5 After you set the arming schedule you can copy the schedule to other days Optional 6 Click OK button to save the settings 3 Set the Alarm Actions Taken for Motion Detection Purpose You can specify the alarm type when an...

Page 61: ...l when an event occurs you need to go to the network setting interface to set the related parameters Refer to Section7 3 5 Configuring Email Settings Upload to FTP Capture the image when an alarm is triggered and upload the picture to a FTP server 3 Select the channel you want to trigger an external alarm output when a motion detection event occurs Figure 8 15 Motion Detection Trigger Alarm Output...

Page 62: ...n Section 8 4 1 Configuring Motion Detection Figure 8 17 Motion Detection Alarm Output Settings 5 Return to the Alarm Output Settings interface and click Save to save the settings 4 Select the channel you want to trigger recording when a motion detection event occurs Figure 8 18 Motion Detection Alarm Linked Recording 5 Click Save to save the settings of linking method motion detection 8 4 2 Confi...

Page 63: ...Detection in Section 8 4 1 Configuring Motion Detection 4 Click the Linkage Method tab to set the actions taken for the alarm input Refer to Step 3 Set the Alarm Actions Taken for Motion Detection in Section 8 4 1 Configuring Motion Detection Figure 8 20 Alarm Input Settings Linking Method 5 You can also choose the PTZ linking for the alarm input if your camera is installed with a pan tilt unit ...

Page 64: ...ss 4 Click Edit to edit the arming schedule for video loss detection The arming schedule configuration is the same as the Setting of the Arming Schedule for Motion Detection Please refer to Step 2 Set the Arming Schedule for Motion Detection in Section 8 4 1 Configuring Motion Detection 5 Click the Linkage Method tab to set the actions taken for the video loss alarm Please refer to Step 3 Set the ...

Page 65: ...arm Please refer to Step 3 Set the Alarm Actions Taken for Motion Detection in Section 8 4 1 Configuring Motion Detection 8 4 5 Handling Exception The exception type can be HDD full HDD error network disconnected IP address conflict illegal access video standard mismatch video signal exception record capture exception and video resolution mismatch Note When the selected resolution under Remote Con...

Page 66: ...nel to prevent your privacy from live viewing and recording Steps 1 Click Configuration Remote Configuration Camera Settings Privacy Mask to enter the privacy mask settings interface 2 Select the camera to configure privacy mask 3 Check the checkbox of Enable Privacy Mask to enable this function Figure 8 24 Privacy Mask Settings 4 Click the button 5 Draw the mask area by clicking and dragging the ...

Page 67: ...tion by the serial port management tools Steps 1 Click Remote Configuration Serial Port Settings 232 Serial Port to enter RS 232 port setting interface Figure 8 25 RS 232 Port Settings Note If you want to connect the encoder by the RS 232 port the parameters of the RS 232 should be exactly the same with the parameters you configured here 2 Click Save to save the settings 8 6 2 RS 485 Settings Purp...

Page 68: ... RS 485 parameters By default the Baud Rate is set as 9600 the Data Bit as 8 the Stop Bit as 1 and the Parity and Flow Control as None Note The Baud Rate Address and PTZ Protocol parameters should be exactly the same as the parameters of the connected PTZ camera 3 Click Save to save the settings ...

Page 69: ...re 9 1 Configuring Holiday Settings Purpose You may want to have different plan for recording on holiday Follow the steps to configure the record schedule on holiday Steps 1 Click Remote Configuration Camera Settings Holiday Settings to enter holiday settings interface Figure 9 1 Holiday Settings 2 Select an item from the list and click to edit the holiday 1 Edit the holiday name 2 Check the check...

Page 70: ...tion is available in the Schedule dropdown list when you have enabled holiday schedule in Holiday settings 9 2 Configuring Scheduled Record Capture Steps 1 Click Remote Configuration Camera Settings Schedule Settings to enter record schedule settings interface 2 Select the camera to configure the record capture schedule 3 Click the Record or Capture tab 4 Check the checkbox of Enable Record Schedu...

Page 71: ...rface 6 Choose the day in a week to configure scheduled record capture Figure 9 5 Edit Schedule 1 Configure All Day or Customized period record capture If you want to configure the all day record capture please check the All Day checkbox If you want to record capture in different time sections check the Customize checkbox Set the Start ...

Page 72: ...Type and check the checkbox of Trigger Channel on the Linkage Method of Alarm Input Settings interface Record Capture Triggered by Motion Alarm If you select Motion Alarm the video will be recorded captured when the motion and alarm are triggered at the same time Besides configuring the record capture schedule you have to configure the settings on the Motion Detection and Alarm Input Settings inte...

Page 73: ... If you want to copy the display settings of the current camera to other cameras spread the Copy to Camera panel and select the camera s to copy or click Select All to select all cameras Figure 9 7 Copy to Camera 9 Click Save to validate the above settings ...

Page 74: ...ack through the WEB browser Steps 1 Click Playback on the menu bar to enter playback interface Figure 10 1 Playback Page 2 Click the camera from the device list for playback 3 Select the date from the calendar and click Search Figure 10 2 Select Date for Search 4 Click the Play button to play the video file searched on the current date ...

Page 75: ...op playing Slow forward Fast forward Play by single frame Stop all channels from playing Capture pictures in playback mode Download video files Start Stop clipping video files Audio on off 6 You can also drag the progress bar with the mouse to locate the exact playback point You can also input the time and click button to locate the playback point Figure 10 5 Progress Bar The color of the video on...

Page 76: ...d up to 31 users can be created 11 1 Adding a User Steps 1 Click Add to enter the Add user interface 2 Input the User Name and Password and confirm the password 3 Select the Level to Operator or User Figure 11 2 Add a User Different user level is given with different permissions Operator The Operator user level has permission of Local Log Search in Local Configuration Remote Log Search and Two way...

Page 77: ...on and Camera Operation 5 Click OK to finish the user addition 11 2 Modifying a User Steps 1 Select a user account from the list on the User Information interface to be modified Figure 11 3 Select a User 2 Click Modify to enter the setting interface Figure 11 4 Modify a User 3 Modify the User Name Password and then select User type 4 Configure the user permission for the user including the Basic P...

Page 78: ...coder 77 11 3 Deleting a User Steps 1 Select a user account from the list on the User Information interface to be deleted 2 Click Delete and the information box will pop up Figure 11 5 Delete a User 3 Click OK to delete the selected user account ...

Page 79: ...re the HDD or network disk has been initialized for the first time to use Please refer to Section 7 3 6 Adding Network Disk for details Steps 1 Click Log on the menu bar to enter the Log interface 2 Set the log search conditions to refine your search including the Major Type Minor Type Start Time and End Time 3 Click the Search button to start searching log files 4 The matched log files will be di...

Page 80: ...ce Information interface of the encoder Figure 12 2 Device Information You can edit the Device Name and Device No and view the device information including Model Serial No Firmware Encode Version Number of Channels Number of HDDs and Number of Alarm Input Output 12 3 Maintenance Click Remote Configuration Maintenance to enter the Maintenance interface of the encoder ...

Page 81: ... interface click Reboot to enter the following message box Figure 12 4 Reboot the Device Click OK to reboot the device or Cancel to cancel the operation 12 3 2 Restoring Default Settings On the Maintenance Default interface click Restore or Default to restore device parameters to the factory settings Figure 12 5 Restore Default Settings ...

Page 82: ...on files of one device can be imported to multiple device devices if they are to be configured with the same parameters On the Maintenance Import Config File interface click Browse to select the file from the selected backup device and then click the Import button to import a configuration file Note After having finished the import of configuration files the device will reboot automatically On the...

Page 83: ...er with software 1 Check the encoder IP 2 Make sure the cable is connected 3 User name and password of encoder are correct Why cannot control the connected PTZ camera or speed dome through the encoder 1 Check the RS 485 connection of the device with the PTZ camera or dome 2 Check whether the PTZ address protocol and baud rate of the device are set to be the same with the connected camera or speed ...

Reviews: