DS-3WF0AC-2NT User Guide
3
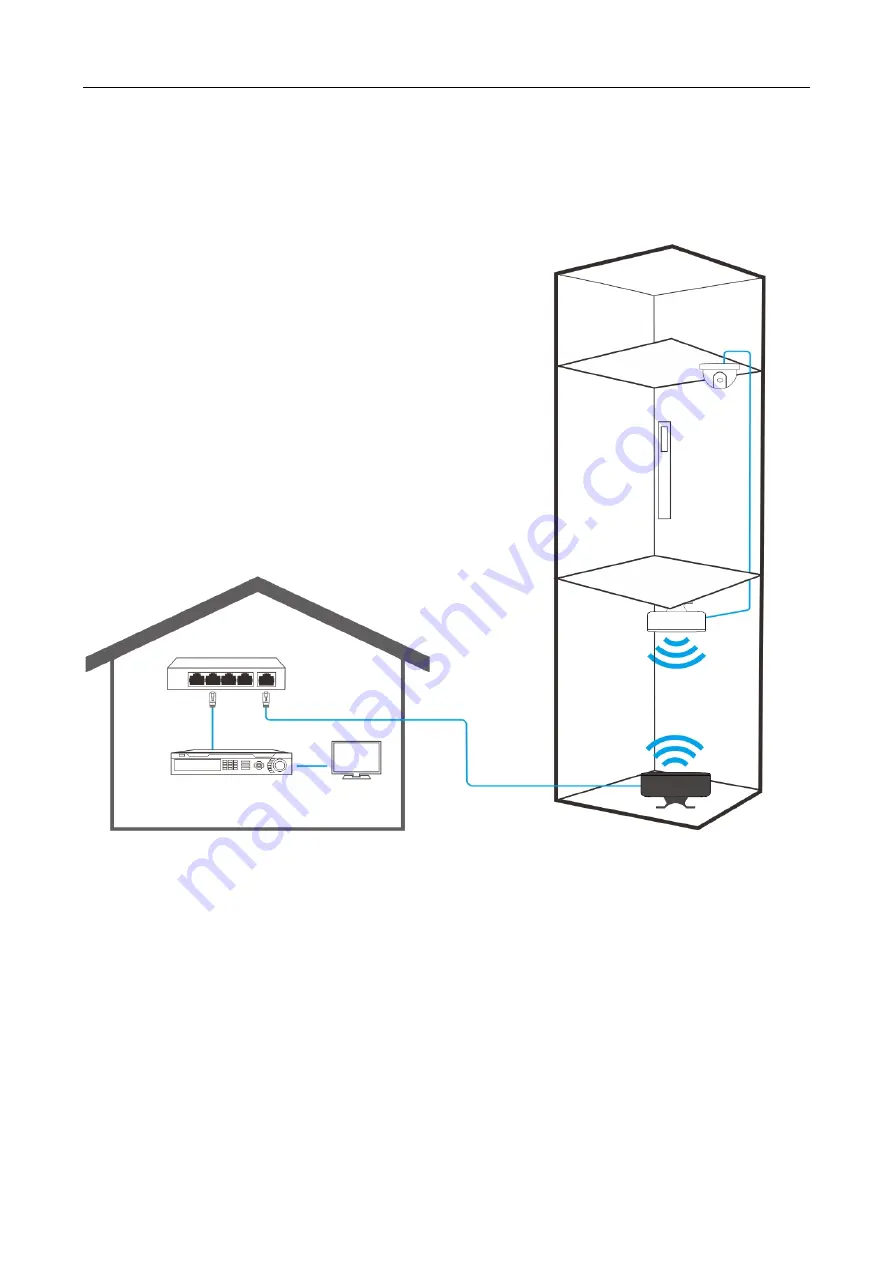
1.4
Networking topology
Select one scenario to install the wireless bridge to the corresponding site.
Scenario 1
Switch
NVR
Monitor
Elevator shaft
Page 1: ...DS 3WF0AC 2NT User Guide i Wireless Bridge DS 3WF0AC 2NT User Guide ...
Page 2: ...f their respective owners Legal Disclaimer TO THE MAXIMUM EXTENT PERMITTED BY APPLICABLE LAW THE PRODUCT DESCRIBED WITH ITS HARDWARE SOFTWARE AND FIRMWARE IS PROVIDED AS IS WITH ALL FAULTS AND ERRORS AND HIKVISION MAKES NO WARRANTIES EXPRESS OR IMPLIED INCLUDING WITHOUT LIMITATION MERCHANTABILITY SATISFACTORY QUALITY FITNESS FOR A PARTICULAR PURPOSE AND NON INFRINGEMENT OF THIRD PARTY IN NO EVENT ...
Page 3: ... 2 This device must accept any interference received including interference that may cause undesired operation EU Conformity Statement This product and if applicable the supplied accessories too are marked with CE and comply therefore with the applicable harmonized European standards listed under the EMC Directive 2014 30 EU the LVD Directive 2014 35 EU the RoHS Directive 2011 65 EU 2012 19 EU WEE...
Page 4: ...t access might be under network security risks please strengthen protection for your personal information and data security If you find the device might be under network security risks please contact with us Symbol Description Provides additional information to emphasize or supplement important points of the main text Indicates a potentially hazardous situation which if not avoided could result in...
Page 5: ... 7 Chapter 3 System Status 8 3 1 Device info 8 3 2 Information of peer device 9 Chapter 4 Network 11 4 1 Overview 11 4 2 Changing the IP address 12 Chapter 5 Wireless 14 5 1 Overview 14 5 2 Changing wireless parameters 16 5 3 Scanning SSID nearby 17 Chapter 6 System 19 6 1 Maintenance 19 6 1 1 Device info 19 6 1 2 Maintenance 19 6 1 3 Import Export 22 6 1 4 Upgrade 23 6 2 Time settings 25 6 2 1 Ma...
Page 6: ...video surveillance system needs to be installed in a building site 1 2 Solution The wireless bridges are used to address this requirement 1 3 Connecting the wireless bridges 1 3 1 Hardware connection of AP device Connect the AP device to a switch in monitor center See the following figure AP device PoE power supply Switch NVR Monitor ...
Page 7: ...DS 3WF0AC 2NT User Guide 2 1 3 2 Hardware connection of CPE device Connect the CPE device to an IP camera in the monitoring site CPE device PoE power supply IP camera ...
Page 8: ...DS 3WF0AC 2NT User Guide 3 1 4 Networking topology Select one scenario to install the wireless bridge to the corresponding site Scenario 1 Switch NVR Monitor Elevator shaft ...
Page 9: ...DS 3WF0AC 2NT User Guide 4 Switch NVR Monitor Elevator shaft Scenario 2 ...
Page 10: ...dge you can refer to the following procedure for login Step 1 Connect a computer to the wireless bridge or the switch connected to the wireless bridge Step 2 Configure the IP address of the computer used to configure the wireless bridge OS example Windows 7 1 Right click the icon on the lower right corner of the desktop 2 Click Open Network and Sharing Center 3 Click Local Area Connection then cli...
Page 11: ...rsion 4 TCP IPv4 5 Select Use the following IP address set the IP address to 192 168 1 X X ranges from 2 to 253 excluding 35 and 36 the Subnet mask to 255 255 255 0 and click OK 6 Click OK on the Local Area Connection Properties window and close the other windows ...
Page 12: ... 1 36 for the CPE device 2 Enter the login password you set before and click Login End Log in to the web UI successfully Now you can configure the wireless bridge 2 2 Logging out of the web UI of the wireless bridge Click the Logout on the upper right corner of the web UI to logout When you close the web browser the system logs you out as well ...
Page 13: ... network this name helps you identify the device You can change the name of this device on the System Maintenance page Model It specifies the model number of this device Device SN It specifies the serial number of this device The devices in the same package have the same serial number Firmware It specifies the system software version number of this device Uptime It specifies time during which this...
Page 14: ...ge Setting a proper transmit power helps improve the performance and security of the wireless network Network Parameters IP Address It specifies the IP address also named management IP address of this device You can change this IP address on the Network page Subnet Mask It specifies the subnet mask of the wireless bridge Gateway It specifies the default gateway of the wireless bridge When the devi...
Page 15: ... wireless bridge Transmitted Rate Mbps It specifies the transmitting rate of this wireless bridge Noise dBm It specifies the interference signal and electromagnet noise strength of peer wireless device in the current environment Larger absolute value indicates less interference IP Address It specifies the IP address of peer wireless bridge MAC Address It specifies the MAC address of peer wireless ...
Page 16: ...ice Devices in LAN can use it to log in to the web UI of this wireless bridge If you want to enable this wireless bridge to access the internet this IP address should be set to an unused IP address which is in the same segment as that of the egress router Subnet Mask It specifies the subnet mask of the wireless bridge The default is 255 255 255 0 Gateway It specifies the default gateway of this wi...
Page 17: ...ent you need to enter a correct DNS IP address here DNS2 It specifies the secondary DNS server IP address of this wireless bridge It is optional If you have two DNS server IP addresses you can enter the other one here 4 2 Changing the IP address Assume that you need to change the IP address to 192 168 1 25 Configuration procedure Step 1 Choose Network Step 2 Change the IP Address to 192 168 1 25 S...
Page 18: ... the web UI for configuration If the new IP address is in different network segment from that of the old one set the IP address of your management computer to an unused one which should be in the same network segment as that of the new IP address of the wireless bridge Then use the new IP address of the wireless bridge to log in to the web UI for configuration ...
Page 19: ...arameters description Items Description Operating Mode It specifies the working mode the device operates The wireless bridge works in AP mode or CPE mode and cannot be changed SSID It specifies the wireless network name of this device You can change it here After changing the SSID of this wireless bridge you need to change the SSID of peer wireless bridge as well Otherwise the wireless bridge fail...
Page 20: ...fies channel in which this device operates and its center frequency Auto indicates the wireless bridge select the channel automatically according to the current environment Antenna Gain It specifies the built in antenna gain value It cannot be changed Transmission Power It specifies the transmit power of this device Larger transmission power indicates wider WiFi coverage Set a proper transmission ...
Page 21: ...DS 3WF0AC 2NT User Guide 16 5 2 Changing wireless parameters Step 1 Choose Wireless Step 2 Change the parameters as required Step 3 Click Save End ...
Page 22: ...at you need to detect the wireless networks nearby Step 1 Choose Wireless Step 2 Click Scan End Wait until the scanning completes You can set a channel with less interference which is less used by the devices nearby to improve the wireless transmission performance ...
Page 23: ...DS 3WF0AC 2NT User Guide 18 ...
Page 24: ...ntenance In this module you can reboot reset or partially reset the wireless bridge Partial Reset After being reset partially the wireless bridge is restored to the activated status and only network configurations and the login password are kept unchanged Reset After being reset the wireless bridge is restored to factory settings and you need to activate it again before configuration Reboot If a s...
Page 25: ...A progress bar is displayed on the page Wait for it to elapse Partial reset If you want to reset the wireless bridge to activated status and keep network parameters and login password unchanged you can partial reset the device Configuration procedure Step 1 Choose System Maintenance Step 2 Click Partial Reset Step 3 Confirm the message on the pop up window and click OK ...
Page 26: ...it again When the factory settings are restored the configuration of the wireless bridge is lost Therefore you need to reconfigure it Restore the factory settings of the wireless bridge only when necessary To prevent damaging the wireless bridge ensure that the power supply of the wireless bridge is normal during reset Configuration procedure Step 1 Choose System Maintenance Step 2 Click Reset Ste...
Page 27: ...um condition after you greatly change the configuration of the wireless bridge you are recommended to export the configuration so that you can import it after upgrading or resetting the wireless bridge If you need to apply same or similar configurations to many wireless bridges you can configure one of the wireless bridges export its configuration and use the Import function to import the configur...
Page 28: ...indow and click OK End A progress bar is displayed on the page Wait for it to elapse 6 1 4 Upgrade Log in to the web UI and choose System Maintenance This function upgrades the firmware of the wireless bridge for more functions and higher stability To prevent damaging the wireless bridge verify that the new firmware version is applicable to the wireless bridge before upgrade and keep the power sup...
Page 29: ...s displayed on the page Wait for it to elapse Then Log in to the web UI of the wireless bridge and check the Firmware on the Status page and ensure that the version displayed here is the same as the firmware you upgrade After the firmware is upgraded you are recommended to restore the factory settings of the wireless bridge and configure it again so as to ensure stability of the wireless bridge an...
Page 30: ...Step 1 Choose System Time Settings Step 2 Click the Date Time input box Step 3 Set the date and time for the wireless bridge or click Synchronize with PC Time button to synchronize the time to that of the management computer Step 4 Click OK End 6 2 2 Synchronize with the internet Log in to the web UI and choose System Time Settings The wireless bridge automatically synchronizes its system time wit...
Page 31: ... web UI and choose System Basic Service In this module you can set the SSH function and export system logs 6 3 1 SSH server Log in to the web UI choose System Basic Service Secure Shell SSH uses encryption and authentication mechanisms to achieve remote access and file transmission services This wireless bridge supports SSH server and allows SSH client to connect to it SSH server is disabled by de...
Page 32: ...box Step 3 Run the SSH client software on the management computer PuTTY is used for illustration 1 Run the Putty 2 Set Connection type to SSH 3 Set Host Name or IP address to 192 168 1 35 4 Click Open Step 4 Enter the user name hikvision and login password of the wireless bridge according to the instructions to log in to the configuration page ...
Page 33: ...etwork fault you can refer to the logs during troubleshooting To ensure that the logs are recorded correctly verify the system time of the wireless bridge You can correct the system time of the wireless bridge by choosing System Time Settings When the wireless bridge reboots the previous logs are lost The wireless bridge reboots when it is powered on again the firmware is upgraded a wireless bridg...
Page 34: ...less bridge to prevent unauthorized login Changing the login password Step 1 Choose System Account Step 2 Click Change Step 3 Enter the current login password in the Old Password input box Step 4 Customize a new login password in the New Password input box Step 5 Enter the new password you set again in the Confirm New Password input box Step 6 Click Save End ...
Page 35: ... IP Address 192 168 1 35 or 192 168 1 36 Subnet Mask 255 255 255 0 Gateway 0 0 0 0 DNS1 0 0 0 0 DNS2 0 0 0 0 Wireless Operating Mode AP or CPE SSID HIKVISION_XXXXXXXXXXX XXXXXXXXXXX is the serial number of the wireless bridge Network Mode 11b g n Channel Width 20MHz Channel auto Transmission Power 20 dBm Security Mode WPA2 PSK Security Key 123456789abc System Device Name Wireless Bridge Time Setti...
Page 36: ...bbreviations Acronym or Abbreviation Full Spelling DNS Domain Name System IPv4 Internet Protocol version 4 MAC Media Access Control NTP Network Time Protocol PoE Power Over Ethernet PSK pre shared key SSH Secure Shell SSID Service Set Identifier ...
Page 37: ...DS 3WF0AC 2NT User Guide 32 ...