HIKVISION DS-3WF01C-2N Quick Start Manual Download Page 10

DS-3WF01C-2N    Quick Start Guide 

Chapter 3 Prepare 

Step 1 Use a network cable to connect the computer to the LAN interface of the device to prepare 
the device. First, you need to configure the computer IP address and the device's default IP address 
to be on the same network segment. Take the Windows 7 system as an example. Click the network 
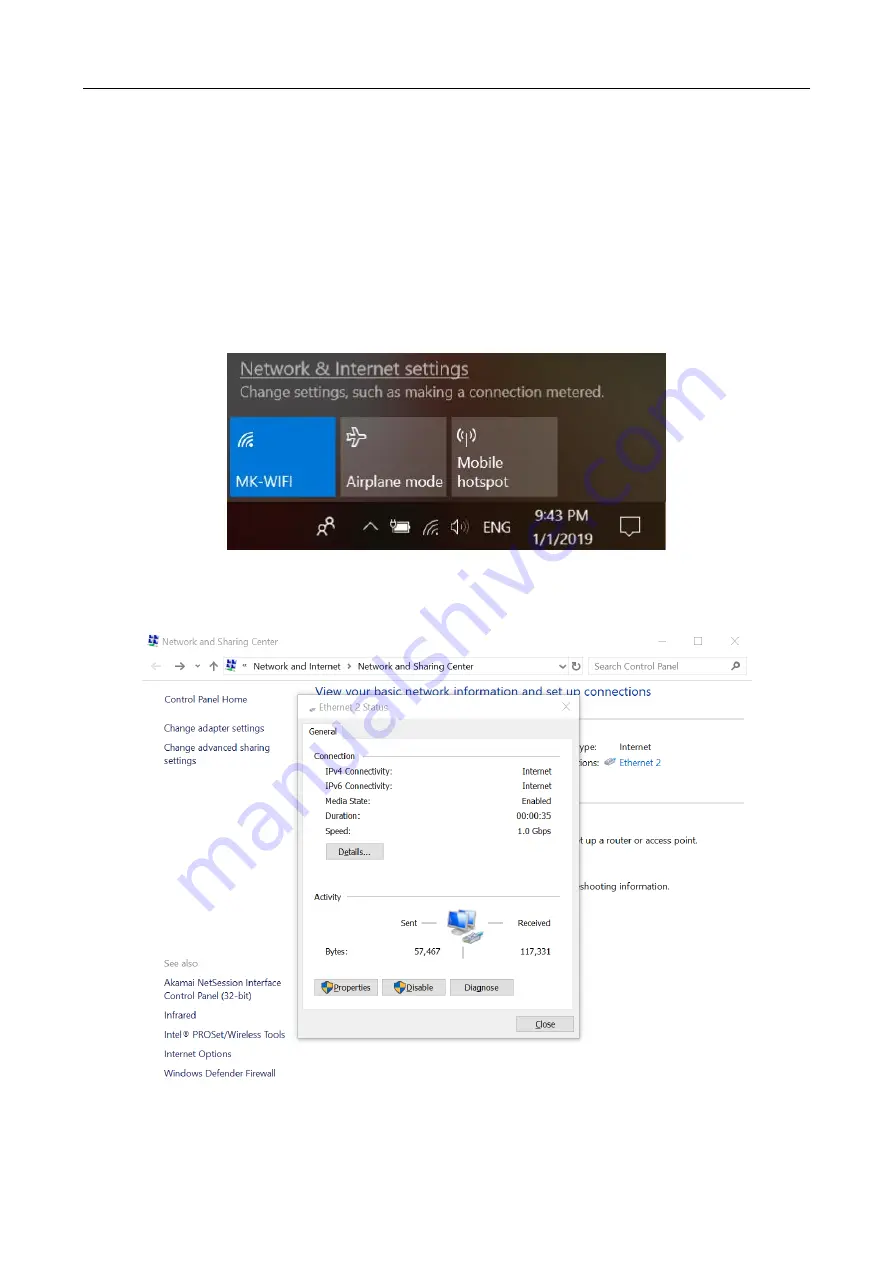
logo in the lower right corner of the desktop and click Open Network & Internet settings-Network 
and Sharing Center. As shown below. 


Figure 3-1 Network & Internet settings 

Step 2 Click “Local Area Connection” on the right and click “Properties”. As shown below. 


Figure 3-2 Local Area Connection 

Summary of Contents for DS-3WF01C-2N

Page 1: ...DS 3WF01C 2N Quick Start Guide i DS 3WF01C 2N Quick Start Guide...

Page 2: ...mentioned below are the properties of their respective owners Legal Disclaimer TO THE MAXIMUM EXTENT PERMITTED BY APPLICABLE LAW THE PRODUCT DESCRIBED WITH ITS HARDWARE SOFTWARE AND FIRMWARE IS PROVID...

Page 3: ...ce 2 This device must accept any interference received including interference that may cause undesired operation EU Conformity Statement This product and if applicable the supplied accessories too are...

Page 4: ...vice with Internet access might be under network security risks please strengthen protection for your personal information and data security If you find the device might be under network security risk...

Page 5: ...F01C 2N Quick Start Guide iv Catalog Chapter 1 Introduction 5 1 1 Overview 5 1 2 Packing List 5 1 3 Appearance 5 1 3 1 Front Panel 5 Chapter 2 Installation 7 Chapter 3 Prepare 9 Chapter 4 Configuratio...

Page 6: ...pdate 1 2 Packing List The packing list is shown as below If any accessories are damaged or lost keep the package intact and contact your dealer for replacement Table 1 1 Packing List of DS 3WF01C 2N...

Page 7: ...01C 2N are as follows Figure 1 2 Physical Interface Table 1 1 Physical Interface Index Description 1 Access to the camera digital signage and other equipments 2 Access to the camera digital signage an...

Page 8: ...ce contains a magnet to help the device automatically adsorb on the surface of the iron containing material If the surface of the mounting device does not contain iron please install it with the plast...

Page 9: ...ck Start Guide 8 Step 3 Install the CPE device on top of the elevator as shown below Figure 2 3 Finish installation The device must be installed without direct obstruction and the two devices are alig...

Page 10: ...and the device s default IP address to be on the same network segment Take the Windows 7 system as an example Click the network logo in the lower right corner of the desktop and click Open Network Int...

Page 11: ...As shown below Figure 3 3 Internet Protocol Version 4 TCP IPv4 Step 4 Configure the IP address of the computer to be the unused 192 168 1 X address in the LAN X is any integer other than 35 36 in 2 t...

Page 12: ...n a browser and enter the default IP address of the device in the address bar 192 168 1 35 192 168 1 36 When you log in to the device for the first time click Enter enter the device activate page The...

Page 13: ...to avoid conflicts AP In this scenario mode the device will be set to access point mode it can be connected to a client device When you close the TDMA function your phone or laptop can connect to the...

Page 14: ...Quick Start Guide 13 Figure 4 3 Wizard Users can also click the Network bar at the top of the page to enter the Wireless page click the Edit button and modify the network name frequency key and other...

Page 15: ...DS 3WF01C 2N Quick Start Guide 14 Figure 4 4 Wireless For the CPE device configuration please refer to the AP device configuration...

Page 16: ...DS 3WF01C 2N Quick Start Guide 15...

Reviews: