background image

7

English

CUTTING PROCEDURES

1.  Place the saw body (base) on the lumber, and align 

the intended line of cut with the saw blade, using the 

notch at the front of the base. This relationship of base 

to lumber should remain unchanged regardless of the 

inclination of the base (

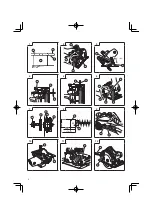
Fig. 5

).

2.  Turn ON the switch before the saw blade contacts the 

lumber. The switch is turned ON when the trigger is 

squeezed, and turned OFF when the trigger is released.

3. Moving the saw straight at a constant speed will 

produce optimum cutting.

CAUTION

Prior to cutting operation, make sure the material you 

are going to cut. If the material to be cut is expected to 

generate harmful / toxic dusts, make sure the dust bag or 

appropriate dust extraction system is connected with dust 

outlet tightly.

Wear the dust mask additionally, if available. 

○  Before starting to saw, confirm that the saw blade has 

attained full-speed revolution.

○  Should the saw blade be stopped or made an abnormal 

noise while operating, promptly turn OFF the switch.

○  Always  take  care  in  preventing  the  power  cord  from 

coming near to the revolving saw blade.

○  Using  the  Circular  Saw  with  the  saw  blade  facing 

upwards or sideways is very hazardous. Such 

uncommon applications should be avoided.

○  When cutting material, always wear eye protection.

○  When  finished  a  job,  disconnect  the  plug  from  the 

receptacle.

MOUNTING AND DISMOUNTING THE SAW 

BLADE

CAUTION


To avoid serious accident, ensure that the switch is in the 

OFF position, and the power source is disconnected.

1.  Dismounting the saw blade

(1) Set the cutting volume at maximum, and place the 

Circular Saw as shown in 

Fig. 6

.

(2)  Depress the lock lever, lock the spindle, and remove the 

hexagonal-flange bolt with the box wrench.

(3) While holding the lower guard lever to keep the lower 

guard fully retracted into the saw cover, remove the saw 

blade.

2.  Mounting the saw blade

(1)  Thoroughly remove any sawdust which has accumulated 

on the spindle, bolt and washers.

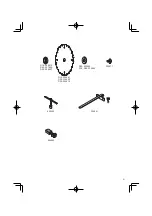
(2) As shown in 

Fig. 7

, the side of Washer (A) with a 

projected center the same diameter as the inner 

diameter of the saw blade and the concave side of 

Washer (B) must be fitted to the saw blade sides.

*  Washer (A) is supplied for 3 types of saw blades 

with the hole diameters of 16 mm, 20 mm and 

30 mm. (When buying the Circular Saw, one type of 

washer (A) is supplied.)

  In case the hole diameter of your saw blade does 

not correspond to that of washer (A), please contact 

the shop where you purchased the Circular Saw.

(3)  To assure proper rotation direction of the saw blade, the 

arrow direction on the saw blade must coincide with the 

arrow direction on the saw cover.

(4)  Using  the  fingers,  tighten  the  hexagonal-flange  bolt 

retaining the saw blade as much as possible. Then 

depress the lock lever, lock the spindle, and thoroughly 

tighten the bolt.

CAUTION

After having attached the saw blade, reconfirm that the lock 

lever is firmly secured in the prescribed position.

MAINTENANCE AND INSPECTION

1.  Inspecting the saw blade

  Since use of a dull saw blade will degrade efficiency and 

cause possible motor malfunction, sharpen or replace 

the saw blade as soon as abrasion is noted.

2.  Inspecting the mounting screws

  Regularly inspect all mounting screws and ensure that 

they are properly tightened. Should any of the screws 

be loose, retighten them immediately. Failure to do so 

could result in serious hazard.

3.  Inspecting the carbon brushes (Fig. 8)

  The motor employs carbon brushes which are 

consumable parts. Since an excessively worn carbon 

brush can result in motor trouble, replace the carbon 

brushes with new ones having the same carbon brush 

No.  shown  in  the  figure  when  it  becomes  worn  to  or 

near the “wear limit”. In addition, always keep carbon 

brushes clean and ensure that they slide freely within 

the brush holders.

4.  Replacing carbon brushes (Fig. 9)

  Disassemble the brush caps with a slotted-head 

screwdriver. The carbon brushes can then be easily 

removed.

5.  Maintenance of the motor

  The motor unit winding is the very “heart” of the power 

tool. Exercise due care to ensure the winding does not 

become damaged and/or wet with oil or water.

6.  Adjusting the base and saw blade to maintain 

perpendicularity:


The angle between the base and the saw blade has been 

adjusted to 90°, however should this perpendicularity be 

lost for some reason, adjust in the following manner:

(1)  Turn the base face up (

Fig. 10

) and loosen the wing-bolt 

(A).

(2) Apply a square to the base and the saw blade and 

turning the screw with a screwdriver, shift the position 

of the base to produce the desired right angle (

Fig. 11

).

CAUTION

  In the operation and maintenance of power tools, the 

safety regulations and standards prescribed in each 

country must be observed.

NOTE

Due to HiKOKI’s continuing program of research and 

development,  the  specifications  herein  are  subject  to 

change without prior notice.

Summary of Contents for C 7ST

Page 1: ...형톱 เลื อยวงเดือน C 7ST Read through carefully and understand these instructions before use 본 설명서를 자세히 읽고 내용을 숙지한 뒤 제품을 사용하십시오 โปรดอ านโดยละเอียดและท ำความเข าใจก อนใช งาน Handling instructions 취급 설명서 คู มือการใช งาน ...

Page 2: ...1 2 3 4 5 6 7 8 9 10 11 12 2 43 6 mm 17 mm 0 45 ...

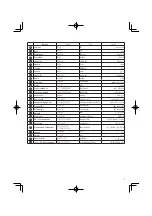
Page 3: ...ck lever 록 레버 คันล อก القفل ذراع Box wrench 박스 렌치 ประแจปากตาย صندوقي ربط مفتاح Hexagonal flange bolt 육각 플랜지 볼트 สลักเกลียวหกเหลี ยมแบบมีครีบ سداسية شفة ذو مسمار Washer B 와셔 B แหวนสกรู B B معدنية حلقة Washer A 와셔 A แหวนสกรู A A معدنية حلقة Spindle 스핀들 เพลา الدوران عمود Wear limit 마모 한도 ขอบเขตการสึกหรอ التآكل حد No of carbon brush 카본 브러시 번호 เบอร แปรงถ าน بالكربون الصقل فرشاة رقم Brush cap 브러시 캡 ฝาครอ...

Page 4: ... is in the off position before connecting to power source and or battery pack picking up or carrying the tool Carrying power tools with your finger on the switch or energising power tools that have the switch on invites accidents d Remove any adjusting key or wrench before turning the power tool on A wrench or a key left attached to a rotating part of the power tool may result in personal injury e...

Page 5: ...lacing saw down on bench or floor An unprotected coasting blade will cause the saw to walk backwards cutting whatever is in its path Be aware of the time it takes for the blade to stop after switch is released PRECAUTION Keep children and infirm persons away When not in use tools should be stored out of reach of children and infirm persons SAFETY INSTRUCTIONS FOR ALL SAWS DANGER a Keep hands away ...

Page 6: ...APPLICATION Cutting various types of wood PRIOR TO OPERATION 1 Power source Ensure that the power source to be utilized conforms to the power requirements specified on the product nameplate 2 Power switch Ensure that the power switch is in the OFF position If the plug is connected to a receptacle while the power switch is in the ON position the power tool will start operating immediately inviting ...

Page 7: ...ed In case the hole diameter of your saw blade does not correspond to that of washer A please contact the shop where you purchased the Circular Saw 3 To assure proper rotation direction of the saw blade the arrow direction on the saw blade must coincide with the arrow direction on the saw cover 4 Using the fingers tighten the hexagonal flange bolt retaining the saw blade as much as possible Then d...

Page 8: ...또는 피곤한 상태에서는 전동 툴을 사용하지 마십시오 전동 툴을 사용할 때 주의가 흐트러지면 심각한 부상을 입을 수 있습니다 b 개인 보호 장비를 사용하십시오 항상 눈 보호 장구를 착용해야 합니다 먼지 보호 마스크 미끄럼 방지 신발 안전모 청각 보호 장비 등을 사용하면 부상을 줄일 수 있습니다 c 실수로 툴을 가동하지 않도록 주의하십시오 전원 및 또는 배터리 팩을 연결하거나 툴을 들거나 운반하기 전에 스위치가 OFF 위치에 있는지 확인하십시오 손가락을 스위치에 접촉한 채 전동 툴을 들거나 스위치가 켜진 상태로 전원을 연결하면 사고가 날 수 있습니다 d 전원을 켜기 전에 조정 키 또는 렌치를 반드시 제거해야 합니다 전동 툴의 회전 부위에 키 또는 렌치가 부착되어 있으면 부상을 입을 수 있습니다 e 작업 대상과의...

Page 9: ...는 이빨이 목재의 상부 표면 안으로 파고 들어가서 날이 절단면 바깥으로 삐져 나와 작업자 쪽으로 뒤로 튈 수 있습니다 반동은 톱 오용 및 또는 부정확한 작업 절차 또는 조건의 결과인데 아래 제시된 적절한 주의를 취함으로써 피할 수 있습니다 a 양 손으로 톱을 계속 단단히 잡고 팔은 반동력에 저항할 수 있는 위치에 둡니다 신 체 는 날 의 어 느 한 쪽 에 위 치 시 키 되 날 과 일직선으로는 두지 않습니다 반동으로 인해 톱이 뒤쪽으로 튈 수 있지만 작업자가 적절한 주의만 취하면 반동력을 억제할 수 있습니다 b 어떤 이유로 날이 끼거나 절단이 방해되면 방아쇠를 놓고 날이 완전히 설 때까지 톱을 목재 속에서 가만히 붙들고 있습니다 날이 움직이고 있는 동안 톱을 가공물에서 빼내거나 톱을 뒤쪽으로 당기려고 하지 마...

Page 10: ...절하게 안정되도록 평평한 지면을 선택하십시오 작업대가 안정되지 않으면 작업이 위험해집니다 주의 사고 가능성을 방지하기 위해 항상 절단 후 남는 목재 부분이 고정되거나 제 자리에 유지되게 하십시오 사용전 전동 톱 조정 1 절단 깊이 조정 절단 깊이를 조정하려면 레버 A 를 풀고 한 손으로 베이스를 잡은 채 본체를 위 아래로 움직여 규정된 절단 깊이를 확보합니다 규정된 절단 깊이에 맞춘 후 레버 A 를 단단히 죕니다 그림 2 주의 이 레버 A 를 느슨하게 두면 매우 위험한 상황을 야기합니다 항상 철저하게 죄어두십시오 2 경사각 조정 스케일의 레버 A 를 풀어서 톱날을 베이스에 대해 최대 45 각도까지 기울일 수 있습니다 스케일의 레버 A 를 풀어서 경사각을 조절할 수도 있습니다 그림 3 주의 이 레버 A 를 느...

Page 11: ...에 끼워야 합니다 와셔 A 는 16mm 20mm 30mm의 구멍 직경을 가진 3가지 종류의 톱날을 위해 공급됩니다 원형톱 구입시 한 종류의 와셔 A 가 공급됩니다 톱날의 구멍 직경이 와셔 A 의 구멍 직경과 맞지 않는 경우에는 원형톱을 구입한 상점에 문의하십시오 3 톱날의 적절한 회전 방향을 위해 톱날의 화살표 방향이 톱 커버의 화살표 방향과 일치해야 합니다 4 톱날이 붙은 육각 플랜지 볼트를 손가락을 사용하여 최대한 죕니다 그 다음에 록 레버를 눌러 스핀들을 체결하고 볼트를 단단히 죕니다 주의 톱날을 부착한 후에 록 레버가 규정된 위치에 단단히 고정되었는지 다시 확인하십시오 관리 및 검사 1 톱날 검사 무딘 톱날을 사용하면 효율성이 떨어지고 모터 고장이 발생할 수 있으므로 마멸이 보이는 즉시 톱날을 날카롭...

Page 12: ...ขณะเมื อใช เครื องมือไฟฟ าอาจท ำให คุณบาดเจ บ สาหัส b ใช อุปกรณ ป องกันส วนบุคคล สวมแว นตาป องกันเสมอ อุปกรณ ป องกัน เช น หน ากากกันฝุ น รองเท ากันลื น หมวก นิรภัย หรืออุปกรณ อุดหูที เหมาะสม จะลดการบาดเจ บของ ร างกายได c ป องกันเครื องจักรท ำงานโดยไม ตั งใจ อย าลืมให สวิทช อยู ใน ต ำแหน งปิด ก อนเสียบไฟและ หรือต อกับแบตเตอรี ก อนการ เก บ หรือการเคลื อนย ายเครื องมือ เมื อจับเครื องมือไฟฟ าเมื อนิ ...

Page 13: ...ดยทันที ถ าใบเลื อยบิดหรือไม ได ศูนย ขณะตัด ฟันเลื อยที ขอบหลังจะฝังเข าที ผิวบนของแท งไม ท ำให ใบเลื อยไต ออกจากคลองเลื อย และกระโดด กลับมายังผู ใช งาน การกระดอนเป นปฏิกิริยาจากการใช เลื อยและ หรือขั นตอนและสภาพการใช งานที ไม ถูกต อง และอาจเลี ยงได โดยใช ความระมัดระวังดังต อไปนี a ใช มือทั งสองจับเลื อยให แน น และวางต ำแหน งมือให ต านแรงกระดอน กลับ วางต ำแหน งล ำตัวไปทางด านใดด านหนึ งของใบเลื อย...

Page 14: ... ถ าเสียบปลั กเข ากับเต า เสียบเมื อสวิทซ อยู ในต ำแหน ง ON เครื องใช ไฟฟ าจะท ำงานทันที และท ำให เกิดอุบัติเหตุที ร ายแรงได 3 สายไฟฟ าพ วง เมื อพื นที ท ำงานอยู ห างจากแหล งจ ายไฟ ให ใช สายพ วงที โตและมีความ จุไฟฟ ามากพอ ควรพยายามให สายพ วงสั นที สุดเท าที จะท ำได 4 เตรียมแท นงานไม รูปที 1 เนื องจากใบเลื อยจะตัดผ านไปทางผิวล างของชิ นไม จึงให วางไม บน แท นงานขณะที ตัด ถ าใช ไม เหลี ยมเป นแท นงาน ...

Page 15: ...ละวางเลื อยวงเดือนตามรูปที 6 2 กดคันล อก ล อกเพลา และถอดครีบหกเหลี ยมออกโดยใช ประแจ 3 ถอดใบเลื อยออกเมื อกดแผ นครอบล างลงให ร นเข าในฝาใบเลื อยจนเต ม ที 2 การติดตั งใบเลื อย 1 เอาขี เลื อยที ตกค างบนเพลา สกรูและแหวนรองออกไป 2 ตามรูปที 7 เล งศูนย ด านข างของแหวนรอง A ที มีขนาดเดียวกับ เส นผ านศูนย กลางให เข าภายในของใบเลื อย และทาบด านเว าของ แหวนรอง B เข ากับด านข างของใบเลื อย แหวนรอง A มีมาให กั...

Page 16: ...ควงเลื อนต ำแหน งของ ฐานจนได มุมฉากที ต องการ รูปที 11 ค ำเตือน ต องปฏิบัติตามระเบียบและมาตรฐานความปลอดภัยของแต ละประเทศ ในการใช งานและบ ำรุงรักษาเครื องมือไฟฟ า หมายเหตุ เนื องจาก HiKOKI มีแผนงานวิจัยและพัฒนาอย างต อเนื อง รายละเอียด จ ำเพาะนี จึงอาจเปลี ยนแปลงได โดยไม ต องแจ งล วงหน า 16 ไทย ...

Page 17: ...الداﺋرﻱ المنشار شراء عند مم 30 و مم 20 و مم 16 قطر ذاﺕ A المعدنية الحلقة من واحد نوع معه يﺄتي المعدنية الحلقة مع المنشار شفرة فتحة قطر توافﻖ عند حالة في الداﺋرﻱ المنشار بشراء قمﺕ الذﻱ بالمتجر اﻻتصال ُرجﻰ ي A منه اتجاﻩ يتطابﻖ أن يجب النشر لشفرة الصحيح الدوران اتجاﻩ لﺿمان 3 غطاء علﻰ الموجود السﻬم اتجاﻩ مع النشر شفرة علﻰ الموجود السﻬم المنشار احتجاﺯ مع السداسية الشفة ذﻱ المسمار بربط قم األصابع باستخد...

Page 18: ... مفكوك A الذراع ترك تم إذا ا ً م تما ﺛبته ا ً م داﺋ ﺍﻟﻣﻳﻝ ﺯﺍﻭﻳﺔ ﺿﺑﻁ 2 المنشار شفرة إمالة يمكن المقياس علﻰ A الذراع إرخاء خﻼل من القاعدة مقابل في درجة 45 إلﻰ تصل ﺯاوية إلﻰ علﻰ A الذراع إرخاء خﻼل من الميل ﺯاوية تعديل ًا ﺿ أي يمكن 3 ﺍﻟﺷﻛﻝ المقياس ﺗﻧﺑﻳﻪ ﺛبته ا ً م داﺋ ًا ي مرخ يبقﻰ بﺄن ﻫذا A للذراع السماح ًا د ج الخطير من ا ً م تما ّﻪ ﺟ ﺍﻟﻣﻭ ﺗﻌﺩﻳﻝ 3 إلﻰ أو اليسار إلﻰ ّه ج المو تحريك خﻼل من القطع وﺿع ت...

Page 19: ...ﻟﻣﺎﺩﺓ ﻓﻲ ﺍﻟﻣﻧﺷﺎﺭ ﺃﺳﻧﺎﻥ ﺗﺷﺎﺑﻙ ﻋﺩﻡ ﻣﻥ ﻭﺗﺣﻘﻖ ﺍﻟﺷﻖ ﻓﻲ العمل قطعة من ًا ي عكس يرتد أو يبتعد فقد النشر شفرة انحشار حالة في المنشار تشﻐيل إعادة عند ﺎ ً ﻳ ﻋﻛﺳ ﻭﺍﺭﺗﺩﺍﺩﻫﺎ ﺍﻟﺷﻔﺭﺓ ﺍﻧﺣﺷﺎﺭ ﺧﻁﺭ ﻟﺗﻘﻠﻳﻝ ﻛﺑﻳﺭﺓ ﻟﻭﺣﺎﺕ ﺑﺩﻋﻡ ﻗﻡ ﺙ بﻬا الخاﺹ وﺯنﻬا تحﺕ لترتخي الكبيرة األلواح ترتفع القطع خط من بالقرب الناحيتين من اللوح تحﺕ الدعاﺋم وﺿع يجب اللوح حافة من وبالقرب ﺗﺎﻟﻔﺔ ﺃﻭ ﺣﺎﺩﺓ ﻏﻳﺭ ﺷﻔﺭﺍﺕ ﺗﺳﺗﺧﺩﻡ ﻻ ﺝ شﻖ صحيحة غير بطريقة المركبة ...

Page 20: ...ي شخصية ﻹصاباﺕ التعرض ﺍﻟﻭﺿﻊ ﻓﻲ ﺍﻟﻣﻔﺗﺎﺡ ﺃﻥ ﻣﻥ ﺗﺄﻛﺩ ﺍﻟﻣﻘﺻﻭﺩ ﻏﻳﺭ ﺍﻟﺗﺷﻐﻳﻝ ﻣﻧﻊ ﺕ ﺣﺯﻣﺔ ﺃﻭ ﻭ ﺍﻟﻁﺎﻗﺔ ﺑﻣﺻﺩﺭ ﺍﻟﺗﻭﺻﻳﻝ ﻗﺑﻝ ﺍﻟﺗﺷﻐﻳﻝ ﺇﻳﻘﺎﻑ ﺍﻷﺩﺍﺓ ﺣﻣﻝ ﺃﻭ ﻭﺍﻻﻟﺗﻘﺎﻁ ﺍﻟﺑﻁﺎﺭﻳﺔ أو المفتاح في إصبعك وجود مع الكﻬرباﺋية العدد حمل يﺅدﻱ التشﻐيل وﺿع في المفتاح فيﻬا يكون التي الكﻬرباﺋية العدد تشﻐيل حوادﺙ وقوع احتمال إلﻰ ﺍﻟﻛﻬﺭﺑﺎﺋﻳﺔ ﺍﻟﻌﺩﺓ ﺗﺷﻐﻳﻝ ﻗﺑﻝ ﺍﻟﺭﺑﻁ ﻣﻔﺗﺎﺡ ﺃﻭ ﺍﻟﺿﺑﻁ ﻋﺩﺩ ﺍﻧﺯﻉ ﺙ من المتحرك الجﺯء يسار علﻰ ﺿبط مفتاح أو ربط مفتاح...

Page 21: ...21 302691 320971 D16 320970 D20 321639 D30 324597 D30 333556 D16 D20 333555 D16 333641 D20 334509 D30 302412 940543 999043 ...

Page 22: ...22 ...

Page 23: ...23 ...

Page 24: ...906 Code No C99194837 F Printed in China Shinagawa Intercity Tower A 15 1 Konan 2 chome Minato ku Tokyo Japan ...

Reviews: