background image


www.hi-fortune.net


18


5.4 Braking by other person


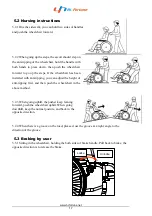
5.4.1 Grip two sides of brake handles to brake. 
Release two sides of brake handles to push. 
 
5.4.2 Press the brake down, the wheelchair is in a state of 
parking brake, then you can release both of your hands. 
 
5.4.3 Pull the brake up will have the wheelchair in the state of 
braking. 


5.5 First using wheelchair 

5.5.1 Operating the wheelchair by user. 

5.5.1.1 Reading the instruction manual  carefully, then  assemble  the wheelchair correctly  and 

adjust the footrest, rear wheels and anti-tipping height properly. 

5.5.1.2 Correctly assemble the cushions of backrest and seat. 

5.5.1.3 Check that the brake and fold switch are locked. 

5.5.1.4 Sit in the wheelchair, adjust your body position and gravity center. 

5.5.1.5 Fasten the seat belt. 

5.5.1.6  Please  practice  using  the  wheelchair  in  a  spacious  area  and  on  a  flat  surface  with 

accompanied. 

5.5.1.7 Hold two sides of hand rims with both hands, push the hand rims forward and downward 

to move the wheelchair forward. 

5.5.1.8 Hold two sides of hand rims with both hands, push the hand rims up and back to move 

the wheelchair backward. 

5.5.1.9 Push the hand rim with your right hand to turn to the left. Push the hand rim with your 

left hand to turn to right. 

5.5.1.10 Practice braking. 

5.5.1.11 Practice to sit in the wheelchair and go off the wheelchair. 


Braking 

Parking 

Summary of Contents for HM303D

Page 1: ...UCTION MANUAL Before operating the wheelchair please read the manual and keep it for future reference Date 2022 06 16 REV V 02 No HM303D SM 010 KunShan Hi Fortune Health Products Co Ltd www hi fortune...

Page 2: ...13 4 6 Assembling and removing the seat and backrest cushion 15 4 7 Transporting and carrying the wheelchair 15 4 8 lift back the armrest 303DF 15 5 Use 16 5 1 My operating instructions 16 5 2 Nursin...

Page 3: ...an important role in your safe operation This instruction manual is one integral part of the product design As the design changes if some illustrations and figures in the instruction manual can not m...

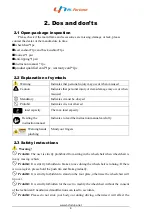
Page 4: ...apacity The max load capacity Reading the instruction manual Indicates to read the instruction manual carefully Warning hands pinching Mind your fingers 2 3 Safety instructions Warning Prohibit The us...

Page 5: ...ways and do not lift the wheelchair during the wheelchair is running Mandatory Please park the wheelchair on a flat place Mandatory Do not place tires near heating appliances Mandatory Please do not h...

Page 6: ...ers 3 1 2 It is a standard wheelchair The backrest has no function of angle adjustment There is also no function for exercise and bathing it is just only a standard wheelchair 3 1 3 This product is ma...

Page 7: ...th inch 17 3 17 3 Seat depth inch 16 1 16 1 Seat surface height at front edge inch 17 7 17 7 Armrest height inch 8 8 8 6 Distance between armrests inch 16 9 20 Backrest height inch 15 7 15 7 Foot plat...

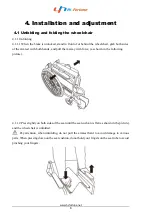
Page 8: ...with both hands and pull them away with force as shown in the following picture 4 1 1 2 Press lightly on both sides of the seat until the seat cushion is flat as shown in the picture and the wheelchai...

Page 9: ...ith both hands then lift both sides of the seat sling at last pull both sides of armrest to close to the center 4 2 Unfolding and folding the backrest 4 2 1 Unfolding Hold the handle and lift up until...

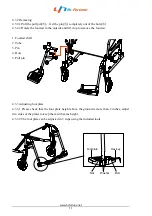
Page 10: ...k folder to release the pin from the back folder 4 3 Assembling and removing the footrests 4 3 1 Assembling 4 3 1 1 Insert the footrest shaft into the tube from the side 4 3 1 2 Rotate the footrest in...

Page 11: ...up to remove the footrest 1 Footrest shaft 2 Tube 3 Pin 4 Hole 5 Pull pin 4 3 3 Adjusting foot plate 4 3 3 1 Please check that the foot plate height above the ground is more than 2 inches adjust two s...

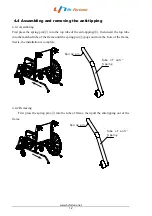
Page 12: ...ti tipping then insert the top tube into the matched tube of the frame until the spring pin pops out from the hole of the frame that is the installation is complete 4 4 2 Removing First press the spri...

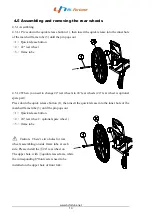
Page 13: ...els to 24 rear wheels 24 rear wheel is optional spare part Press down the quick release button 1 then insert the quick release into the inner hole of the matched frame tube 3 until the pin pops out 1...

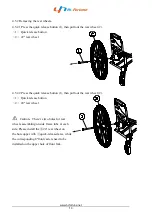
Page 14: ...5 2 2 Press the quick release button 1 then pull out the rear wheel 2 1 Quick release button 2 24 rear wheel Caution There re two holes for rear wheels assembling on side frame tube at each side Plea...

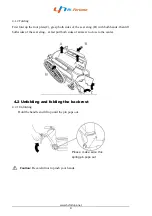
Page 15: ...o use its wheels and push the wheelchair to move 4 7 2 You can also lift the wheelchair by grasping the seat tube after folding the wheelchair 4 7 3 If you need to put the wheelchair in the car you ca...

Page 16: ...on t cross the steps higher than 1 5 inches 5 1 3 When going uphill use a forward leaning posture to climb forward when going downhill keep forward leaning and slide the hand rim in the opposite direc...

Page 17: ...ith anti tipping you can adjust the height of anti tipping first and then push the wheelchair in the above method 5 2 3 When going uphill the pusher keep leaning forward push the wheelchair uphill Whe...

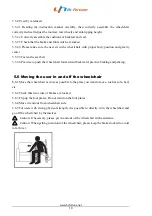
Page 18: ...ble the cushions of backrest and seat 5 5 1 3 Check that the brake and fold switch are locked 5 5 1 4 Sit in the wheelchair adjust your body position and gravity center 5 5 1 5 Fasten the seat belt 5...

Page 19: ...sh the wheelchair forward and backward practice braking and parking 5 6 Moving the user in and off the wheelchair 5 6 1 Move the wheelchair as close as possible to the place you want to move such as s...

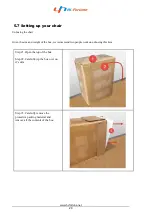
Page 20: ...ir Given the size and weight of the box we recommend two people work on unboxing this item Step 1 Open the top of the box Step 2 Carefully tip the box over on it s side Step 3 Carefully remove the pro...

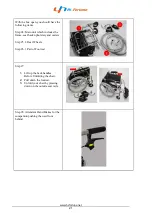
Page 21: ...frame seat back upholstery and casters Step 5 2 Rear Wheels Step 6 1 Pair of Footrest Step 7 1 Lift up the back handles Before Unfolding the chair 2 Pull down the footrest 3 Unfold your chair by pres...

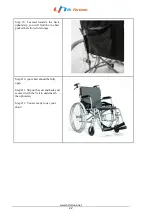
Page 22: ...he back upholstery you will find the in chart pocket that allows for storage Step 10 your chair should be fully open Step 11 Slip on the seat and back and secure it with the Velcro underneath the upho...

Page 23: ...www hi fortune net 23 Available Accessories 1 Optional carry bag for Travel Storage purposes 2 Anti Tippers recommended upgrade 3 Seat Back Upholstery Available colors Red Blue and Grey...

Page 24: ...veryday A After the wheelchair has been used for a period of time it is necessary to check whether each component is loose B Should add lubricating oil weekly C After using the wheelchair wipe the moi...

Page 25: ...cal laws and regulations As for plastic parts frame and pipe parts they can be handed over to professional recycling units for disposal after the end of use 7 Warranty 7 1 Repair and replacement The w...

Page 26: ...enance records Date Issue Caused Remark Name Address Telephone Product name Barcode Purchasing date Warranty period Except for wearing parts Others show in the instruction manual Note Please go to the...

Page 27: ...www hi fortune net 27...

Page 28: ...www hi fortune net 28 Hi Fortune Health Products Co Ltd Add No 625 Juxiang Rd Zhangpu Town Kunshan City Jiangsu CHINA Tel 86 512 55195100 Ext 86 512 55199300 Pc 215321 http www hi fortune net...

Reviews: