background image


21 


STARTING/STOPPING THE MOWER(Figure11,12&13) (H36GC16C) 


WARNING:

 The operation of any lawn mower can result in foreign objects being thrown 

into your or others’ eyes, which can damage eyes severely. Always wear safety glasses while 

operating the mower or while performing any adjustments or repairs on the mower. 


WARNING:

 Ensure that other people an

d pets remain at least 100’ (30m) away from the 

mower when it is in use. 


WARNING:

 The blade will continue to rotate for a few seconds after the mower is turned 

off. Allow the motor/blade to stop rotating before starting it again. Do not rapidly turn the mower 

off and on. 


CAUTION:

 Do not attempt to override the operation of the safety button and bail switch. 

NOTE: 

The motor cannot be started unless:   

  The side rails are fully extended 

  Both green handle-locking clamps are securely closed 

  The handle is locked into one of the three operating positions 

To start the mower 

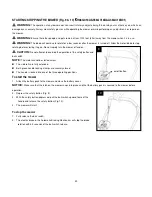
1.  Attach the battery pack to the mower and close the battery cover and upper side rails are 

fully extended(Fig.11) 

NOTICE:

 Make sure that the latch on the mower snaps into place and that the battery pack is 

secured to the mower before operation.                                                                                                                                                                 

2.  Depress the safety button (Fig. 12). 

3.  With the safety button depressed, press 1 of the 4 on/off buttons and release the safety 

button (Fig. 13). 

4. 

The mower will start.


To stop the mower   


1.  Fully release 4 on/off buttons. 

2.  The electric brake in the Automatic Braking Mechanism will stop the blade rotation within 3 

seconds of the bail switch release. 


safety button 

13 

12 

11 

on/off button 

Summary of Contents for A36GC16B01

Page 1: ...TOR S MANUAL Ningbo AOSHENG Machine Co Ltd No 77 West Nantang Road Linshan Industrial Park 315462 Yuyao City Zhejiang P R China Tel 0574 62078293 Fax 0574 62037800 WARNING Read all safety rules and instructions carefully before operating this tool Improper use can cause serious or fatal injury ...

Page 2: ...rranty 36 Parts List 37 39 IMPORTANT Read and understand this manual before assembling or operating this appliance Improper use of this appliance can cause severe injury or death Keep this manual for future reference SAFETY SYMBOLS This page depicts and describes safety symbols that may appear on this product Read understand and follow all instructions on the machine before attempting to assemble ...

Page 3: ...ning Look Behind While Backing Look down and behind first to avoid tripping when pulling back DANGER Keep Hands and Feet Away To reduce the risk of injury keep hands and feet away from rotating parts Do not operate unless discharge cover or grass bag is in its proper place If damaged replace immediately DANGER Keep Bystanders Away Do not mow when children or others are nearby DANGER Steep Slope Ha...

Page 4: ...local waste authority for information regarding available recycling and or disposal options Do not expose to rain Do not expose to rain Charging Store the battery pack Charging and Store the battery pack only in dry rooms with an ambient temperature of 50 F to 104 F 10 C to 40 C V Volt Voltage A Amperes Current Hz Hertz Frequency cycles per second W Watt Power min Minutes Time Alternating Current ...

Page 5: ...ucting materials such as rings bracelets and keys The battery or conductor may overheat and cause burns For Mower 1 Avoid Dangerous Environment Don t use lawn mowers in damp or wet locations 2 Don t Use In Rain 3 Dress Properly Do not wear loose clothing or jewelry They can be caught in moving parts Use of rubber gloves and footwear is recommended when working outdoors 4 Use Right Appliance Do not...

Page 6: ...n under 15 years old to operate a power mower Children 15 years old and over should read and understand the operation instructions and safety rules in this manual and should be trained and supervised by a parent Only responsible individuals who are familiar with these rules of safe operation should be allowed to use this machine OPERATION General Operation Read this operator s manual carefully in ...

Page 7: ...ar of the discharge zone when operating the machine Never pick up or carry the machine while the motor is running Use the right appliance Do not use the lawn mower for any job except that for which it is intended Your lawn mower has been designed to perform only one job to mow grass Don t overreach Keep proper footing and balance at all times Objects struck by the lawn mower blade can cause severe...

Page 8: ... injury through contact with the rotating blade The motor blade control handle must operate easily in both directions and automatically return to the disengaged position when released Avoid dangerous environments Don t use lawn mowers in damp or wet locations so as to avoid slipping and falling during operation Always be sure of your footing A slip and fall can cause serious personal injury If you...

Page 9: ...r and damage which could expose moving parts or allow objects to be thrown and could increase the risk of injury For safety protection frequently check all components and replace damaged components immediately with identical replacement parts listed in this manual Examine the machine and replace worn or damaged parts for safety Ensure replacement cutting means of the right type are used If the mow...

Page 10: ...e battery into machines that have the switch on invites accidents Keep the battery charger away from rain or moisture Penetration of water in the battery charger increases the risk of an electric shock Recharge only with the charger specified by the manufacturer A charger that is suitable for one type of battery may create a risk of fire when used with another battery Do not charge other batteries...

Page 11: ...important information on the safe assembly operation and maintenance of your mower Read it carefully before using the mower Keep this manual handy so you can refer to it at any time SERIAL NUMBER DATE OF PURCHASE THE MODEL AND SERIAL NUMBERS WILL BE FOUND ON A LABEL ATTACHED ON THE REAR DISCHARGE DOOR YOU SHOULD RECORD BOTH SERIAL NUMBER AND DATE OF PURCHASE AND KEEP IN A SAFE PLACE FOR FUTURE REF...

Page 12: ...pthefronthandleand rearhandleatthesametimeto carefully lift the mower up and out of the carton Make sure that all items listed in the parts list are included Inspectthe productcarefully to makesurethatno breakageordamage occurredduringshipping Donotdiscard thepacking material until youhave carefullyinspected and satisfactorilyoperated the mower If any parts are damaged or missing please return the...

Page 13: ...de Discharge Chute 1 Operator s manual 1 DESCRIPTION control panel power indicator high low Speed button Safety button on off button side rail Handle locking clamp quick adjustment lever grass bag battery pack cover cutting height adjustment lever front wheel rear wheel 1a Model H36GC16C ...

Page 14: ...ton rear discharge door power indicator handle bail switch On off switch Quick adjustment lever upper wire clamp Quick adjustment lever lower Battery pack cover front wheel cutting height adjustment lever rear discharge door grass bag 1b Model H36GC16A H36GC16B A36GC16B01 1c 1d ...

Page 15: ...ls in the extended or the recessed position SIDE RAILS Can be extended and locked for operation or recessed for storage QUICK ADJUST LEVER Locks unlocks the handle position when adjusting the angle of the mower handle 1 Locked Storage Position 2 Upper Operating Position 3 Middle Operating Position 4 Lower Operating Position TRAILING SHIELD REAR DISCHARGE DOOR The trailing shield is designed to min...

Page 16: ...ion tail see Figure 2 1 the angle is approximately 41 degree tighten the two lower quick adjustment levers by turning them in clockwise MIDDLE OPERATING POSITION adjust the angle between side rails and the ground by hand until the arrow see Figure 2 1 points to the 2nd calibration tail see Figure 2 1 the angle is approximately 50 degree tighten the two lower quick adjustment levers by turning them...

Page 17: ... side rails and the ground by hand until the arrow see Fig 2 in previous page points to the 3rd calibration tail see Fig 2 in previous page the angle is approximately 59 degree tighten the two quick adjustment levers by turning them in clockwise NOTE The motor cannot be started unless a The side rails are fully extended b Both green handle locking clamps are securely closed c The handle is locked ...

Page 18: ...harge chute SPRING LOADED CUTTING HEIGHT ADJUSTMENT Fig 6 WARNING Do not at any time make any adjustment to the lawn mower without first stopping the motor removing the battery pack and waiting for the blade to stop rotating WARNING Keep your feet away from the deck when adjusting its height The mower can be set to 7 cutting heights between 1 1 2 25mm and 3 75mm Choose the proper cutting height ac...

Page 19: ...and then insert the battery pack into the compartment 2 Push the battery pack until you hear a click The battery release button will spring up when the battery pack is securely attached 3 To detach the battery pack depress the battery release button to release the battery pack and then lift it out of the compartment 4 Close the battery cover NOTICE Make sure that the latch on the mower snaps into ...

Page 20: ...mpt to override the operation of the safety button and bail switch NOTE The motor cannot be started unless The side rails are fully extended Both green handle locking clamps are securely closed The handle is locked into one of the three operating positions To start the mower 1 Attach the battery pack to the mower and close the battery cover NOTICE Make sure that the latch on the mower snaps into p...

Page 21: ...e safety button and bail switch NOTE The motor cannot be started unless The side rails are fully extended Both green handle locking clamps are securely closed The handle is locked into one of the three operating positions To start the mower 1 Attach the battery pack to the mower and close the battery cover and upper side rails are fully extended Fig 11 NOTICE Make sure that the latch on the mower ...

Page 22: ...d For best results do not mow in circles Travel back and forth across the lawn When cutting thick grass reduce your walking speed in order to allow for a more effective cut and a proper discharge of the clippings To maintain a healthy lawn cut off only one third or less of the total length of the grass The average lawn should be approximately 1 1 2 to 2 inches long during cool months and between 2...

Page 23: ...23 Sight and hold the line level with a vertical tree Sight and hold the line level with a pole or a corner of a building or a fence post 15o 21 14 ...

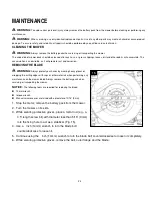
Page 24: ...ING Always protect your hands by wearing heavy gloves or wrapping the cutting edges with rags or other materials when performing any maintenance on the mower blade Always remove the battery pack when servicing or transporting the mower NOTICE The following tools are required for replacing the blade 14mm wrench torque wrench Manual screwdriver or metal rod with a diameter of 5 16 8mm 1 Stop the mot...

Page 25: ...other stabilizer Tighten the bolt with 14mm torque wrench available separately The torque to tighten the blade bolt is suggested to be 23 to 27 Nm Fig 18 SHARPENING THE BLADE WARNING Always protect your hands by wearing heavy gloves or wrapping the cutting edges with rags or other materials when performing any maintenance on the mower blade Always remove the battery pack when servicing or transpor...

Page 26: ...ful not to cut yourself 4 Carefully file the cutting edges of the blade with a fine tooth file or sharpening stone maintaining the original cutting edge angle 5 To check the blade balance clamp a nail or a screw driver with a round shank in the horizontal position Position the blade so that the nail or round shank of the screwdriver supports the blade through its center hole Balance the blade hori...

Page 27: ...t and engage it in the lowest setting setting 1 3 Open the handle locking clamps and fully recess the side rails to the compact position 4 Press and hold the quick adjust lever with your right hand to release the handle 5 Gently pivot the handle toward the front of the mower release the quick adjust lever and continue to pivot the handle until you hear and feel the lock pin engage in the locked st...

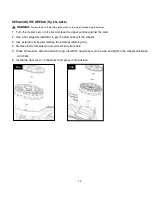
Page 28: ...ainst the wall 2 Use a flat edged screwdriver to pry the dust cover off the wheels 3 Use external circlip plier release the external retaining ring 4 Remove bolts flat washer and worn wheels from axle 5 Place flat washer external retaining ring install the new wheels on the axle and tighten the wheels clockwise with bolts 6 Install the dust cover on the wheel and press it into position ...

Page 29: ...which causes rust and corrosion The handle assembly can be folded away completely for storage 1 Remove the grass bag 2 Move the cutting height adjustment lever toward the front and engage it in the lowest setting setting 1 3 Open the handle locking clamps and fully recess the side rails to the compact position 4 Press and hold the quick adjust lever with your right hand to release the handle Gentl...

Page 30: ...52 F 67 C Fully extend the handle and lock both clamps Adjust the handle to one of the three operating positions Clean the mower deck and make certain that the blade has freedom of movement The mower cuts unevenly The blade is dull The cutting height is not set properly The blade is assembled incorrectly Sharpen or replace the blade Move the deck height to a higher setting Reassemble the blade fol...

Page 31: ...mps cannot be closed in position The side rails are not fully extended Fully extend the side rails then lock the clamps Mower is difficult to pull back when the self propel is turned off The wheels are temporarily locked Simply push ahead slightly and then move the mower as desired The motor works but the blade doesn t cut the grass The blade is not tightened to the required torque Re tighten the ...

Page 32: ...g of the product beyond capacity and immersion in water or other liquid accidents neglect or lack of proper installation and improper maintenance or storage This warranty does not cover normal deterioration of the exterior finish including but not limited to scratches dents paint chips or to any corrosion or discoloring by heat abrasive and chemical cleaners HOW TO OBTAIN SERVICE For warranty serv...

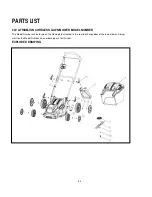
Page 33: ...UM ION CORDLESS LAWN MOWER MODEL NUMBER The Model Number will be found on the Nameplate attached to the rear discharge door of the lawn mower Always mention the Model Number when ordering parts for this tool EXPLODED DRAWING ...

Page 34: ...ols have to be separated from other waste and disposed of in an environment friendly fashion e g by taking to a recycling depot Recycling alternative to the return request As an alternative to returning the equipment to the manufacturer the owner of the electrical equipment must make sure that the equipment is properly disposed of if he no longer wants to keep the equipment The old equipment can b...

Page 35: ...ess lawn mower commercial name Cordless lawn mower function cut grasses or weeds on lawns gardens and pastures and turn recycled dry grass into forage model H36GC16A H36GC16B H36GC16C A40GC16B01 type Battery powered serial number N A fulfils all the relevant provisions of Directives 2006 42 EC and tested in accordance with below standards EN 60335 1 2012 A11 A13 A1 A14 A2 EN 60335 2 77 2010 Additi...

Reviews: