7
Lynx 42
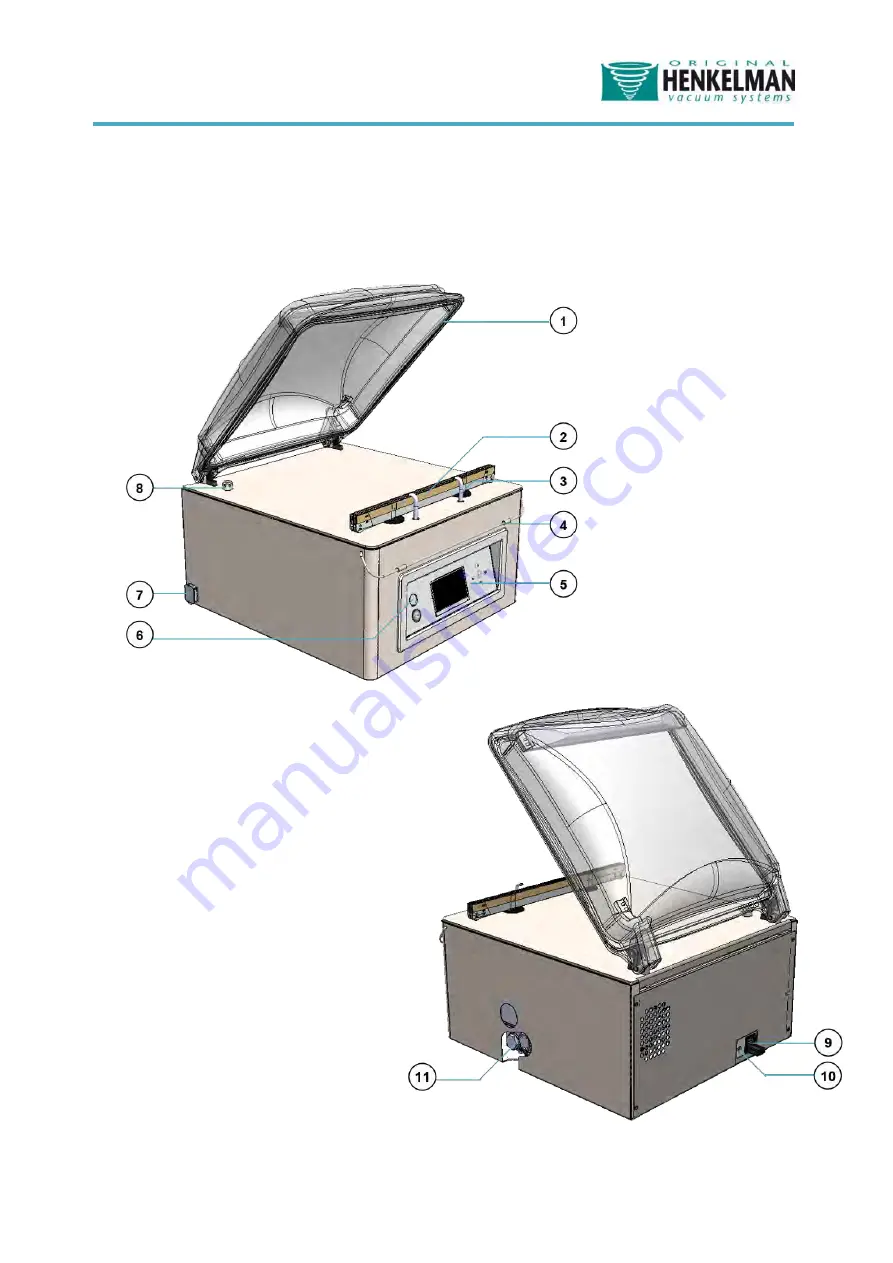
1. Lid 2. Seal bar 3. Gas flush nozzle / Bag-
holder (if applicable)
4. Lid lock 5. Control Panel 6. On/off switch 7. USB port 8. Vacuum/ventilation nozzle 9. Power socket 10. Gas bottle connector 11. Oil sight glass
Page 1: ...User manual Lynx 42 Lynx 32 L ENG C...
Page 2: ...2 All rights reserved No part of this publication may be reproduced by photocopy printing or in any other way without prior consent from Henkelman B V...
Page 3: ...1st time 10 Machine functions 11 Function description 11 Guideline for function values 14 Function relations 16 Controlling the machine 17 Control panel overview 17 On off button 17 Step button right...
Page 4: ...Oil Cleaning Program 30 Oil maintenance 30 Changing Oil Filling Up 30 Oil system overview 31 Oil types and amounts 32 Changing the oil exhaust filter 33 Filter housing types 33 Changing oil exhaust f...
Page 5: ...ts authorized distributors In the case of malfunctions contact the supplier Always clean the lid with solvent free cleaning agents Solvents may damage the lid The machine must always be completely vol...
Page 6: ...e overview Lynx 32 1 Lid 2 Seal bar 3 Gas flush nozzle if applicable 4 Lid lock 5 Control Panel 6 On off switch 7 USB port 8 Vacuum ventilation nozzle 9 Power socket 10 Gas bottle connector 11 Oil sig...
Page 7: ...x 42 1 Lid 2 Seal bar 3 Gas flush nozzle Bag holder if applicable 4 Lid lock 5 Control Panel 6 On off switch 7 USB port 8 Vacuum ventilation nozzle 9 Power socket 10 Gas bottle connector 11 Oil sight...
Page 8: ...When operating the machine in other ambient temperatures please contact the supplier for advice Connecting the machine Check that the voltage stated on the machine tag is the same as the mains voltag...
Page 9: ...aforementioned gasses Accidents and or damage caused by using abovementioned gasses void all liability on the part of supplier as well as the guarantee The gas bottles must always be correctly secured...
Page 10: ...l is delivered in a separate bottle 2 Press the on off switch 3 Select the desired program 4 Put the product in the vacuum bag and place it in the machine with the opening of the bag over the seal bar...
Page 11: ...hPa This is the percentage or value of the pressure in the vacuum chamber related to the normal outside atmosphere of 1 bar 0 Optional the Gas Plus function can be programmed with an additional time...
Page 12: ...t is possible to program a maximum of 5 steps Soft Air Herewith it is possible to allow the air from outside to slowly enter the chamber so the vacuum bag will shape itself slowly around the product a...
Page 13: ...ntainer related to the normal outside atmosphere of 1 bar Menu Menu is used the change machine setting such as language printing options The functions H2O and H2O Plus Gas and Gas plus 1 2 Cut off sea...
Page 14: ...scape from the product Gas 2 700 mbar 0 70 The two main reasons for gas flushing are first to increase shelf life by the chemical reaction between gas and the product Secondly to protect fragile produ...
Page 15: ...he bag The best way to determine the right time is trial and error Sequential Vacuum Holding time 2 700 mbar 30 99 8 0 1 5 0 sec In case the Vacuum Plus time is not effective enough to allow entrapped...
Page 16: ...gram Vacuum Vacuum Plus Red Meat H 2 O H 2 O Plus Sequential Vacuum Gas Gas Plus Seal 1 2 Cut off seal Soft air Printer Vacuum Vacuum Plus Red Meat H2O H2O Plus Sequential Vacuum Gas Gas Plus Seal 1 2...
Page 17: ...cycle will skip all functions and terminate the cycle Screen The screen has four possible modes Startup mode it shows the current date and time during the startup of the machine It also displays the...
Page 18: ...ure on the right These names will be used for the navigation description in the next section Viewing machine programs Users can view machine programs and the active functions in the navigation mode Th...
Page 19: ...layed in color tone When it is inactive it is displayed in soft tone Both tones are illustrated in the figure on the right If the Plus functions are activated the illustration is displayed in color If...
Page 20: ...chine settings and all functions settings An authorization code is requested when the enter button is pressed while the menu icon is selected in the navigation mode When the owner s code has been put...
Page 21: ...to Numeric Increase the value Decrease the value Character Get a lowercase alphabet Get numbers and a capital alphabet Go to the previous next character On off Change mode Change mode Multiple choice...
Page 22: ...22 Setting overview The sitemap below gives an overview of all the settings of the machine The sitemap shows all possible settings for all functions...
Page 23: ...operating the label printer Turn off the vacuum machine and connect the printer via the USB cable to the machine Connect the power cable of the printer Turn the vacuum machine and the printer on USB...
Page 24: ...ter The above steps are equal Just hold the green button till the light under the button blinks twice Now the sensors register the length of the new label For activating the printer and changing the s...
Page 25: ...le of the machine as shown Connect the other side of the external vacuum hose to the container that needs to be vacuumed Make sure this container is capable of resisting and holding a vacuum Use the c...
Page 26: ...act your supplier for this software Creating programs labels with the Lynx software programming tool Installing the Lynx software programming tool Create a folder on the C drive of your PC and name it...
Page 27: ...firm the existing programs and labels will be overwritten by the data that have been programmed on the PC Note Never change the txt files by opening them in notepad or any other program This will resu...
Page 28: ...onally service it every 6 months For normal use of the machine complete servicing once a year should be sufficient depending on location environment and products If there are doubts about the maintena...
Page 29: ...ire if the seal quality is no longer sufficient or if the Teflon tape sealing wire is no longer tight and straight on the sealing bar See instructions Inspect the lid gasket and replace it when the ga...
Page 30: ...tomatically after closing the lid If necessary the program can be interrupted at any time using the STOP key Use the conditioning program at least once a week to enhance correct and long lasting pump...
Page 31: ...nt the oil drain plug Filling up oil After draining or when the oil level is low oil needs to be filled up The oil fill plug must be removed The pump can now be filled with oil Take care to fill with...
Page 32: ...e is operated is also important for the type of oil If the machine is used outside normal specifications regarding ambient temperature contact the supplier See amounts and types with related ambient t...
Page 33: ...the pump absorb and filter oil vapours The filter should be replaced after 12 to 18 months When the filters are saturated it is no longer possible to achieve maximum vacuum Filter housing types Remov...
Page 34: ...34 Lynx 42 To create access for the filter to be removed the gas spring bracket needs to be disassembled as shown...
Page 35: ...lace a new filter and screw it tight Please note that an O ring should be placed at the exhaust filter inlet Replace filter 16 m3 h Lynx 42 Unscrew the oil exhaust filter cover and remove the filter b...
Page 36: ...size of the sealing beam plus about 15 cm 6 inches First attach one side of the wire at a side of the seal bar and screw it tight Now attach the other side of the wire at the other side of the seal ba...
Page 37: ...ve the old silicone rubber from the holder Cut a new piece of silicone rubber to the same size as the old one The same size is very important too short or too long will cause problems with sealing Pla...
Page 38: ...e the lid gasket at least once every 6 months Remove the old gasket rubber from the holder Cut a new piece of rubber of the same size as the old one When the lid rubber is too short or too long it can...
Page 39: ...just vacuum setting of the program Check if extraction opening is not covered Check level and or contamination of the oil in the pump Check replace the oil exhaust filter Check replace the lid gasket...
Page 40: ...upplied or by the unsuitability of it for the goal for which the other party purchased it Warranty Subject to the following limitations the warranty period for products supplied by Henkelman is at lea...
Page 41: ...ded from the warranty 7 If we replace parts in compliance with the obligations of this warranty then the replaced parts become our property The stipulations of the warranty and liability are part of t...
Page 42: ...42 Electrical diagram Lynx 32 42 main circuit diagram...
Page 43: ...43 Electrical diagram Lynx 32 42 control diagram...
Page 44: ...Neutral PE Ground connection Overload devices Fuse main entrance F1 F2 Part number 0232014 Specification 10 Amp Slow Size 5 x 20 mm Fuse seal transformer F4 Part number 0232027 Specification 3 15 Amp...
Page 45: ...Tb 1 Part number 0223011 Input 220 230 Volt Capacity 60 Va Output 1 24 Volt Output 2 9 Volt ED 100 Seal bar Used Seal bar R1 Connection Stand alone Contactors Pump K1 Part number 0221007 Seal K2 Part...
Page 46: ...N Neutral PE Ground connection Overload devices Fuse main entrance F1 F2 Part number 0232014 Specification 10 Amp Slow Size 5 x 20 mm Fuse seal transformer F4 Part number 0232018 Specification 5 Amp S...
Page 47: ...Tb 1 Part number 0223011 Input 220 230 Volt Capacity 60 Va Output 1 24 Volt Output 2 9 Volt ED 100 Seal bar Used Seal bar R1 Connection Stand alone Contactors Pump K1 Part number 0221007 Seal K2 Part...
Page 48: ...s P O Box 2117 5202 CC s Hertogenbosch The Netherlands Address Titaniumlaan 9 5221 CK s Hertogenbosch The Netherlands Tel 31 0 73 621 3671 Fax 31 0 73 622 1318 E mail info henkelman com Information ww...