


Operating Manual
Page 16
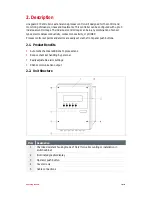
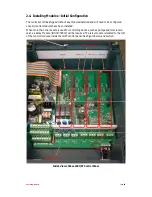
4. Installation
Before using the equipment for the first time check it carefully for signs of external
damage. If any shipping damage is found DO NOT USE THE EQUIPMENT – return it to your
supplier immediately.
4.1. Installation Instructions
The Lineguard 97 Controller can be wall mounted or installed in a control cabinet without any
additional components.
Room conditions for Lineguard 97 controller installation should be free of vibrations and dry
with ambient temperature 0° – 45° C [32° - 113° F].
Failure in observing the installation requirements can result in damage of the unit.
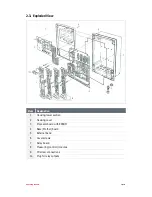
4.2. Wall Mounting
Open housing of the Lineguard 97 Controller by loosening the 4 cover screws.
Use the housing as a template and scribe the 4 mounting holes onto the surface where the
controller will be mounted.
Drill the scribe marks using a 6 mm [ 1/4”] drill bit.
Insert dowel plugs supplied with the controller.
Attach housing using the screws provided.
Close the housing and tighten the 4 cover screws.
When Closing the housing, ensure that the seal is not damaged and it is seated exactly in
the seal groove.
4.3. Control Cabinet Installation
Cut a 213 x 259 mm [ 8.3” x 10.1”] (w x h) opening in the control cabinet.
Scribe the holes as per the drawing.
Drill the mounting holes using a 4.5 mm [ 3/16”) drill bit.
Insert the unit into the opening from the control cabinet front.
Use M4 x 15 screws, from the inside of the control cabinet, to fasten the E-CO Lineguard
97 Controller.
Will damage the Lineguard 97 Controller housing if using screws longer than the suggested
15 mm.


