


XPM 80™
Thermal Printer Family
HENGSTLER
Part No. D 690 019
Mod. No. 4 051015 Eli1
page 28 of 32
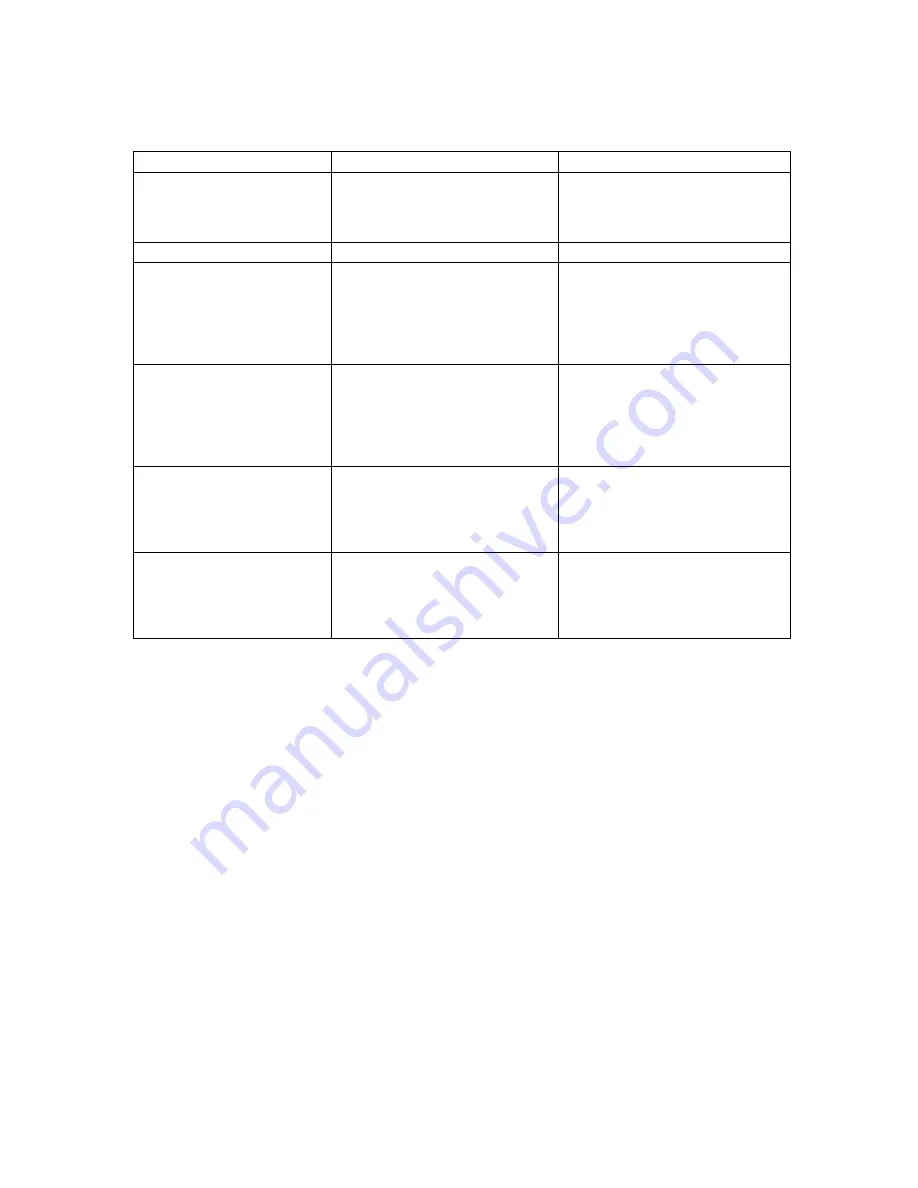
9. Troubleshooting
Symptom
Possible Cause
Corrective Action
No LEDs light on printer
1. Power not connected
2. PCB mounted fuse blown
1. Check line cord and outlet
2. Return printer for fuse
replacement; not field
replaceable
LEDs flashing
See Section “LED Indicators”
See Section “LED Indicators”
Dual-Feed unit will not run
when paper inserted
1. If paper has been ejected by
DFU control button, it must be
completely removed from
DFU and reinserted to feed.
2. Narrow paper not blocking
sensor in center of path
1. Remove and reinsert paper.
2. Center paper
Printer prints blank paper
1. Paper inserted upside-down
2. Wrong side of roll coated
3. Printout positioned outside
printable area by “set”
command
1. Invert paper roll
2. Invert roll as test, have paper
made properly
3. Change “set” command
settings to relocate printout
Print quality poor
1. Print density set too low
2. Printhead not fully lowered
3. Incorrect paper type for XPM
80™ printhead
1. Adjust print density, other burn
time adjustments.
2. Lower printhead.
3. Procure and use correct paper.
Baud rate, or other
configuration setting
changes not effective after
use of Configuration Tool
1. Printer was not reset after
changes made with
Configuration Tool.
1. Reset printer. Consider
enabling “Automatically reset
printer” option on “Tool
Settings” tab of XPM 80™
Configuration Tool.
10. Maintenance
The XPM 80™ printers require very little maintenance.
Note:
Discharge your body’s static electric charge by touching a grounded surface before
performing any maintenance procedure. Do not touch the connector pins of the printhead
cable with your bare hands.
Note:
Do not touch the surface of the thermal printhead. Mechanical stress or shock
(including foreign contamination) to the surface of the printhead substrate should be avoided
to prevent printhead damage.
Cleaning the XPM 80™ Printer
Clean the XPM 80™ whenever it becomes dusty, as paper dust will reduce the friction of the platen
and cause the print quality to deteriorate.
Open the print mechanism by using the Printer Access Control.
Remove any paper
, if
necessary.
Clean the platen with a special platen cleaning agent and a lint-free cloth. DO NOT use
alcohol to clean the platen because alcohol hardens the platen material.
Gently wipe the surface of the thermal printhead using a cotton pad soaked in
METHANOL to remove dust on the heating elements. DO NOT use sandpaper or other
abrasives.
Dry the XPM 80™ mechanism completely and reload the paper.
Note:
Condensation should be avoided. If condensation occurs, do not power the printer until
all condensation has dissipated.


