HENAN SUWEI CreatBot User Manual Download Page 6

Leveling


Platform

Printer


Operation

1. Enter setting menu->leveling bed, waiting for the platform back to home.
2. Adjust first leveling nut, make nozzle close to the platform.
3. 

Press Up/Down button or rotating knob, adjust other three leveling nut.

4

To


adjust


repeatedly

eventually


distance

 (

0

.

2mm

to


insert


a


name


card


is


advisable

.

5

All


the


leveling


nut


should


uniform

nozzle


can

'

t


too


close


to


the


platform

.

6

All


will


be


subject


to


the


actual effect of print, please make more little adjust at 

the beginning of printing.

(The new Printer Head also use this method to adjust machine)

Platform


need


paste


masking paper


or


Kapton


to


achieve


best


viscosity, and the 

model will be firmly fixed on the platform

.

Kapton


is


double

-

sided


tape

please


tear


film


on


both


sides

.

Paving


Masking Paper

1

2

3

4

-  7 -

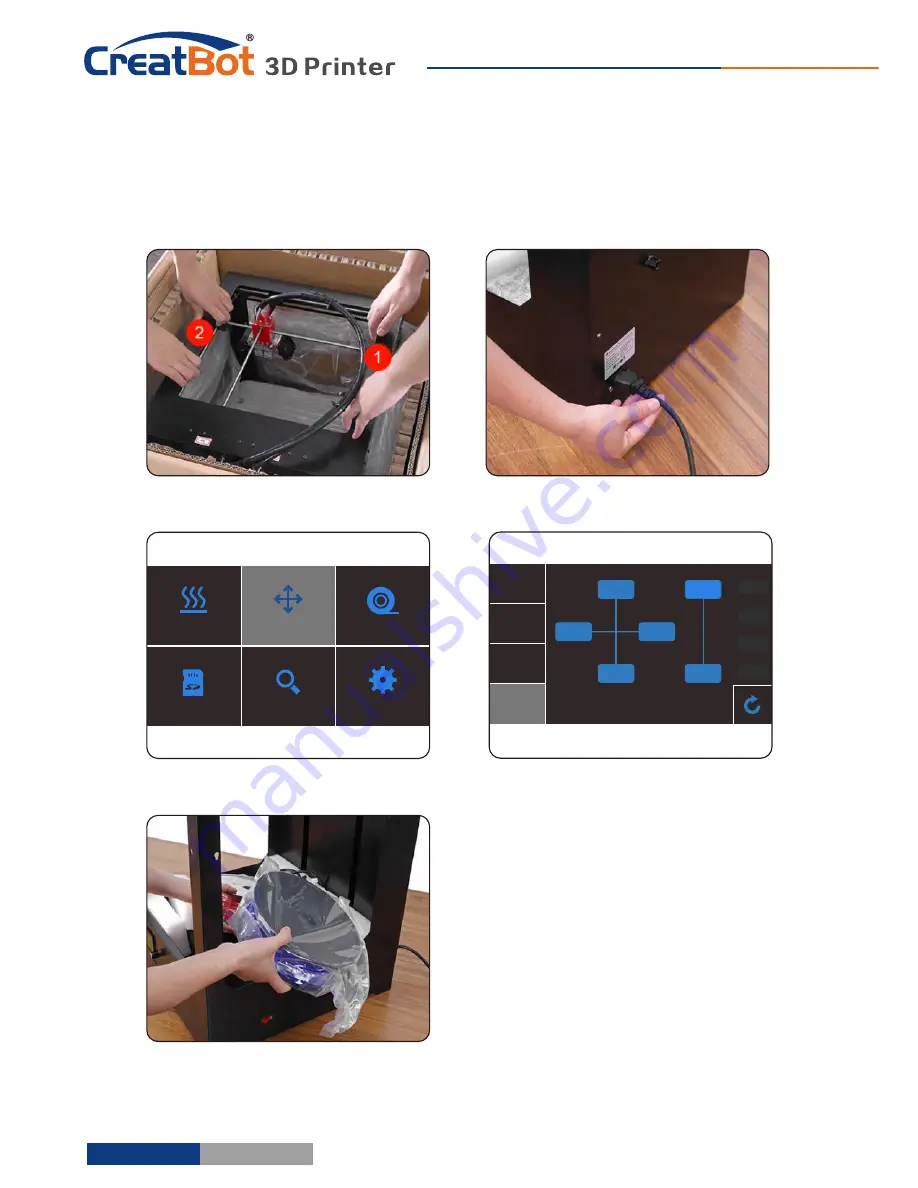
Hardware Installation

1

Ensure


the


packing


is


not


broken

.

2

Need


two people at the same 

time.

3

Lift


it


out


by


grasping


the


frame, 

not the belt or rails.

4

Turn


on


the


printer, enter 

"

Move 

axis

menu

select

 "

All


home

", 

the bracket will rise, now


you


can


takeout


filament

.

Unpacking

Move


axis

Settings

Filament

Status

Preheat

SD Card

Unpacking

Up platform 

Turn on


printer

Turn on


printer

Takeout


filament

+X

-X

-Z

-Y

+Y

+Z

X:

Y: 

Z:

0.1mm

1mm

10mm

100mm

X


Home

Y


Home

Z


Home

All Home

-  6 -

Summary of Contents for CreatBot

Page 1: ...Henan Suwei Electronics Technology Co Ltd 1 CreatBot 3D Printer User manual English V7 2...

Page 2: ...ail page 12 Printing page 13 Axis operation 14 Filament menu 15 SD Card U disk 16 Setting menu 17 Info menu 18 Software Operation CreatWare Setup 19 Quick Print UI 20 Print Your First Model 20 Full Se...

Page 3: ...the failure of the printer the loss will be borne by the user Software running environment 2G or above processors at least 1G memory compatible with Windows MAC or Linux please use memory as much as...

Page 4: ...Machine Diagram 4 1 Power switch 2 Indicator light 3 U disk 4 Build platform 5 Touch Scanner 2 3 4 5 1 Nozzle 2 Nozzle 1 U disk Hotbed Front Indicator light...

Page 5: ...Machine Diagram 5 1 Nozzle 2 steering engine 3 Heating block 4 Thermostat tube 5 Heating tube 6 Extruder block 7 Pressure nut 8 Pressure spring 9 Cooling fan 8 1 3 4 5 6 7 10 2 9 Printer Head...

Page 6: ...the belt or rails 4 Turn on the printer enter Move axis menu select All home the bracket will rise now you can takeout filament Unpacking Move axis Settings Filament Status Preheat SD Card Unpacking...

Page 7: ...insert a name card is advisable 5 All the leveling nut should uniform nozzle can t too close to the platform 6 All will be subject to the actual effect of print please make more little adjust at the...

Page 8: ...d check the filament is not self winding 3 Insert the filament to the inlet and push it to the nozzle until melted and flowing naturally 4 Tighten the compression nut tightness is back a circle after...

Page 9: ...ture 3 After reching temperature feeder will send a certain number of filament and then automatically withdraw filament 4 To manually unload filament same as above mentioned Unload filament menu Prehe...

Page 10: ...reen Printer Operation Main Menu Move axis Settings Filament Status Preheat SD Card Preheat PLA Cool down Move axis Filament menu Check Status Setting Open U disk Open SD card USB unavailable SD card...

Page 11: ...0 Touch and set up the temp of the nozzle Current Temp 1 Target temp 1 210 200 0 X Y Z 00 00 00 00 00 00 210 200 45 40 Print speed Fan speed Flow 100 100 100 X 0 00mm Y 0 00mm Z 0 00mm Print speed Fa...

Page 12: ...nt speed 100 Fan speed 100 Flow 100 Z 0 00mm Print speed 100 Fan speed 100 Flow 100 Z 0 00mm Touch and set up the temp of the hotbed Tar hotbed temp Cur hotbed temp 45 40 Touch and set up the temp of...

Page 13: ...nt Z Z down Printing page Stop Pause Change 50 00 Heating 01 30 00 Heating 13 Printer Operation The display will get darken when no operation in ten seconds and can be waken by clicking anywhere on th...

Page 14: ...X 000 00 Y 000 00 Z 000 00 Move X to home Move Y to home Move Z to home All axis to home 1mm X Home Y Home Z Home All Home X Y Z Z Back Minimum units Move X Y axis Z up Z down Axis operation X Y Z 00...

Page 15: ...Head 2 2 extruder unavailable Back Extrude lament Retract lament Filament menu 0 225 300 150 75 Adjust value when extrude retract lament Retract lament Unload Extrude Retract Unload 15 Printer Operati...

Page 16: ...16 file1 gcode file2 gcode Click and choose a file to print Last page Superior menu Next page Back file1 gcode file2 gcode SD Card U disk Printer Operation...

Page 17: ...100 100 Reset Save Back Setting menu Motor Preheat Extruder temp Fan speed Reset Save X step Y step Z step E step More Bed temp Sink fan speed Fan speed Filter fan speed 78 7401 78 7401 800 0000 125...

Page 18: ...rmware version Back Screen version V4 2 Henan Suwei Elec Tech Co Ltd www CreatBot com 86 4000 558 930 sales creatbot com Time used V4 2 3D 3D Printer 0000 00 00 Firmware 5 2 160810 Time used 0000 00 0...

Page 19: ...common 3D file format Installation path can not contain non Latinn characters Please associated common 3D file format When there is a driver digital signature please choose to agree When finished the...

Page 20: ...lice model 3 Insert SD card to the printer browse and select the Gcode file you just saved the printer will automatically start to heating when the temperature reaches the printing will start When ins...

Page 21: ...ide is view area The setting area contain Basic Advanced Plugins Start End GCode four tabs The Basic tab is the most common settings usually the most frequently used parameters are here Each parameter...

Page 22: ...el Left Right Hold and move the mouse to zoom Scrollwheel Use the scroll wheel to zoom in or out Left Shift Click and drag in rotary model can according to each 1 degree angle Shift Right Shift Hold a...

Page 23: ...atus to the default state Button is lay flat button 3 can lay the model flat on the platform automatically Model Scale 3 1 2 4 Click the left corner of the zoom button you can see a 1 contour line aro...

Page 24: ...ation will lead to a change in the direction of rotation and the rotation will not change the model 3 1 2 4 View Mode From the overhang view you can see the suspended part of the model which is shown...

Page 25: ...model pop up shortcut menu here are more features 1 Centered make the model back to the center position of the platform Delete to 2 remove the currently selected model Multiply 3 to copy the currently...

Page 26: ...ow Print speed Speed at which printing happens Print speed is affected by many factors it is recommended to use low speed for complex model high speed will cause the feed shortage need improve nozzle...

Page 27: ...printing time Retract distance The length of the filament when enable retraction First layer thickness Height of the first layer of printing generally greater than 0 15mm First layer flow When the set...

Page 28: ...holes in the print for the head to travel over Wipe tower Is a small tower next to your print where the nozzle wipes itself clean when switching nozzles Dual extrusion switch amount Amount of retracti...

Page 29: ...Plugin enable you to easily include your own features without having to modify the source code or Gcode In the screen shot above these can be enabled by clicking on the arrow down button then you can...

Page 30: ...color model and save the GCode Tip The model select rst will print by main extruder the right clicked one by second extruder Dual Head Printing The start and end gcode are the startup and end procedu...

Page 31: ...onfig all the different machine settings F160 Nozzle temperature Hot bed Plantform adhesion type Fully enclose or not PLA 190 210 None 45 None Raft Can open ABS 190 210 90 Brim Raft Enclosed Nylon 240...

Page 32: ...tenance Using skills Change Fuse Open fuse tray Change new fuse 1 Frequent cleaning stains on the rail 2 Lubricate the four guide rail 3 Frequent cleaning feeder gear Notice Don t add too much lubrica...

Page 33: ...can prevent winding filament 2 After preheating nozzle Sharpen and straighten filament head is necessary This will get filament through extruder easily 3 if you can t send filament through nozzle wel...

Page 34: ...finish printing 4 Tighten pressure nut twist pressure nut 8 12 times after nut touch spring Neither too loose nor too tight 5 Extrude filament for a while and pull out quickly when you change filamen...

Page 35: ...aged or belt wheel screw loose 7 Print head hit the framework Corresponding axis stop limit or circuit fault 8 Unable to power on Power switch is damaged or fuse is burned and please check whether the...

Page 36: ...g effect as the standard too close will lead to a silk blocked too far will cause the model not stick on the platform 8 How to determine whether the temperature is too high PLA temperature is too high...

Page 37: ...PU PETG HIPS PVA PA PC Carbon Fibre etc Fila Diameter 3 0mm 1 75mm optional Keypad Yes nine key Auto Turnoff Yes pwr manager relay Continue Play Yes Power outage lower plate and save data Fila Check Y...

Page 38: ...PC Carbon Fibre PEEK etc Fila Diameter 1 75mm 3 0mm Motion Structures Optic axis Rectilinear orbit Auto Turnoff Yes pwr manager relay Continue Play Yes Power outage lower plate and save data Fila Chec...

Page 39: ...39 Henan Suwei Electronics Technology Co Ltd Telephone 86 4000 558 930 Website www CreatBot com Email sales creatbot com Address A805 XingHua Building HangHai road Zhengzhou City China...

Page 40: ...Quality Experience Service...

Reviews: