


sello de fijación
fixing seal
rondana
washer
tuerca
nut
nut
tuerca
sello de fijación
rondana
washer
conectores
connectors
o’rings
Limpie la superficie.
Clean the surface.
2
5
6
3
4
empaque
gasket
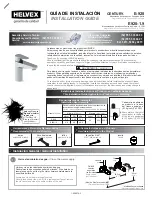
Instalación de las Mangueras
/ Hoses Installation
empaque
gasket
Desenrosque los conectores con o’ring y la tuerca, retire la rondana
y el sello de fijación.
/ Unscrew the connectors with the o’rings and
the nut, remove the washer and the fixing seal.
Inserte la salida en el lavabo y verifique que se coloque el empaque.
/
Place the faucet into the sink hole and check that the gasket is placed.
Inserte el sello de fijación y la rondana. Enrosque la tuerca para fijar
y enrosque los conectores con sus o’rings.
/
Insert the fixing seal
and the washer. Screw the nut to fix and screw the connectors with
their o’rings.
Para purgar las líneas de alimentación, abra el suministro de agua y
cierre.
/ To purge supply lines, open and close angle valves.
línea de alimentación
(no incluidas)
supply lines
(not included)
Enrosque las mangueras (no incluidas) a los conectores y a las
líneas de alimentación.
/ Screw the hoses (not included) to the
connectors and the supply lines.
conectores
connectors
mangueras
(no incluidas)
hoses
(not included)
½” 14 NPSM
fixing seal
Instalación General /
General Installation
conectores
connectors
o’rings
Para placas barrene de acuerdo a las medidas mostradas. /
Drill the
countertop according to the shown dimensions.
2
*3,8 cm
(1,5")
Placa para Lavabo
Bathroom Countertop
lavabo
sink
* Medidas Recomendadas
* Recommended Dimensions
* barreno Ø 3,4 cm max.
* drill max Ø 1 3/8"
Espesor máximo de placa de 3 cm. /
Maximum thickness of 1,18" countertop.
válvulas
angulares
angle valves
agua caliente
hot water
agua fría
cold water
7


