background image

3

Elektrische Vorheizung AIR1-EVH RH

Montage- und Betriebsvorschrift

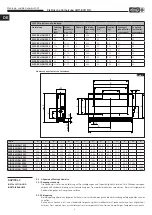
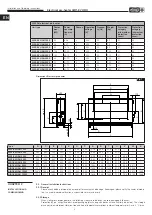
Abmessungen elektrische Vorheizung

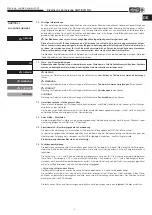
2 .0  Allgemeine Montagehinweise
2 .0 .1 Sendungsannahme

Die Sendung ist sofort bei Anlieferung auf Beschädigungen und Typenrichtigkeit zu prüfen. Falls Schäden vorliegen, 
umgehend Schadensmeldung unter Hinzuziehung des Transportunternehmens veranlassen. Bei nicht fristgerechter 
Reklamation gehen evtl. Ansprüche verloren.

2 .0 .2 Einlagerung

Bei Einlagerung über einen längeren Zeitraum sind zur Verhinderung schädlicher Einwirkungen folgende Maßnahmen 
zu treffen:
Schutz durch trockene, luft- und staubdichte Verpackung (Kunststoffbeutel mit Trockenmittel und Feuchtigkeitsindi-
katoren). Der Lagerort muss erschütterungsfrei, wassergeschützt und frei von übermäßigen Temperaturschwankun-

AIR1 RH elektrische Vorheizung
Gerätetype

Leistung 
max . 
(kW)

Strom-
aufnahme 
max . (A)

Phasen Betriebs-

spannung 
(V)

Frequenz 
(Hz)

Gewicht 
(kg)

Schutzart
(ohne Wetter-
schutzdach)

Schutzart
(mit Wetter-
schutzdach)

AIR1-EVH RH 1500

4,2

6,06

 3

 400

 50

65

31

54

AIR1-EVH RH 2000

5,8

8,37

 3

 400

 50

70

31

54

AIR1-EVH RH 3000

9,1

13,13

 3

 400

 50

80

31

54

AIR1-EVH RH 5000

15,6

22,52

 3

 400

 50

100

31

54

AIR1-EVH RH 6000

18,1

26,13

 3

 400

 50

115

31

54

AIR1-EVH RH 8000

22

31,75

 3

 400

 50

140

31

54

AIR1-EVH RH 9500

22

31,75

 3

 400

 50

155

31

54

AIR1-EVH RH 12000

22

31,75

 3

 400

 50

170

31

54

AIR1-EVH RH 15000

22

31,75

 3

 400

 50

190

31

54

 100 

 max. 80 

 400 

 max. E 

 I 

 K 

 T 

 W 

 R 

 X 

 U 

 S 

 V 

 110 

 B 

 O 

 C 

 M8 

 P 

Maße (mm)

Art.-Nr.  Type

B

C

E

I

K

O

P

R

S

T

U

V

W

X

01262 AIR1-EVH RH 1500

520 760 700 200 173 380 265 378 338 350 310

-

-

-

01710 AIR1-EVH RH 2000

580 860 760 250 173 430 295 498 338 470 310

-

-

-

01711 AIR1-EVH RH 3000

640 970 820 250 173 485 300 608 438 580 410

-

-

-

01791 AIR1-EVH RH 5000

780 1240 960 300 465 620 375 883 438 855 410 498

-

-

01792 AIR1-EVH RH 6000

830 1360 1010 300 465 680 400 883 438 855 410 498

-

-

01819 AIR1-EVH RH 8000

950 1610 1130 350 515 805 465 1083 438 1055 410 498 361,1

-

01830 AIR1-EVH RH 9500

1000 1710 1180 350 515 855 490 1228 438 1200 410 498 409,4

-

01871 AIR1-EVH RH 12000

1080 1860 1260 350 515 930 530 1503 538 1475 510 598 501,1 1563

01883 AIR1-EVH RH 15000

1200 2110 1380 350 515 1055 590 1628 738 1600 710 798 814,2 1688

Abb .1

Type

B

C

E

I

K

O

P

R

S

T

U

V

W

X

AIR1-EVH RH 1500

520

760

700

200

173

380

265

378

338

350

310

AIR1-EVH RH 2000

580

860

760

250

173

430

295

498

338

470

310

AIR1-EVH RH 3000

640

970

820

250

173

485

320

608

438

580

410

498

AIR1-EVH RH 5000

780

1240

960

300

465

620

375

883

438

855

410

498

AIR1-EVH RH 6000

830

1360

1010

300

465

680

400

883

438

855

410

498

AIR1-EVH RH 8000

950

1610

1130

350

515

805

465

1083

438

1055

410

498

361,1

AIR1-EVH RH 9500

1000

1710

1180

350

515

855

490

1228

438

1200

410

498

409,4

AIR1-EVH RH 12000

1080

1860

1260

350

515

930

530

1503

538

1475

510

598

501,1

1563

AIR1-EVH RH 15000

1200

2110

1380

350

515

1055

590

1628

738

1600

710

798

814,2

1688

KAPITEL 2 

INSTALLATION UND
INBETRIEBNAHME


DE

Summary of Contents for AIR1-EVH RH

Page 1: ...chauffage lectrique AIR1 EVH RH f r AIR1 RH L ftungsger te for AIR1 RH ventilation units pour les centrales AIR1 RH DE EN FR Helios Ventilatoren MONTAGE UND BETRIEBSVORSCHRIFT INSTALLATION AND OPERATI...

Page 2: ...schreibung Seite 2 KAPITEL 2 INSTALLATION UND INBETRIEBNAHME Seite 3 2 0 Allgemeine Montagehinweise Seite 3 2 0 1 Sendungsannahme Seite 3 2 0 2 Einlagerung Seite 3 2 0 3 Transport Seite 4 2 0 4 Demont...

Page 3: ...ss Wenn die nachfolgenden Ausf hrungen nicht beachtet werden entf llt die Gew hrleistung Gleiches gilt f r Haftungs anspr che an den Hersteller Der Gebrauch von Zubeh rteilen die nicht von Helios empf...

Page 4: ...15000 22 31 75 3 400 50 190 31 54 100 max 80 400 max E I K T W R X U S V 110 B O C M8 P Ma e mm Art Nr Type B C E I K O P R S T U V W X 01262 AIR1 EVH RH 1500 520 760 700 200 173 380 265 378 338 350 3...

Page 5: ...rtung Die Demontage und der Wiederaufbau des Ger ts d rfen nur von qualifiziertem Fachpersonal durchgef hrt werden 2 0 5 Entsorgung m Lebensgefahr durch Stromschlag Ein Stromschlag kann zu Tod oder sc...

Page 6: ...ird s Abb 3 2 Schraubenabdeckungen am Ger t entfernen bevor das Modul installiert wird s Abb 4 3 Den Temperatursensor im Lieferumfang enthalten an die Au enluftseite der Vorheizung anschlie en Den Sen...

Page 7: ...ng montieren AIR1 Ger t wie folgt mit der Vorheizung verbinden s Abb 8 7 Abdeckung des Hauptschalters ffnen Leitungsquerschnitt der f r den Stromanschluss verwendet wird festlegen Die Leitung an die e...

Page 8: ...Kapitel der Montage und Betriebsvorschrift des jeweiligen AIR1 L ftungsger ts beachten 3 0 Service und Wartung Reinigungs und Wartungsarbeiten d rfen nur von einer Elektrofachkraft durchgef hrt werde...

Page 9: ...lter nach oben dr cken um eine manuelle R ckstellung zu erzielen Abb 12 Manuelle R ckstellung Die manuelle R ckstelltemperatur ist 90 C Wenn die Sicherheitstemperatur 90 C erreicht ist wird der Sicher...

Page 10: ...ption Page 2 CHAPTER 2 INSTALLATION AND COMMISSIONING Page 3 2 0 General installation instructions Page 3 2 0 1 Receipt Page 3 2 0 2 Storage Page 3 2 0 3 Shipping Page 4 2 0 4 Disassembly and re assem...

Page 11: ...ch can result in material damage if the safety instruction is not followed 1 2 Warranty claims Exclusion of liability If the preceding instructions are not observed all warranty claims shall be exclud...

Page 12: ...31 54 100 max 80 400 max E I K T W R X U S V 110 B O C M8 P Ma e mm Art Nr Type B C E I K O P R S T U V W X 01262 AIR1 EVH RH 1500 520 760 700 200 173 380 265 378 338 350 310 01710 AIR1 EVH RH 2000 58...

Page 13: ...t is leak free with regard to oil and refrigerants Since the diameter of the heating and cooling pipes is small water may remain in the register after emptying For safety reasons compressed air should...

Page 14: ...module joins the unit see Fig 3 2 Remove screw covers on the unit before installing the module see Fig 4 3 Connect the temperature sensor included in delivery to the outdoor side of the pre heater Fa...

Page 15: ...metal parts to the pre heater Connect AIR1 unit to the pre heater as follows see Fig 8 7 Open main switch cover Check cable thickness for the power connection Connect the cables to the terminals and...

Page 16: ...g assistant For this purpose please refer to corresponding chapter in the installation and operating instructions for the respective AIR1 ventilation unit 3 0 Service and maintenance Cleaning and main...

Page 17: ...to access the reset switch 2 Press the reset switch up for a manual reset Fig 12 Manual reset The manual reset temperature is 90 C When a temperature of 90 C is reached the safety temperature limiter...

Page 18: ...e 2 CHAPITRE 2 INSTALLATION ET MISE EN SERVICE Page 3 2 0 Consignes de montage g n rales Page 3 2 0 1 R ception de la marchandise Page 3 2 0 2 Stockage Page 3 2 0 3 Transport Page 4 2 0 4 D montage et...

Page 19: ...e garantie R serves du constructeur Si les consignes figurant dans cette notice ne sont pas correctement respect es la garantie s annule Il en est de m me pour toute implication de responsabilit du fa...

Page 20: ...00 max 80 400 max E I K T W R X U S V 110 B O C M8 P Ma e mm Art Nr Type B C E I K O P R S T U V W X 01262 AIR1 EVH RH 1500 520 760 700 200 173 380 265 378 338 350 310 01710 AIR1 EVH RH 2000 580 860 7...

Page 21: ...de la maintenance courante Le d montage et le remontage de l appareil doivent exclusivement tre effectu s par un personnel qualifi 2 0 5 Mise au rebut m Danger de mort par choc lectrique Un choc lect...

Page 22: ...aux endroits o le module est accol la centrale voir fig 3 2 Retirer les cache vis de la centrale avant d installer le module voir fig 4 3 Raccorder la sonde de temp rature incluse dans la livraison du...

Page 23: ...centrale AIR1 au pr chauffage comme indiqu ci apr s voir fig 8 7 Ouvrir le couvercle de l interrupteur principal D terminer la section du c ble utiliser pour le raccordement raccorder le c ble la born...

Page 24: ...l assistant de mise en service Pour ce faire veuillez consulter le chapitre correspondant de la notice de montage et d utilisation de la centrale AIR1 concern e 3 0 Entretien et maintenance Les travau...

Page 25: ...Pousser le bouton de r initialisation vers le haut pour proc der la r initialisation manuelle voir fig 12 R initialisation manuelle la temp rature de r initialisation manuelle est de 90 C Lorsque cet...

Page 26: ...9 Pr chauffage lectrique AIR1 EVH RH Notice de montage et d utilisation...

Page 27: ...10 Pr chauffage lectrique AIR1 EVH RH Notice de montage et d utilisation...

Page 28: ...se 4 8112 Otelfingen GB HELIOS Ventilation Systems Ltd 5 Crown Gate Wyncolls Road Severalls Industrial Park A HELIOS Ventilatoren Postfach 854 Siemensstra e 15 6023 Innsbruck Colchester Essex CO4 9HZ...

Reviews: