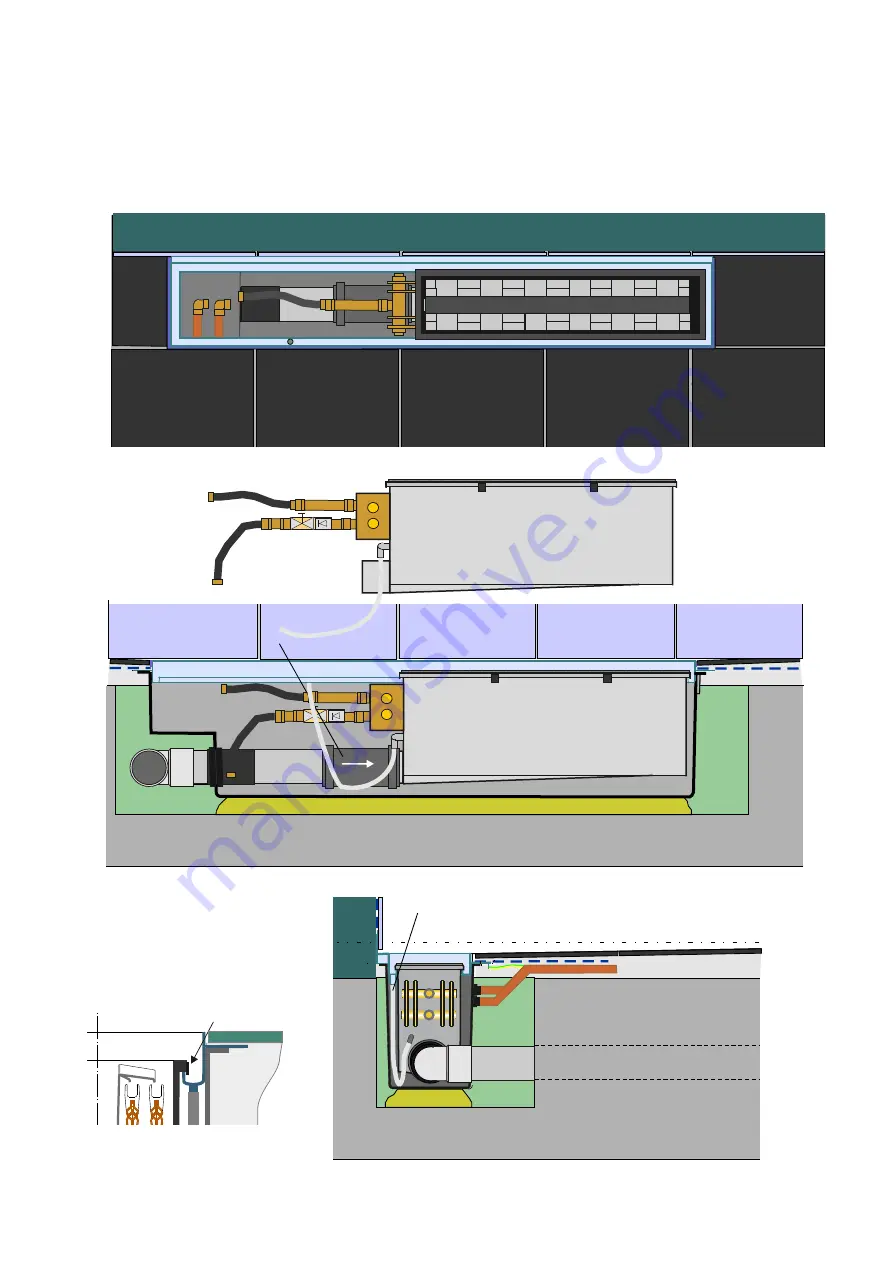
connect leakage tube
-9-
connect sliding sleeve
6.1 Place Recoh-drain heatexchanger
6 Installing unit 2
.
Cross section A-A
Cross section B-B
Connect the clips at the sides behind the gutter frame.
locking / clips
Page 1: ...se for some time Using a thermostatic mixer tap is therefore recommendable When using the Recoh drain the tap limit of the hot water preparer must be taken into account It is possible the necessary en...
Page 2: ...nto contact with water have been made of copper or brass The heat Floor and wall heating Assuming a maximum temperature of 50 C water in the floor heating system there must be at least 100 mm distance...
Page 3: ...oss section A A A A RVS gutterframe 50 mm discharge 2 Units Unit 1 3 Screed mould template heat exchanger Topview Unit 2 grate siphon gutter hair stopper rubber seal 2 Overview of components of the Re...
Page 4: ...by using System A 3 Installation System B boiler Discharge tap water supply mixer tap Recoh drain preheated tap water boiler Discharge tap water supply mixer tap System A Recoh drain preheated tap wat...
Page 5: ...B A mould discharge 50mm 60 90 o 5 5 Installing unit 1 5 1 Gap in concrete floor level tiled floor level tiled floor at Recoh drain Cross section A A level tiled floor at Recoh drain level tiled floo...
Page 6: ...tiled floor level tiled floor at Recoh drain 200 quick set mortar K70 level horizontal 6 earth connection A 5 2 Mounting unit 1 Cross section A A level tiled floor at Recoh drain level tiled floor Cro...
Page 7: ...nection discharge 7 level tiled floor level tiled floor at Recoh drain level tiled floor level tiled floor at Recoh drain screed earth connection 5 3 Connect discharge and waterconnections Cross secti...
Page 8: ...membrane After applying the tiles kit the gutter frame all around Before kit Primer frame en edges of tiles to achieve a good connection or 2 component kit We recommend to apply level tiled floor Gra...
Page 9: ...nect leakage tube 9 connect sliding sleeve 6 1 Place Recoh drain heatexchanger 6 Installing unit 2 Cross section A A Cross section B B Connect the clips at the sides behind the gutter frame locking cl...
Page 10: ...10 flexible tube 1 2 female 6 2 Conect fresh water connections Cross section A A Cross section B B...
Page 11: ...pointed downwards Cross section A A Cross section B B Rubber seal Press firmly from the center to the sides Note Don t push the rubber seal to deep upper side equal to top siphon gutter Prevent closin...