


med 0315 2015-03-25
med 0315 2015-03-25
6/28
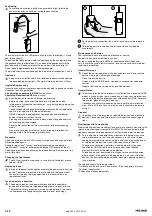
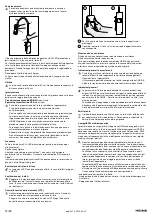
Positioning
To avoid contamination, position the examination light prior to the
examination or by an assistant during the examination.
The swivel arm of the EL3 LED examination light has two flexible (1, 3) and
one rigid section (2).
To position the light precisely, hold the light head by the hand grip (4) and
the gooseneck by the flexible part (1) and bend the gooseneck into the
desired position. Fine adjustments can be made via the hand grip (4).
Do not bend the gooseneck into a <90 degree angle.
The picture shows the positioning of the lamp during transport on a stand.
Operation
Keep a minimum distance of 20 cm between the examination light and
the examined object (patient). The optimal working distance is 30cm.
Hygienic Reprocessing
Instructions on hygienic reprocessing must be adhered to, based on national
standards, laws and guidelines.
Classification according to KRINKO: non-critical
Spaulding Classification USA: non-critical
Allow the device to cool down before reprocessing.
Before cleaning, disconnect the device from the power source.
In the event of suspected contamination, carry out hygienic preparation
of the instrument.
The described cleaning and disinfection measures do not replace the
specific rules applicable for the establishment.
HEINE Optotechnik only approves the resources and procedures
named in these instructions for use.
Cleaning and disinfection may only be carried out by personnel with
sufficient hygienic knowledge.
Observe the instructions of the manufacturer of the reprocessing
media.
Do not use any spray disinfectant, or any dripping-wet or heavily-
foaming cloths. Do not prepare mechanically.
Procedure
Clean and disinfect the EL3 LED manually (wipe clean and wipe disinfect).
Recommended agents:
Alcoholic (eg Incides
®
tissues), quaternary ammonium compounds
(eg Microbac
®
tissues) or ortho-phthalaldehyde (OPA example Cidex
®
)
Conditioning residues on optics may be removed using a low-bacterial, dry,
micro-fibre cloth.
Changing the light source
The LED unit cannot be replaced. In case of a fault or defect, please
contact HEINE.
Replacing fuses
Switch off the examination light and remove the power cable from the
device. The fuses are located in the fuse holder of the panel mount
connector. Use only the fuses specified in the technical data as
replacement fuses.
Technical safety inspection
The power supply unit and power cable should be inspected for
damage and that they are in good working order at regular intervals.
The technical safety inspection must be carried out every two years
in accordance with the generally accepted rules of technology.
For the electrical inspection, the installation cover must be removed
first.
The testing point is located on the left hand side and is labelled
accordingly.
Maintenance and Service
The instrument does not require maintenance or service.
The device may not be modified in any way.
For repair, send the device to HEINE or an authorized service partner
only, to avoid the risk of electrical shocks, burns or injuries due to improper
repair work or handling.
General Warnings
Check the correct operation of the device before use! Do not use the
device if there are visible signs of damage.
Do not modify the device.
Use only original HEINE parts, spare parts, accessories and power
sources.
Repairs shall only be carried out by qualified persons.
General Notes
The warranty for the entire product is invalidated if non-genuine HEINE
products or non-original parts are used and if repairs or modifications
are made to the device by persons not authorized by HEINE. For more
information, please visit www.heine.com.
Condensation can form when moving from a cold to a warm environ-
ment. Wait until the unit has warmed up and is absolutely dry before
using it.
Disposal
The product must be recycled as separated electrical and electronic
devices. Please observe the relevant state-specific disposal regula-
tions.
Electromagnetic Compatibility
Medical electric devices are subject to special precautionary measures with
regard to electromagnetic compatibility (EMC). Portable and mobile high
frequency communication equipment can affect medical electric devices.
This is a device in the domestic environment, this device may cause
radio interference, so that it may be necessary in this case, to take
appropriate remedial measures, as e.g. orientation, new arrangement
or shielding of the device or restrict the connection to the site.
The use of accessories, converters or cables other than the ones
specified by HEINE might lead to increased emission reduced
electrical immunity of the medical equipment.
The device may not be stacked directly near or used directly beside
other devices. If the device is to be operated in a stack or with other
devices, the device should be watched to ensure it operates properly
in this location.
The appendix contains following tables:
- Guidance and Manufacturer’s declaration – Electromagnetic immunity
- Technical specification
- Explanation of the used symbols
1
2
3
2
1
4
1
2


