background image

21  

80-23024 Issue 3r1 


HEBER 


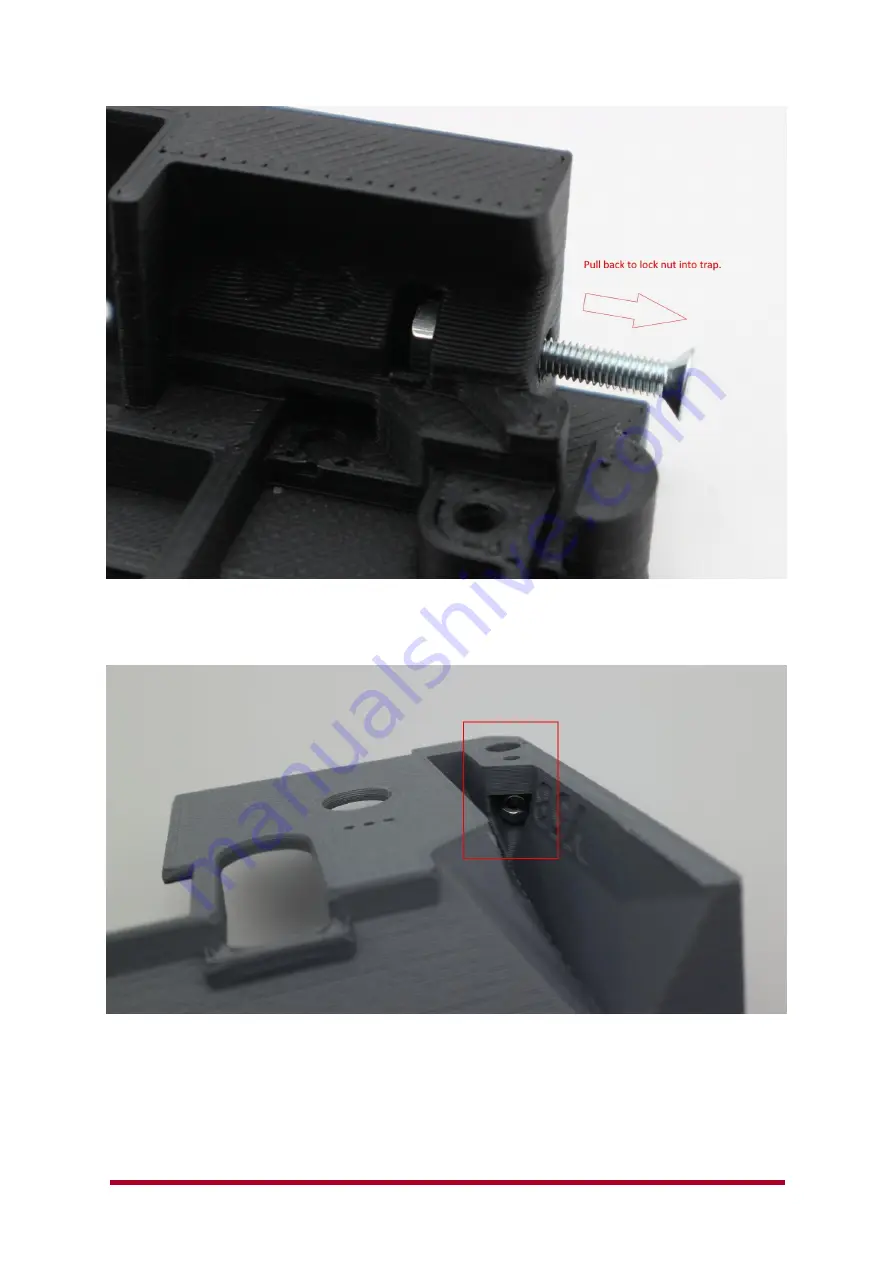
Use the supplied M3 x 20mm bolt to slightly grip the threads of the M3 nut, then pull the nut back 
into the nut trap, you should feel the nut firmly lock into the 3D printed material. Repeat for the 
other side of the base 

 back panel nut traps. 


The front lid section also has two nut traps. Drop an M3 nut into the pocket. 
 

Summary of Contents for MiSTer Multisystem

Page 1: ...ER MiSTer Multisystem user manual and operational guide 80 23024 3r1 Current Issue 3r1 23 03 2022 Previous Issues 3 10 03 2022 2r3 23 11 2021 2r2 22 11 2021 2r1 18 11 2021 2 18 11 2021 1 11 08 2021 Author Richard Horne Heber Ltd 2022 ...

Page 2: ...Document 80 23024 Issue 3r1 HEBER Easter Egg well done you found it now send me an e mail Richard Heber Ltd multisystem heber co uk ...

Page 3: ...SCART OUTPUT 37 7 3 FITTING SCART AND AN SSD HDD INTERNALLY 39 8 USING THE MULTISYSTEM 48 8 1 BEFORE YOU POWER ON 48 8 2 SNAC PORT 49 8 3 FUTURE EXPANSION 52 9 GENERAL WARNINGS FOR OPERATION 53 9 1 FAQ 53 9 1 1 Why does the SCART output not work with my TV Monitor Arcade 53 9 1 2 Sync issues with LCD Plasma OLED multisync trisync BVM PVM CRT 54 9 1 3 Audio sound output is not working 55 9 1 4 Why ...

Page 4: ...sions If you are using a Multisystem with the original Classic Version from 2021 enclosure then please see manual version 80 23024 2r3 This manual is specifically focused for the 2022 evolved enclosure Version 5 X used with the Multisystem motherboard Just before we begin this is not a MiSTer FPGA manual it does assume you are somewhat familiar with the MiSTer operation and terminology That said w...

Page 5: ... board from the Multisystem board Now check the Multisystem board has its switches jumpers and settings correctly configured to the standard positions please note you may need to change these later in the manual for the desired use The image above should be how your Multisystem board is delivered including an HDMI Bridge PCB ...

Page 6: ... a 3D printed enclosure from the RMCretro Shop or a deluxe kit The fittings pack is intended to be used with the 3D printed enclosure reference design if you are fitting the Multisystem into your own enclosure or have designed your own case you may find the fittings pack useful but it is not essential unless you intend to use the reference design enclosure All the following instructions in this us...

Page 7: ...pins 2 and 3 3 3v The MiSTer User port is used for direct connection of other devices Mt32Pi for example to the FPGA on the DE10 nano using 3 3v signals The SNAC mostly uses 5 0v for original gamepad Joystick paddle light gun and peripheral devices Check the option links J10 and J13 shown above are both in the Left hand position This will auto select a 4 3 mode for the SCART output and apply a 5v ...

Page 8: ...nalogue green channel output This will also apply SOG to the SCART output port as the signals are shared from the 15 way VGA P1 connector Some multisync trisync Arcade monitors may also require the Jumper J15 set to the alternative position shown below right image this disables the capacitor C22 from the Green video output SOG circuit Standard position option link jumper pins 1 2 Alternative posit...

Page 9: ...I output another device may switch on or off or not automatically be recognised as being on If you discover any undesired operation you can isolate various connections from the HDMI output using the SW1 switch shown above If you wish to isolate SW1 CEC or SW7 Hot plug detect or any of the other connections shown just change SW1 SW7 to the OFF position opposite to the image above Please note that o...

Page 10: ...lly important as you could snap the card if you try to install into the enclosure without first removing it 3 1 Recommended tools You should only require a Philips Number 1 screwdriver to install and setup your Multisystem If you have printed your own enclosure you may also require snips Tweezers or small pliers will also assist with assembly Retro snack is not essential but is very highly recomme...

Page 11: ...sue 3r1 HEBER Remove cover and brass stands from the DE10 nano development board you will not require these parts Fit the heatsink supplied if you bought a full kit or 3D printed enclosure from RMCretro to the FPGA ...

Page 12: ...down firmly The heatsink should bond to the device when warmed up during use it s a good idea to check that the heatsink has bonded after a few hours of initial use The official Real Time Clock module can also now be fitted if desired ...

Page 13: ...e 3r1 HEBER The DE10 nano switch positions should be as shown above standard for MiSTer Analogue I O Upper switches 2 and 4 down off and all others are in the Up position on All lower switches in the downwards position ...

Page 14: ...11 80 23024 Issue 3r1 HEBER 4 FITTING THE DE10 NANO You will need three plastic posts and 8 small screws for fitting the DE10 nano to the Multisystem ...

Page 15: ...24 Issue 3r1 HEBER Use three small screws provided to secure the plastic posts onto the Multisystem board Do not overtighten just make them secure Fit the micro USB cable and Ethernet patch cable as shown above ...

Page 16: ...lastic posts and the two rows of 40 pins Make sure to align the Pins on the DE10 nano board with the MiSTer Multisystem connectors Check both sides for correct alignment shown above We make connection to all the pins supplied by the DE10 nano so if any resistance is felt check the dual in line and single in line connectors are all vertically straight ...

Page 17: ... nano board Push down gently but firmly until the board is seated onto the connectors and plastic posts The SD Card and Reset button mount is an integrated 3D printed part that mounts onto the board and attaches to the corner of the DE10 nano as shown in the following steps ...

Page 18: ...system motherboard and fix in place with the supplied 3mm screws one on the back of the Multisystem and the other is securing the DE10 nano into the SD card post mount as seen above Fit the remaining screws to secure the other three corners of the DE10 nano to the Multisystem ...

Page 19: ...16 80 23024 Issue 3r1 HEBER Fit the red reset switch and the power switch cover as shown above ...

Page 20: ...ation calls for a nominal 9 5v signal and we supply a current limited 9 0v output If you find any SCART equipment that does not automatically switch 4 3 or 16 9 it would be good to know the make and model VGA also has a voltage select output this is J13 shown above and is normally set to 5V You can select 3 3v or remove the link to disable any output voltage on the VGA port The VGA output on MiSTe...

Page 21: ...18 80 23024 Issue 3r1 HEBER 5 2 Connect the USB and Ethernet cables Carefully bend the cables into the positions shown above and connect to the DE10 nano board ...

Page 22: ...version of the 3D printed enclosure you own check on the printed parts they should have version numbers as shown below If you have a Multisystem from 2022 it s most likely going to be a V5x model or higher The original V V2 V3 enclosure is shown on the left Version 5 x 2022 is shown on the right and below Initially available in Charcoal Black Fossil Grey and Cotton White PolyTerra matte PLA ...

Page 23: ...20 80 23024 Issue 3r1 HEBER The base and front lid sections contain M3 Nut traps these 4 M3 nuts must be fitted as shown below ...

Page 24: ... grip the threads of the M3 nut then pull the nut back into the nut trap you should feel the nut firmly lock into the 3D printed material Repeat for the other side of the base back panel nut traps The front lid section also has two nut traps Drop an M3 nut into the pocket ...

Page 25: ...22 80 23024 Issue 3r1 HEBER Now use the M3 x 20mm bolt to grab the nut onto a few threads of the M3 nut Now pull the bolt and the nut will slide into thew nut trap and be firmly secured in place ...

Page 26: ... lay it out onto the table Above shows the parts in a standard fixings kit if you bought your Multisystem enclosure from RMCretro You should already have used a few of these fixings in the steps above all other parts will be used for fitting the Multisystem motherboard into the 3D printed case Note Heatsink not shown but should be fitted to your DE10 nano board ...

Page 27: ...lace if you tilt the base on a slight angle Ideally fit them as above if you have any technical support issues we may ask you to press the blue yellow or red buttons If your 30mm case fan is not already fitted then fix to the base of the case as shown above note that fan colour and fixings supplied may look slightly different from the images above ...

Page 28: ...came with your Multisystem Carefully align both of the HDMI connectors and push the bridge board into place There is a stopping point that may not get fully engaged without a small level of force push firmly but gently until the bridge is fitted as per the above images ...

Page 29: ... when fitting the Multisystem board into the case Check that the PCB slides into the front of the case and that the buttons line up with the switches Fit the front two screws leave them loose for now and tighten later when the back panel is fitted ...

Page 30: ...27 80 23024 Issue 3r1 HEBER The front USB ports have a blanking plate fit the standard 4 port panel as supplied Also check the USB ports and screw holes for the PCB are aligned to the enclosure base ...

Page 31: ... side of the base plate the panel should self align vertically straight do not fit the back screws until the panel is correctly in place Now fit the last two m3 screws to secure the back of the Multisystem motherboard PCB tighten the front two screws when everything feels aligned ...

Page 32: ...29 80 23024 Issue 3r1 HEBER Now you can connect up the fan to either J7 3 3v or J8 5V this is a 5v fan but can run slower and quieter on a 3 3v connection ...

Page 33: ... 3 3v connection 3 3v will provide plenty of airflow to cool the DE10 nano and Multisystem board You are almost done just a few more steps Make sure to tuck the USB Hub cable behind the 3D printed section shown above This is important as it allows the back panel to be inserted and removed without catching on the USB cable Note the USB cable can be supplied in white or black ...

Page 34: ...tting the lid angle the yellow fuse shown above just slightly off vertical as shown in the image above Now you can fit the front section of the top cover onto the base Check that the SD card mount and reset switch aligns into the top cover ...

Page 35: ...32 80 23024 Issue 3r1 HEBER Fit the M3 x 20mm bolt into the base do not overtighten Repeat for the other side the front lid is now secured to the base ...

Page 36: ...w the last thing to do is to make up the thumbscrews as shown above These thumbscrews allow easy and quick access to the Multisystem motherboard settings cables and internal upgrades without also needing to take off the front cover ...

Page 37: ... the Multisystem you will need a good quality SCART cable ideally where all 21 pins are connected and the cable has a dedicated shield connection See below Look for a braided wire that connects to the SCART metal outer shell Unscrew the round cable clamp and remove the connector and wiring from the plastic shell ...

Page 38: ...35 80 23024 Issue 3r1 HEBER Now you can plug the SCART connector into the Multisystem push all the way down The SCART and or USB access panels can be snipped out of the back panel as shown above ...

Page 39: ...ER Gently place the SCART cable into the back panel slot as shown above and flatten down the many individual wires You can use a standard 3 2mm zip tie to secure the SCART cable onto the back panel strain relief as shown above ...

Page 40: ...the Japanese 21 pin connector as they have a different pin output For technical reference the SCART sync output is automatically combined from the VSync and HSync signals this combined sync is then connected to the SCART Composite sync output via a 68 Ohm resistor This combined sync means that you do not need to select composite sync output in the MiSTer INI file It can be enabled or disabled and ...

Page 41: ...If you have a multi sync monitor you may be able to see the output but as stated the VGA and SCART outputs should not be used at the same time If you do have the VGA scaler enabled for the analogue output it is also highly unlikely that the SCART device TV will display this signal correctly HDMI VGA or HDMI SCART can both be used together Please also be aware that each MiSTer core can override the...

Page 42: ...internally USB SSD drives can be connected to the Multisystem to external USB 2 0 ports or via the internal USB headers You have two options for mounting an internal 2 5 SSD HDD or similar storage device Above shows that standard mount if you are not using SCART ...

Page 43: ...connection it is recommended that the internal SSD is fitted via the side screws with the SSD facing up Depending on what SATA to USB adaptor you are using the goal is to have the USB cable away from the area around the SCART cable as shown in the images above and below ...

Page 44: ...41 80 23024 Issue 3r1 HEBER There is a lot of space inside for cables but they do need to be routed inside the case correctly to allow the back panel to slide in and out of the base ...

Page 45: ...u wish to use an internal USB connection or make use of the back panel cable exit for a USB cable See below for further information You can also use the back cover without any additional devices fitted The back cover can simply be inserted into the groove mounts of the base ...

Page 46: ... a little extra wiggle room when fitting both the SSD and SCART with internal cables see above If you find it a little tricky to fit on the back cover follow the angled insertion as shown above side in the shorter corner 1 and then rotate the cover around so that the second groove mount 2 locates and slides towards the front cover lip ...

Page 47: ...SB devices SUB SATA cable shown above Ideally use 5 pin or 10 pin connectors as these have the Ground GND and shield connected 5 pin cables have a screened cable Some 4 pin cables may also include a screened wire connecting to the Ground pin this is also good to use with USB 2 X devices 4 pin connectors with unscreened cables are available but are not recommended with the Multisystem or any USB 2 ...

Page 48: ...PCB and connect the Red wire 5v the cable should then have the USB White Green and then Ground GND and Shield Usually both black The back USB 2 0 ports have internal connections at J22 remember if you use the internal connections you cannot use the external USB ports at the same time USB connections ...

Page 49: ...46 80 23024 Issue 3r1 HEBER Remember to fit the rubber feet Supplied Into the four corners of the underside of the base ...

Page 50: ...ulations Your Multisystem is now assembled and ready for some classic gaming Visit the MiSTer Wiki to get started Home MiSTer devel Main_MiSTer Wiki GitHub Don t forget to now eat your retro snack if you selected that option at the start ...

Page 51: ...D The Multisystem has a number of protection devices and circuits to help with overload overvoltage overcurrent and thermal protection If you get close to the 4A limit of the recommended power supply then the thermal overcurrent fuse should trip out to help protect your power supply and Multisystem board This Polyfuse should self reset after some time being switched off Ideally use low power devic...

Page 52: ...ting MiSTer I O board Standard SNAC adaptors can be used directly in the Multisystem SNAC port Sega 9 pin is shown above The SNAC port on the Multisystem has a built in level shifter so the dongle device shown above is not required if you intend to use classic gaming controllers directly connected to the SNAC port A short USB 3 0 extension cable can also be used to locate the SNAC boards more conv...

Page 53: ...e 3r1 HEBER To use the Gameboy link cable the switch SW7 should be in the right position This is because the Gameboy was a lower voltage handheld device Most other consoles use 5v for gamepad and peripheral connection ...

Page 54: ...51 80 23024 Issue 3r1 HEBER Note that with the Super Nintendo SNES the adaptor board is fitted upside down as shown above ...

Page 55: ...he following Full JAMMA edge finger connection and CPS kick connection Raspberry Pi cartridge USB expansion zero delay game controllers for example DaemonBite compatible Solid state storage M2 SATA for example I O expansion ports for connection of hardware devices etc Composite video and or s video output more we want to hear from you What would you like to see on the expansion port Internal stora...

Page 56: ...cade Usually for the following reasons 1 The Mister INI file has the incorrect settings see section 7 2 above 2 Some FPGA cores are set to run at higher resolutions that will never output an RGB SCART signal that a CRT TV or Arcade monitor will accept For example the MiSTer Memory test core will display fine on a modern VGA and HDMI but not for a 15Khz CRT screen monitor 3 The SCART output provide...

Page 57: ...splay but also a few CRT s may ignore this signal and require you to select RGB input source etc The SCART output should work with more modern LCD Plasma and OLED screens that still have a SCART input port but it s impossible to test all possible combinations and displays that may support the SCART standard or not We have aimed to make the SCART output conform to the specification and be as compat...

Page 58: ...ontact with us with the make and model of the display and also details of whatever cable you are using to connect up the Multisystem to the display via SCART or VGA We will do our best to help you Also please remember to check the MiSTer INI settings when using the Analogue VGA or SCART output Sending out a higher resolution image into a display CRT TV that s designed to accept a low resolution 15...

Page 59: ... 1 4 Why is there a slot on the SD card mount The Micro SD card used in the MiSTer Multisystem can be fitted into the slot in the SD card mount This can be used for spare SD card storage or allowing a quick swap of a second SD card ...

Page 60: ...ity lead casual support with other Multisystem owners If you wish to raise a support request about your Multisystem hardware please email support rmcretro store Tweet us MultisystemFPGA Show us your setup and how you are using the Multisystem The official MiSTer Forum is also here if you need it MiSTer FPGA Forum Index page https misterfpga org And a big thank you to the wonderful proof readers of...

Page 61: ...ltisystem or if you have a question support request 10 1 3D Printed Enclosure Files for the 3D printed enclosure can be found on the Prusa Printers website https www prusaprinters org prints 75605 mister multisystem classic gaming console 3d print files 10 2 Multisystem PCB board reference The Multisystem PCB key component references and Pin1 indication etc ...

Page 62: ...ltisystem PCB key component functions 10 4 Expansion port connections We plan to make a number of expansion modules but you may also wish to make your own Here are some key technical details to assist you If you require any further information please e mail multisystem heber co uk ...

Page 63: ...60 80 23024 Issue 3r1 HEBER ...

Reviews: