background image

 Model:

 Net Monitor

13

14

Network Series - User Guide

Copy Function

Pressing Copy will allow you to copy the switching times from one thermostat to other individual thermostats or to 
a group of thermostats. To copy to other individual thermostats, simply tick the thermostats you want to copy to and 
then press Apply. To copy to a group of thermostats, select the group in the pull down list at the top and then press 
Apply (See the Groups section for more information on adding or deleting groups).

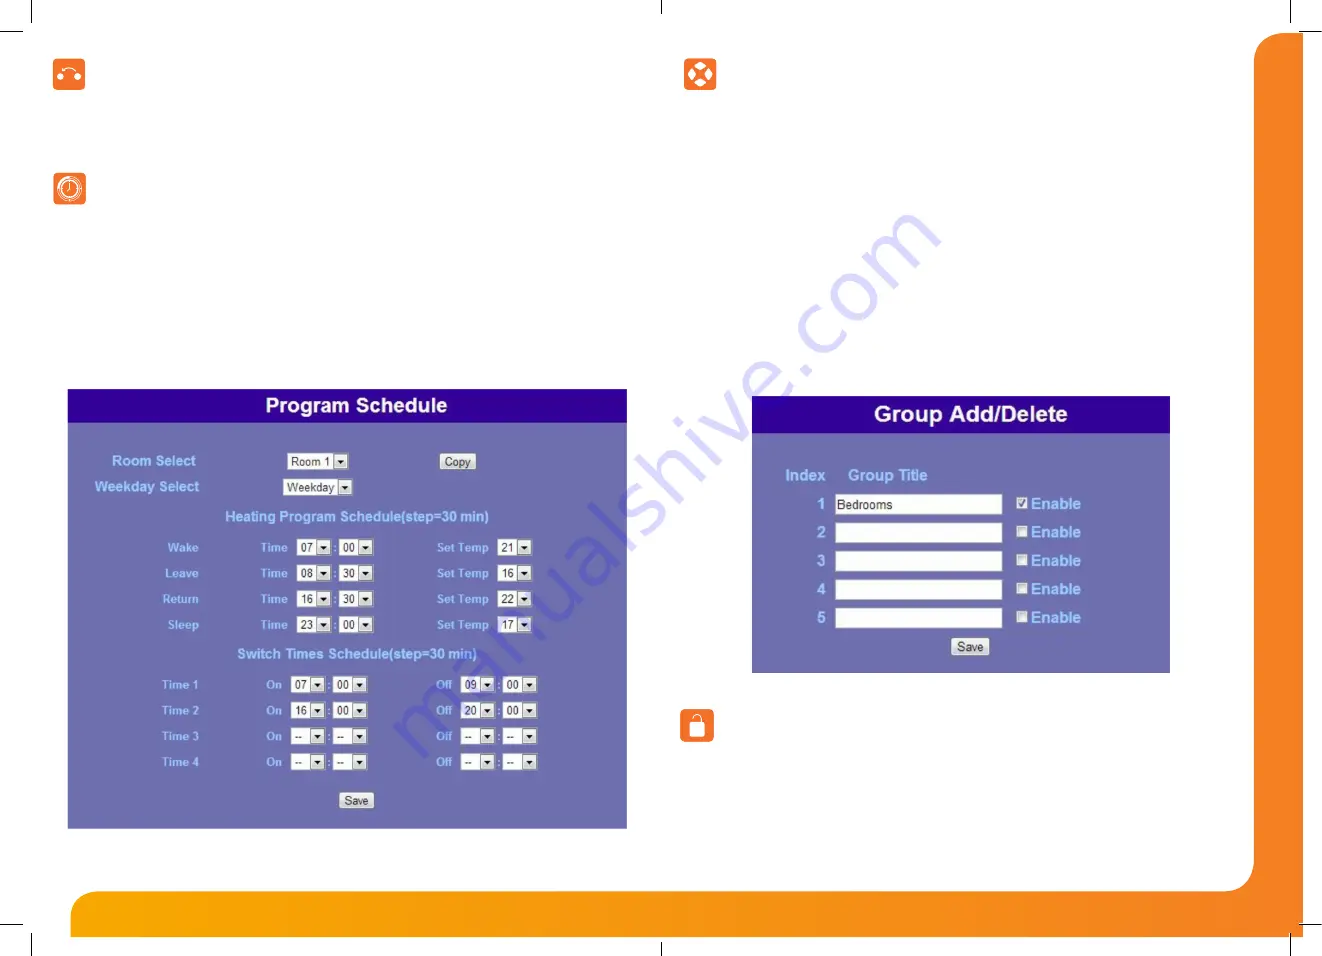
Pressing Program Schedule allows you to program the comfort levels / switching times for each thermostat 
connected to your NetMonitor.
The Program Schedule view will change depending on the model of the thermostat being controlled.

Weekday select: Here you can select between Weekday/Weekend or each day of the week. The program mode is 
configured at the thermostat.
You can then program the desired comfort levels by programming a time and a desired temperature. If the 
thermostat being controlled is a time clock or a PRTHW-N (Heating / Hot water model) then you can program the 
switching times as shown.

Program Schedule

Groups

You are able to create up to 5 groups within the NetMonitor. Groups provide a much easier method of copying 
data between a set of thermostats. For example, you may want to group the bedrooms as 1 group and the 
living/dining areas as another.

To create a group follow these steps;

• Press Groups.
• Press Add/Delete Groups.
• You can now enter the name for the new group.
• Tick enable and press Save.

Now select the group you’ve created from the drop down list at the top of the screen & tick the rooms which 
belong to this group.

• Press Save.

To delete a group follow these steps;

• Press Groups.
• Press Add/Delete Groups.
• You can delete the title and remove the tick in the enable box.
• Press Save.

Keylock

The KeyLock function allows you to lock the thermostat displays in individual rooms or an entire group.
To enable keylock, follow these steps;

• 

To lock individual, simply tick the rooms and then press Apply.

• 

To lock a group of rooms, select the group in the pull down list and then press either Lock or Unlock.

(See Groups for more information on adding or deleting groups.

Summary of Contents for NetMonitor + V3

Page 1: ...Installation User Guide NetMonitorV3 NetMonitor V3...

Page 2: ...ress Fixed or Dynamic Checking the NetMonitors IP address Thermostat Set up Sensor Set up Input Set up Reset Network Settings Output Set up Email Set up 4 5 6 6 7 8 Table Of Contents 3 3 4 5 6 6 7 9 1...

Page 3: ...able If the IP address of both the PC NetMonitor are in different ranges you cannot configure the NetMonitor on a wireless connection Once you can connect to the NetMonitor you can then change its IP...

Page 4: ...will have a firewall which is designed to block unwanted incoming Internet traffic This means that you will not be able to access the NetMonitor without adjusting the configuration of your router To g...

Page 5: ...menu and assign a unique comms number on feature 06 For example if you have 12 thermostats on the system access feature 06 on each one numbering them 1 12 Make a note of the comms number and room so y...

Page 6: ...on by email sms should your alarm be triggered To set up the NetMonitor Inputs follow these steps Click Input Setup you will see a screen like this You can now enter the title for each input on the Ne...

Page 7: ...tting programmed within each thermostat To enable manual setback follow these steps To set individual rooms into setback mode simply tick the rooms and then press Apply To set a group of rooms into se...

Page 8: ...olled is a time clock or a PRTHW N Heating Hot water model then you can program the switching times as shown Program Schedule Groups You are able to create up to 5 groups within the NetMonitor Groups...

Page 9: ...will see the programmed return time and date on the NetMonitor To cancel the holiday early you need to press Home on the NetMonitor You also have the option of controlling your heating system from you...

Page 10: ...sage is returned Network An SMS Message is sent to you indicating the IP Username Password settings of your NetMonitor SMS Message Example Stat xx Stat xx will reply with the full status information S...

Page 11: ...ifications directly on our website www heatmiser com PDF FAQ Heating Professionals Request a copy of our product installation guide containing detailed technical specifications for our complete produc...

Reviews: