background image

Heatilator  •  NDI30-C, NDI30-SP, NDI35-C, NDI35-SP, NDI30-SPFK, NDI35-SPFK  •  2226-901 Rev. K  •  11/12  

26

A. Fuel Conversion

•  Make sure the appliance is compatible with available gas 

types.

•  Conversions must be made by a qualifi ed  technician 

(NFI certifi ed or factory-trained) using Hearth & Home 
Technologies specifi ed and approved parts.

B. Gas Pressure

•  Optimum appliance performance requires proper input 

pressures.

•  Gas line sizing requirements will be determined in ANSI 

Z223.1 National Fuel Gas Code in the USA and CAN/
CGA B149 in Canada.

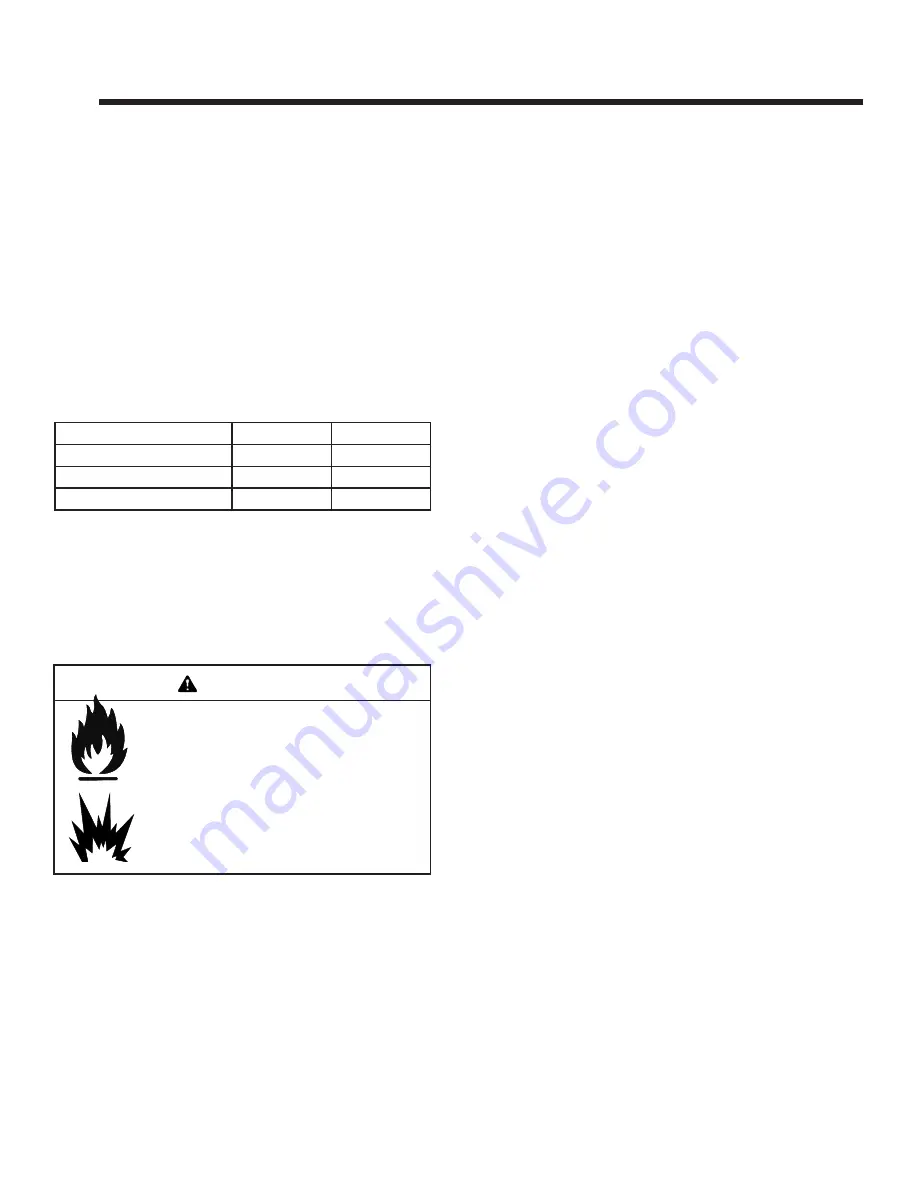
•  Pressure requirements are:

C. Gas Connection

 •  Refer to Reference Section 14 for location of gas line 

access in appliance.

•  Gas line may be run through knockout(s) provided.

•  The gap between supply piping and gas access hole may 

be caulked with caulk with a minimum of 300ºF continuous 
exposure rating or stuffed with non-combustible, unfaced 
insulation to prevent cold air infi ltration.

•  Ensure that gas line does not come in contact with outer 

wrap of the appliance. Follow local codes.

•  Pipe incoming gas line into valve compartment.

•  Connect incoming gas line to the 1/2 in. (13 mm) 

connection on manual shutoff valve.

WARNING! Risk of Fire/Explosion! Support control 
when attaching pipe to prevent bending gas line.

•  A small amount of air will be in the gas supply lines. 

WARNING! Risk of Fire/Explosion! Gas build-up during 
line purge could ignite. 

•  Purge should be performed by technician certifi ed by 

NFI or factory-trained. 

•  Ensure adequate ventilation. 
•  Ensure there are no ignition sources such as sparks 

or open fl ames.

Light the appliance. It will take a short time for air to purge 
from lines. When purging is complete the appliance will 
light and operate normally.

WARNING! Risk of Fire, Explosion or Asphyxiation! 
Check all fi ttings and connections with a non-corrosive 
commercially available leak-check solution. DO NOT use 
open  fl ame. Fittings and connections could have loos-
ened during shipping and handling.

WARNING! Risk of Fire! DO NOT change valve settings. 
This valve has been preset at the factory. 

WARNING! Risk of Fire/Explosion! High pressure will 
damage valve. Low pressure may cause explosion.

•  Verify inlet pressures. Verify minimum pressures when 

other household gas appliances are operating. 

•  Install regulator upstream of valve if line pressure is 

greater than 1/2 psig.

Gas Information 


Note: 

Have the gas supply line installed in accordance with 

local codes, if any. If not, follow ANSI 223.1. Installation 
should be done by a qualifi ed installer approved and/or 
licensed as required by the locality. (In the Commonwealth 
of Massachusetts installation must be performed by a 
licensed plumber or gas fi tter).

Note: 

A listed (and Commonwealth of Massachusetts ap-

proved) 1/2 inch (13 mm) T-handle manual shut-off valve 
and fl exible gas connector are connected to the 1/2 inch 
(13 mm) control valve inlet. 

•  If substituting for these components, please consult 

local codes for compliance.

D. High Altitude Installations

NOTICE: If the heating value of the gas has been reduced, 
these rules do not apply. Check with your local gas utility 
or authorities having jurisdiction.

When installing above 2000 feet elevation:

•  In the USA: Reduce burner orifi ce 4% for each 1000 feet 

above 2000 feet.

•  In the CANADA: Reduce burner orifi ce 10% for elevations 

between 2000 feet and 4500 feet. Above 4500 feet, 
consult local gas utility.

Fire Risk.

Explosion Hazard.

High pressure will damage valve.

•  Disconnect gas supply piping BEFORE 

pressure testing gas line at test pressures 
above 1/2 psig.

•  Close the manual shutoff valve BEFORE 

pressure testing gas line at test pressures 
equal to or less than 1/2 psig.

WARNING

Gas Pressure

Natural Gas

Propane

Minimum inlet pressure

5.0 in. w.c.

11.0 in. w.c.

Maximum inlet pressure

10.0 in. w.c.

13.0 in. w.c.

Manifold pressure

3.5 in. w.c.

10.0 in. w.c.

Summary of Contents for NDI30-C

Page 1: ...e is only for use with the type s of gas indicated on the rating plate Installation and service of this appliance should be performed by qualified personnel Hearth Home Technologies suggests NFI certi...

Page 2: ...ouble free enjoyment Welcome to the Heatilator family of fireplace products We recommend that you record the following pertinent information about your fireplace Gas and Electric Information Serial Nu...

Page 3: ...iance System 15 B Design and Installation Considerations 16 C Tools and Supplies Needed 16 D Inspect Appliance and Components 16 5 Fireplace Size Requirements A Minimum Fireplace Opening 17 B Mantel a...

Page 4: ...the date of original purchase In the case of new home construction warranty coverage begins on the date of first occupancy of the dwelling or six months after the sale of the product by an independen...

Page 5: ...QLVKHV DV D UHVXOW RI QRUPDO XVH V D KHDWLQJ DSSOLDQFH VRPH FKDQJHV LQ FRORU RI LQWHULRU DQG H WHULRU VXUIDFH ILQLVKHV PD RFFXU 7KLV LV QRW D IODZ DQG LV QRW FRYHUHG XQGHU ZDUUDQW DPDJH WR SULQWHG SOD...

Page 6: ...uced these rules do not apply Check with your local gas utility or authorities having jurisdiction When installing above 2000 feet elevation In the USA Reduce input rate 4 for each 1000 feet above 200...

Page 7: ...nologies if the barrier is not present or help is needed to properly install one HOT SURFACES Glass and other surfaces are hot during operation AND cool down Hot glass will cause burns DO NOT touch gl...

Page 8: ...structions supplied with the control installed to operate your fireplace For safety Install a switch lock or a wall remote control with child protection lockout feature Keep remote controls out of rea...

Page 9: ...smell next to the floor because some gas is heavier than air and will settle on the floor WHAT TO DO IF YOU SMELL GAS DO NOT try to light any appliance DO NOT touch any electric switch do not use any...

Page 10: ...fireplaces com A This appliance has a pilot which must be lighted by hand When lighting the pilot follow these in structions exactly B BEFORE LIGHTING smell all around the appliance area for gas Be su...

Page 11: ...or 20 to 40 minutes Odor from appliance When first operated this appliance may release an odor for the first several hours This is caused by the curing of the paint and the burning off of any oils rem...

Page 12: ...ce ap pointment More frequent cleaning may be required due to lint from carpeting or other factors Control compartment burner and circulating air passageway of the appliance must be kept clean CAUTION...

Page 13: ...sed to heat Confirm there is no damage to glass or glass frame Replace as necessary Verify that fixed glass assembly is properly retained and attachment components are intact and not damaged Replace a...

Page 14: ...ies have been removed from battery back up IPI systems to prevent premature battery failure or leaking For optimal battery life locate the battery pack outside of the control cavity on the hearth This...

Page 15: ...rations diagrams are not drawn to scale Actual product may vary from pictures in manual VERTICAL TERMINATION CAP SECTION 8 F VENT PIPE SECTION 8 GAS LINE SECTION 9 ACCESS THROUGH EXISTING MASONRY OR W...

Page 16: ...ronts may be shipped in separate packages If packaged separately the log set and appliance grate must be installed Report to your dealer any parts damaged in shipment particularly the condition of the...

Page 17: ...arts of the fireplace in which the gas fireplace insert is to be installed is prohibited except the floor as tested for and as noted above and in Figure 5 1 A minimum 1 2 inch gap from the bottom of t...

Page 18: ...34 5 8 879 30 1 2 775 C Glass Opening Width 31 9 16 802 27 7 16 697 D Glass Opening Height 15 11 16 398 12 13 16 325 E Height Front 24 610 20 1 2 521 F Height Rear 21 1 16 535 17 5 8 448 G Unit Depth...

Page 19: ...bove combustible material or outer wrap of factory built firebox Combustible facings must not extend behind the insert surround For non combustible material specifications refer to Section 1 E Figure...

Page 20: ...Over 18 12 to 20 12 7 5 Over 20 12 to 21 12 8 0 Figure 6 1 Minimum Height From Roof To Lowest Discharge Opening 3 foot minimum in snow regions HORIZONTAL OVERHANG VERTICAL WALL GAS DIRECT VENT TERMIN...

Page 21: ...as no gas access hole provided an access hole of 1 inch 25 mm diameter or less may be drilled through the lower sides or bottom of the firebox in a proper workmanship like manner This access hole must...

Page 22: ...NOT connect this gas appliance to a chimney flue serving a separate solid fuel or gas burning appliance May impair safe operation of this appliance or other appliances connected to the flue Vent this...

Page 23: ...Aminimum 1 2 inch gap from the bottom of the appliance to a metal surface is RECOMMENDED for optimal fan performance See Figure 5 1 Position any excess flexible vent pipe back up into chimney without...

Page 24: ...24 E Remote Control The receiver for the remotes may be installed BETWEEN the base pan of the insert and the firebox of the wood burning fireplace or in the control cavity of the insert See Figure 8...

Page 25: ...hing on cap by removing 3 screws Connect both the LINK ZC ADPB to Class A Pipe and the termination cap to the LINK ZC ADPB with the self tapping screws provided OPTIONAL LINK ZC ADPB FOR USE WITH CLAS...

Page 26: ...mmercially available leak check solution DO NOT use open flame Fittings and connections could have loos ened during shipping and handling WARNING Risk of Fire DO NOT change valve settings This valve h...

Page 27: ...e protected with ground fault circuit interrupter protection in compliance with the applicable electrical codes when it is installed in locations such as in bathrooms or near sinks Low voltage and 120...

Page 28: ...GNITOR I S GROUND TO FIREPLACE CHASSIS BATTERY PACK ORG WHT WALL SWITCH OR REMOTE CONTROL BRN BRN ON OFF ON OFF NOTE 1 4 IN FEMALE SPADE CONNECTORS CONNECT TO THE REMOTE WIRE ASSEMBLY REMOTE WIRE ASSE...

Page 29: ...for a wiring diagram for a blower or remote Wiring for optional Hearth Home Technologies approved accessories should be done now to avoid reconstruction Follow instructions that come with those acces...

Page 30: ...ed Remove the four screws on the cover plate see Figure 10 6 Install and wire the fan per instruction shipped with the fan Figure 10 5 also shows a wiring diagram Models NDI30 C NDI30 SP NDI35 C and N...

Page 31: ...e board etc Clearance to combustible material under the insert is 1 4 inch 6 mm Clearance from top of fireplace opening for combustibles extending 12 inches max is 12 inches Use leveling legs to raise...

Page 32: ...ly placed embers interfere with proper burner operation Ember material is shipped with this gas appliance To place the ember material Embers CANNOT be placed directly over ports Care should be taken n...

Page 33: ...ails Mate the slot located on the bottom of Log 2 with the log pin located on the right side of the burner Move the right end of Log 2 forward until it comes into contact with the grate tine GRATE GRA...

Page 34: ...ot of Log 2 Position the back end of the log on the flat spot of Log 1 Figure 10 shows the log set properly installed LOG TOUCHES LOG TOUCHES GRATE TINE GRATE TINE PLACE TOP END OF PLACE TOP END OF LO...

Page 35: ...706 Position Log 2 as shown in Figure 4 Refer to Figure 2 and Figure 5 for additional details Mate the slot located on the bottom of Log 2 with the left log pin located on the burner top Rotate the l...

Page 36: ...g 6 BASE TINE BASE TINE GROOVE GROOVE 4 4 5 5 Figure 6 Log 3 Figure 7 Log 3 Log 3 SRV2224 702 Position Log 3 as shown in Figure 6 Refer to Figure 2 and Figure 7 for location of reference points Mate t...

Page 37: ...for cracks chips or scratches DO NOT strike slam or scratch glass DO NOT operate fireplace with glass removed cracked broken or scratched Replace as a complete assembly Removing Fixed Glass Assembly...

Page 38: ...ocouple connection at the gas valve is fully in serted and tight hand tighten plus 1 4 turn Verify proper voltage output from the thermocouple to the valve Place one millivolt meter lead wire on the t...

Page 39: ...tank Refill the fuel tank B Improper gas inlet pressure Natural gas should be 5 14 in w c LP should be 10 14 in w c Verify pressure with manometer C Inner vent pipe leaking exhaust gases back into th...

Page 40: ...led and plugged into module Check voltage of transformer under load at spade connection on module with ON OFF switch in ON position Acceptable readings of a good transformer are between 3 2 and 2 8 vo...

Page 41: ...ot orifice is installed and gas inlet is set to pressure specifications Polish flame sensing rod with fine steel wool to remove any contaminants that may have accumulated on flame sensing rod C Module...

Page 42: ...30 1 2 775 C 31 9 16 802 27 7 16 697 D 15 11 16 398 12 13 16 325 E 24 610 20 1 2 521 F 21 1 16 535 17 5 8 448 G 15 7 8 403 14 5 8 372 H 11 3 4 298 10 1 8 257 I 20 3 8 518 17 432 J 1 3 4 44 1 3 4 44 M...

Page 43: ...udes two liners termination cap flashing and link adapter Figure 14 2 Direct Vent Flex Liner Kits Figure 14 3 Direct Vent Flex Liner Accessory Kits Direct Vent Flex Liner Accessory Kits see Figure 14...

Page 44: ...6 Log 6 SRV2206 704 7 Termination Plate Assembly 2206 012 Flex Pipe Handle 438 351 Gasket 2206 401 8 Grate Assemby 2226 016 9 Burner Assembly 2226 008 Y 10 Base Pan 2206 127 11 Valve Assembly Refer t...

Page 45: ...224 702 4 Log 4 SRV2224 703 5 Log 5 SRV2224 704 6 Log 6 SRV2224 705 7 Fireplace Termination Assembly 2205 012 Flex Pipe Handle 438 351 Gasket 2206 401 8 Grate Assemby 2224 016 9 Burner Assembly 2224 0...

Page 46: ...I30 C 582 835 Y Orifice LP 51C 582 851 Y Orifice NG 33C NDI35 C 582 833 Y Orifice LP 50C 582 850 Y 11 5 Flexible Gas Connector 530 302A Y 11 6 Control Panel Bracket 2205 128 11 7 Valve Bracket 2205 14...

Page 47: ...embly LP 2103 011 Y Pilot Tube SRV485 301 Y Thermocouple 446 511 Y Thermopile 2103 512 Y 11 4 Orifice NG 33C NDI35 SP 582 833 Y Orifice LP 50C 582 850 Y Orifice NG 35C NDI30 SP 582 835 Y Orifice LP 51...

Page 48: ...s Set Only NDI30 BRICK NDI30 NDI35 BRICK NDI35 Rheostat Temp Sensor Assembly SRV2206 800 Y Temp Sensor Assembly 046 018A Y Touch up Paint TUP GBK 12 Wire Assembly SP Only 2020 069 Y Standing Pilot Con...

Page 49: ...______________________________________________________ ________________________________________________________________________________ ________________________________________________________________...

Reviews: