background image

2

598-1119-05

INDOOR PLUG-IN RECEIVER

Features and Ratings:
• Up to 500 Watt maximum incan-

descent load.

• Up to 300 Watt maximum fluo-

rescent load.

• Up to 400 Watt maximum TV

load.

• Up to 1/3 Hp maximum motor load.
• No wiring required.

Operation

Note:  When using two or more receivers, the
receivers should be placed at least 10 feet apart
for best performance.
1. Plug in indoor receiver.
2. Plug in lamp or appliance you wish to control.

Caution: Do not exceed the maximum load
limits listed above.

3. Toggle ON/OFF switches on remote control

to check operation. 

Note: Red light on remote

should come on while button is depressed.
Important: Wait 1 to 2 seconds after you
press the transmitter button before you press
it again to allow the transmission to be
completed.

Note: If plugged in lamp or appliance does not
turn on or off when remote buttons are pushed,
see Troubleshooting section.

INDOOR/OUTDOOR RECEIVER

Features and Ratings:
• Rated for 120VAC/60Hz supply

voltage.

• Up to 13 Amps maximum resis-

tive load.

• Up to 960 Watt maximum incan-

descent load.

• Up to 960 Watt maximum fluorescent load.
• Up to 1/3 Hp maximum motor load.
• No wiring required.

Operation

Note:  When using two or more receivers, the
receivers should be placed at least 10 feet apart
for best performance.
1. Plug in Indoor/Outdoor Receiver. Remem-

ber, the Indoor/Outdoor Receiver requires a
grounded outlet. If you do not have a grounded
outlet, you may want to contact an electrician
to upgrade your electrical system. If you are
using the Indoor/Outdoor Receiver outdoors,
see extra precautions below.

Precautions When Using the Indoor/

Outdoor Receiver Outdoors

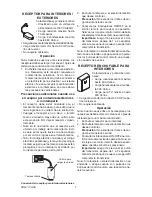
• The receiver must be oriented with the power

outlet down to prevent rain from entering the
unit. See illustration.

• Hang the receiver on a nail or screw as shown.

There is a hole in the back for this purpose.
DO NOT allow receiver to hang by the cord.

• Note in the illustration that the receiver is

located below the wall outlet. This is to pre-
vent rain from running down the cord into the
wall outlet.

Note: The National Electrical Code and Cana-
dian Electrical Code (and most local codes)
require that outside outlets be protected by a
Ground Fault Interrupter (GFI).

2. Plug in lamp or appliance you wish to control.

Caution: Do not exceed the maximum load
limits listed above.

Hole to Hang Unit

Power Outlet

Connecting Indoor/Outdoor Receiver

3. Toggle ON/OFF switches on remote control

to check operation. 

Note: Red light on remote

should come on while button is depressed.
Important: Wait 1 to 2 seconds after you
press the transmitter button before you press
it again to allow the transmission to be
completed.

Note: If plugged in lamp or appliance does not
turn on or off when remote buttons are pushed,
see Troubleshooting section.

Summary of Contents for 598-1119-05

Page 1: ...pical use the battery will last approximately one year Remove battery when remote will not be used for an extended period of time To replace the battery follow the instructions below 1 Place remote control face down on a flat surface 2 Remove screw on bottom of remote with a small phillips head screwdriver 2 BUTTON REMOTE CONTROL ON OFF 3 Gently insert a small flat head screwdriver between the two...

Page 2: ...g in Indoor Outdoor Receiver Remem ber the Indoor Outdoor Receiver requires a groundedoutlet Ifyoudonothaveagrounded outlet you may want to contact an electrician to upgrade your electrical system If you are usingtheIndoor OutdoorReceiveroutdoors see extra precautions below Precautions When Using the Indoor Outdoor Receiver Outdoors The receiver must be oriented with the power outlet down to preve...

Page 3: ...operly Follow the instruc tions below for setting a new channel WARNING ShockHazard Unplugreceiverfrom power source before changing channels 1 Locate dip switches on both the transmitter and receiver unit s 2 To change the channel slide dip switches to ON or OFF as needed It is recommended to only change one dip switch at a time and then check to see if system is functioning properly IMPORTANT Dip...

Page 4: ...UCTS TROUBLESHOOTING GUIDE POSSIBLE CAUSE 1 Circuit breaker is tripped or turned off or fuse is blown 2 Switch on lamp or appliance is turned off 3 Lamp or appliance is defec tive 4 Interrupted by another de vice 5 Signals from transmitter are being blocked or transmitter is out of range 6 Weakbatteryinthetransmitter 7 Dip switches on transmitter and receiver units do not match 8 Receivers are too...

Page 5: ...mbled products and is not extended to other equipment and components that a customer uses in conjunction with our products THIS WARRANTY IS EXPRESSLY IN LIEU OF ALL OTHER WARRANTIES EXPRESS OR IMPLIED INCLUDING ANY WARRANTY REPRESENTATION OR CONDITION OF MERCHANT ABILITY OR THAT THE PRODUCTS ARE FIT FOR ANY PARTICULAR PURPOSE OR USE AND SPECIFICALLY IN LIEU OF ALL SPECIAL INDIRECT INCIDENTAL OR CO...

Page 6: ...proximadamente un año Retire la batería cuando al control remoto no se lo vaya a usar por un largo período Para reemplazar la batería siga estas instruc ciones 1 Coloque el control remoto boca abajo sobre una superficie plana 2 Retire el tornillo de la parte inferior del control usando un destornillador Phillips estrella pequeño CONTROL REMOTO DE 2 BOTONES ON OFF 3 Inserte con delicadeza un destor...

Page 7: ...s exterio res Recuerde este receptor requiere un tomacorriente polarizado Si no tiene un tomacorriente polarizado debe contratar a un electricista para actualizar su sistema eléctrico Si usa su receptor para interiores exteriores a la intemperie vea mas abajo las precauciones adicionales Precauciones adicionales cuando use el receptor para interiores exteriores a la intemperie El receptor debe est...

Page 8: ...receptor de la fuente de alimentación antes de cambiar los canales 1 Ubique los interruptores de circuito impreso tanto en la s unidad es transmisora s como receptora s 2 Para cambiar el canal mueva los interrup tores de circuito impreso a las posiciones ON u OFF según se necesite Es recomen dable cambiar sólo un interruptor a la vez y luego revisar para ver si el sistema está funcionando apropiad...

Page 9: ...lec trodoméstico no se enciende La lámpara o el elec trodoméstico no se apaga La lámpara o el elec trodoméstico se en ciende al azar SOLUCIÓN 1 Reconecte el disyuntor o reem place el fusible 2 Verifique que el interruptor de la lámpara o del electrodoméstico esté encendido 3 Pruebe usando una lámpara o electrodoméstico diferente 4 Cambie los canales en las unida des transmisoras y receptoras 5 Rev...

Page 10: ... ajuste y calibración debido al mal uso abuso o negligencia bombillas baterías u otras partes fungibles no están cubiertas por esta garantía Los Servicios no autorizados o modificaciones del producto o de cualquier componente que se provee invalidarán esta garantía en su totalidad Esta garantía no incluye reembolso por inconveniencia instalación tiempo de instalación perdida de uso servicio no aut...

Page 11: ...nviron un an Retirez la pile si vous prévoyeznepasvousservirdelatélécommande pendant une période prolongée Pour remplacer la pile suivez les directives ci dessous 1 Placez la télécommande à plat la partie avant en dessous 2 Retirez la vis au bas de la télécommande au moyen d un petit tournevis Phillips 3 Insérez délicatement un petit tournevis plat dans la jonction au bas de la télécommande puis f...

Page 12: ...ndement 1 Branchez le récepteur intérieur extérieur Cet appareil exige une prise mise à la terre Si la prise n est pas mise à la terre contac tez un électricien pour faire réparer votre système électrique Si vous vous servez de ce récepteur à l extérieur lisez les précau tions supplémentaires plus loin Précautions à prendre lors de l utilisation du récepteur à l extérieur La prise électrique du ré...

Page 13: ...essous pour programmer une nouvelle voie MISE EN GARDE Risque de choc électrique Débranchez le récepteur de la prise électri que avant de modifier les canaux 1 Trouvez les commutateurs DIP de la télécommande et du récepteur 2 Pour changer de voie placez les commuta teurs DIP en position ON ou OFF selon le cas On recommande de modifier la posi tion d un seul commutateur DIP à la fois puis de vérifi...

Page 14: ...areil ne se met pas sous tension Lalampeoul appareil ne se met pas hors tension La lampe ou l appa reil se met sous ten sion au hasard SOLUTION 1 Réenclenchez le disjoncteur ou remplacez le fusible 2 Assurez vous que l interrupteur de la lampe ou de l appareil est en position ON 3 Faites un essai au moyen d un autre appareil 4 Changez de voie sur l émetteur et le récepteur 5 Vérifiez si un objet m...

Page 15: ...corrigée gratuitement Pour obtenir un remboursement ou un remplacement composez le 1 800 858 8501 pour obtenir des instructions Exclusions de la garantie Réparations réglage et calibrage dus à une mauvaise utilisation un mauvais traitement ou à la négligence Les ampoules les piles et des autres articles non durables ne sont pas couverts par cette garantie Le service non autorisé ou la modification...

Page 16: ..._______ _________________________________________________ _________________________________________________ _________________________________________________ _________________________________________________ _________________________________________________ _________________________________________________ _________________________________________________ __________________________________________...

Reviews: