background image

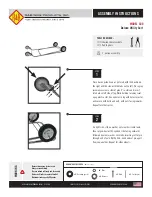
We recommend each operator of the pitching machine spend at least 10 hours ad-
justing the speed and angle settings of the pitching machine. The operator may even 
take note of speed settings and angles for future reference. 

We urge each operator to experiment with many speed settings and angles. 

While adjusting speed and angle settings, we recommend using a wide backstop with no 
person or object in the ball path while experimenting with many settings.

• 

At the beginning of practice, or after any change in speed, angle, or trajectory, have 


the batter stand clear while at least 6 test balls are thrown to make sure the balls 


are thrown at desired target. If you move the machine for any reason, repeat this 

 process.

•  

Throw balls at speeds the batter can hit. As the batter’s skills improve, you can 


throw faster pitches. 

• 

When you increase speed of any pitch, you must lower elevation of aim;  when you 


decrease speed, you must increase the aim elevation. 

• 

Be sure to check tire pressure of each wheel at beginning of practice. Any


change in tire pressure will affect the pitch speed and location. If you notice


any vibration or loudness, turn off machine and check tire balance marks 


and tire pressure.

• 

Always turn both dials to the Zero/Off position when throwing is completed or 


temporary stopped.

WARNING: A PITCHING SCREEN MUST BE USED TO PROTECT THE OPERATOR AND 


THE MACHINE FROM BATTED BALLS.

9

www.HeaterSports.com           

800-492-9334

Summary of Contents for Deuce DC799

Page 1: ...serial number in the space above for reference ACTIVATE YOUR WARRANTY To register your product and activate your warranty call 1 800 492 9334 CUSTOMER CARE For customer service inquiries please call...

Page 2: ...ould be aware at all times KNOWN PROBLEMS WITH SIMULATED SYNTHETIC LEATHER COVERED BALLS Simulated synthetic leather balls Simulated leather balls are inexpensive seamed balls that don t work well in...

Page 3: ...e Section G Ballfeeder End Section H Hardware Silver Hex Bolt I 1x Thick Flat Washer K 1x Carriage Bolt J 1x Flat Washer L 2x Black Washer M 4x Silver Locknut O 1x Teeth Washer N 1x Knob P 1x Ballfeed...

Page 4: ...ghten with Silver Locknut O Flat Washer L STEP 3 On the other side of the tripod push the two Black Plastic Washers M x2 in place between the Tripod Bracket and the U shape arm as shown and line up th...

Page 5: ...BALLFEEDER ASSEMBLY HEATER Section C Section A Section B STEP 1 Slide sections A B C together STEP 2 Secure sections by installing ballfeeder hardware S Insert bolt washer from inside feeder and secu...

Page 6: ...itch speed Always check Check The Air Pressure In Your Pitching Machine Tires Check That The Black Hub Tire Lines Align WARNING MAKE SURE MACHINE IS UNPLUGGED AND THE TIRES ARE NOT SPINNING DURING THE...

Page 7: ...itching machine wheels are not spinning Step 5 Aim pitching machine at desired target and make sure every person and everything is clear of pitching machine ball path Step 6 Turn variable speed contro...

Page 8: ...Sports Two Wheel Pitching Machine Each diagram shows the approximate angle of the machine head Numbers represent the dial setting as seen on the 0 10 knobs IMPORTANT You may have to adjust speed knob...

Page 9: ...ure the balls are thrown at desired target If you move the machine for any reason repeat this process Throw balls at speeds the batter can hit As the batter s skills improve you can throw faster pitch...

Page 10: ...ed but aren t as accurate because of the ball seams Batter should be aware at all times Always have legs set on the ground before pitching to a batter or the Deuce Pitching Machine may move and hit th...

Reviews: