background image

19

Heat & Glo  •  MEZZO36, MEZZO36ST, MEZZO48, MEZZO48ST Owner’s Manual  •  2300-971 Rev. C  •  8/14   

With proper installation, operation, and maintenance your gas appliance will provide years of trouble-free service.  If you do 
experience a problem, this troubleshooting guide will assist a quali

fi

 ed service technician in the diagnosis of a problem and 

the corrective action to be taken. This troubleshooting guide can only be used by a quali

fi

 ed service technician.  Contact 

your dealer to arrange a service call by a quali

fi

 ed service technician.

B. Troubleshooting

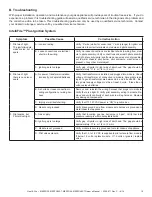
IntelliFire™ Plus Ignition System

Symptom

Possible Cause

Corrective Action

1. Pilot won’t light. 

The ignitor/module 
makes noise, but no 
spark.

A.  Incorrect wiring.

Verify “S” wire (white) for sensor and “I” wire (orange) for ignitor are 
connected to correct terminals on module and pilot assembly.

B.  Loose connections or electrical 

shorts in the wiring.

Verify no loose connections or electrical shorts in wiring from mod-
ule to pilot assembly. Verify connections underneath pilot assembly 
are tight; also verify igniter and 

fl

 ame sense wires are not grounding 

out to metal chassis, pilot burner, pilot enclosure, mesh screen if 
present, or any other metal object. 

C.  Ignitor gap is too large.

Verify gap of igniter to right side of pilot hood. The gap should be 
approximately .17 in. or 1/8 in. (3 mm).

2. Pilot won’t light, 

there is no noise or 
spark.

A.  No power, transformer installed 

incorrectly, or depleted batteries.

Verify that transformer is installed and plugged into module. Check 
voltage of transformer at connection to module. Acceptable read-
ings of a good transformer are between 6.4 and 6.6 volts DC.  Bat-
tery power supply voltage must be at least 4 volts.  If less than 4 
volts, replace batteries.

B.  A shorted or loose connection in 

wiring con

fi

 guration or wiring har-

ness.

Remove and reinstall the wiring harness that plugs into module. 
Verify there is a tight 

fi

 t. Verify pilot assembly wiring to module. Re-

move and verify continuity of each wire in wiring harness.  Replace 
any damaged components.

C.  Improper wall switch wiring.

Verify that 110-120 VAC power is “ON” to junction box.

D.  Module not grounded.

Verify black ground wire from module wire harness is grounded to 
metal chassis of appliance.

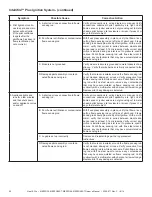
3. Pilot sparks, but 

Pilot will not light.

A.  Gas supply.

Verify that incoming gas line ball valve is “open”. Verify that inlet 
pressure reading is within acceptable limits.

B.  Ignitor gap is too large.

Verify gap of igniter to right side of pilot hood. The gap should be 
approximately .17 in. or 1/8 in. (3 mm).

C.  Module is not grounded.

Verify module is securely grounded to metal chassis of appliance.

D.  Pilot valve solenoid. 

Verify that 1.5 to 1.8 VDC is supplied to pilot solenoid from module.  
If below 1.5 volts, replace module.  If 1.5 volts or greater, replace 
valve.

Summary of Contents for MEZZO36

Page 1: ...h the type s of gas indicated on the rating plate This appliance is not convertible for use with other gases unless a certified kit is used MEZZO36 MEZZO36ST MEZZO48 MEZZO48ST DO NOT store or use gasoline or other flam mable vapors and liquids in the vicinity of this or any other appliance What to do if you smell gas DO NOT try to light any appliance DO NOT touch any electrical switch DO NOT use a...

Page 2: ...e De De Gaz Gaz N NA ATURAL TURAL GAS GAS MADE MADE IN IN USA USA Minimum Minimum Permissible Permissible Gas Gas Supply Supply for for Purposes Purposes of of Input Input Adjustment Adjustment Approved Approved Minimum Minimum De De Gaz Gaz Acceptable Acceptable 0 0 0 0 in in w c w c Po Po Col Col d eau d eau Maximum Maximum Pressure Pressure Pression Pression 0 0 0 0 in in w c w c Po Po Col Col ...

Page 3: ...ce Certification 6 B Glass Specifications 6 C BTU Specifications 6 3 Important Safety and Operating Information A Appliance Safety 7 B General Operating Parts 8 C Fuel Specifications 8 D Wall Surface TV Guidelines 8 E Before Lighting Appliance 10 F Lighting Instructions IPI 11 G Appliance Break In 12 H Heat Management 12 I Operation During A Power Outage 13 J Detailed Component Operating Instructi...

Page 4: ...te of original purchase In the case of new home construction warranty coverage begins on the date of first occupancy of the dwelling or six months after the sale of the product by an independent authorized HHT dealer distributor whichever occurs earlier The warranty shall commence no later than 24 months following the date of product shipment from HHT regardless of the installation or occupancy da...

Page 5: ...SED WARRANTY SPECIFIED ABOVE WARRANTY EXCLUSIONS This warranty does not cover the following Changes in surface finishes as a result of normal use As a heating appliance some changes in color of interior and exterior surface finishes may occur This is not a flaw and is not covered under warranty Damage to printed plated or enameled surfaces caused by fingerprints accidents misuse scratches melted i...

Page 6: ... performed by qualified personnel Hearth Home Technologies suggests NFI certified or factory trained professionals or technicians supervisedby an NFI certified professional www nficertified org C BTU Specifications This product is listed to ANSI standards for Vented Gas Fireplace Heaters and applicable sections of Gas Burn ing Heating Appliances for Manufactured Homes and Recreational Vehicles and...

Page 7: ... the fireplace when children will be present Contact your dealer for more information or visit www hpba org safety information To prevent unintended operation when not using your fire place for an extended period of time summer months vacations trips etc Remove batteries from remote controls Turn off wall controls Unplug 6 volt adapter plug WARNING Choking Hazard Keep media out of reach of childre...

Page 8: ...versions must be made by a qualified service technician using Hearth Home Technologies specified and approved parts Figure 3 2 references the general operating parts of the appliance and the section of this manual in which they are discussed DRAFT CLEAR SPACE SECTION 3 A DECORATIVE DOORS SECTION 4 GLASS ASSEMBLY SECTION 4 OPERATION DURING A POWER OUTAGE SECTION 3 I Figure 3 3 Wall Surface Temperat...

Page 9: ...mperatures should be validated at the Ɵme of each installaƟŽŶ TVs should not be used in situaƟŽŶs where the actual TV temperature exceeds the manufacturers maximum allowable operaƟŶŐ temperatures idĞŶƟĮĞĚ in the TV s technical speciĮcaƟons Contact the TV s manufacturer directly if you have you cannot locate this informaƟon or have queƐƟŽŶs regarding the ŝŶĨŽƌŵĂƟŽŶ 3 Mantel height and depth must co...

Page 10: ...ls have been removed from inside and or underneath the firebox Review proper placement of logs ember material and or other decorative materials Check the wiring Check the air shutter adjustment Ensure that there are no gas leaks Ensure that the glass is sealed and in the proper position and that the integral barrier is in place WARNING Risk of Fire or Asphyxiation DO NOT op erate fireplace with fi...

Page 11: ... appliance Hot while in operation DO NOT touch Keep children clothing furniture gasoline and other liquids having flammable vapors away DO NOT operate the appliance with fixed glass assembly removed cracked or broken Replacement of the fixed glass assembly should be done by a licensed or qualified service person Immediately call your gas supplier from a neighbor s phone Follow the gas sup plier s ...

Page 12: ... assembly and run continuously on high an additional 12 hours This cures the materials used to manufacture the fire place NOTICE Open windows for air circulation during fire place break in Some people may be sensitive to smoke and odors Smoke detectors may activate H Heat Management Burn Rate The MEZZO models have a variable burn rate which is controlled by the remote control Therefore the flame h...

Page 13: ...stalled ON OFF Switch Toggle the switch as you would under normal circumstances Wireless Remote Remote receiver is integrated into the ignition module Use the remote to turn the appliance on To preserve battery life do not use the HI LO flame or THERMOSTAT options Ignition Module Locate the ignition module in the control cavity Slide the ON REMOTE OFF switch to the ON position 3 5 Control Cavity L...

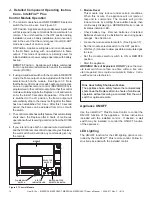
Page 14: ...thout receiving a command from the RC300 remote 4 If you intend to use both an optional wired wall switch and the RC300 remote control to operate your fireplace the wall switch will override any commands given by the remote 5 Module Reset This module may lock out under certain conditions When this occurs the appliance will not ignite or respond to commands The module will go into lock out mode by ...

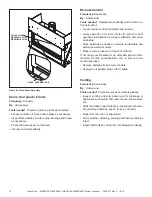
Page 15: ...ont face of firebox 2 Place glass assembly into retaining lip end Tilt top of glass assembly toward fireplace 3 Assure proper left and right placement of glass and engage all four spring latches B Maintenance Tasks Homeowner The following tasks may be performed annually by the homeowner If you are uncomfortable performing any of the listed tasks please call your dealer for a service ap pointment M...

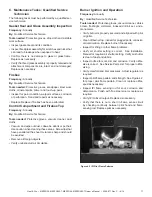
Page 16: ...adapter plug on IPI models Venting Frequency Seasonally By Homeowner Tools needed Protective gloves and safety glasses Inspect venting and termination cap for blockage or obstruction such plants bird nests leaves snow debris etc Verify termination cap clearance to subsequent construc tion building additions decks fences or sheds Inspect for corrosion or separation Verify weather stripping sealing ...

Page 17: ...air Use caution when cleaning these areas Screw tips that have penetrated the sheet metal are sharp and should be avoided Remove all foreign objects Verify unobstructed air circulation Burner Ignition and Operation Frequency Annually By Qualified Service Technician Tools needed Protective gloves vacuum cleaner whisk broom flashlight voltmeter indexed drill bit set and a manometer Verify burner is ...

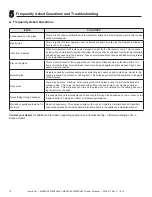
Page 18: ...ner such as gas appliance glass cleaner may be nec essary See your dealer Metallic noise Noise is caused by metal expanding and contracting as it heats up and cools down similar to the sound produced by a furnace or heating duct This noise does not affect the operation or longevity of the fireplace Rock noise There may be some cracking noise coming from the fireplace during the first few heating a...

Page 19: ...e approximately 17 in or 1 8 in 3 mm 2 Pilot won t light there is no noise or spark A No power transformer installed incorrectly or depleted batteries Verify that transformer is installed and plugged into module Check voltage of transformer at connection to module Acceptable read ings of a good transformer are between 6 4 and 6 6 volts DC Bat tery power supply voltage must be at least 4 volts If l...

Page 20: ...d to white sensor wire Polish flame sens ing rod with fine steel wool to remove any contaminants that may have accumulated on flame sensing rod Verify continuity with a multi meter with ohms set at lowest range Replace pilot if any damage is detected 5 Appliance lights and runs for a few minutes and then shuts down and or appliance cycles on and off A A shorted or loose connection in flame sensing...

Page 21: ...kout feature Keep remote controls out of reach of children See your dealer if you have questions Install approved accessories per instructions included with accessories Contact your dealer for a list of ap proved accessories WARNING Risk of Fire and Electric Shock Use ONLY Hearth Home Technologies approved optional acces sories with this appliance Using non listed accessories could result in a saf...

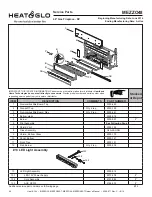
Page 22: ...TS PART NUMBER 1 Non combustible Board Top 2312 460 2 Standoff Top Qty 4 req 2300 199 3 Non combustible Board Side Qty 2 req 2300 461 4 Bottom glass 2312 018 5 Burner 2312 007 Y 6 Pilot Assembly See Following Page 7 Shield Pilot 2300 195 8 Glass Assembly GLA 36 HNG 9 Shield Bottom Glass 2312 179 10 Panel Bottom 2312 147 11 Rock Tray 2312 151 12 Rail Burner Qty 2 req 2312 338 13 LED Light Assembly ...

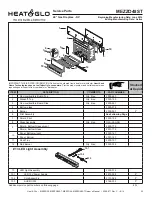
Page 23: ... Top Qty 2 req 2312 460 2 Standoff Top Qty 4 req 2300 199 3 Non combustible Board Side Qty 4 req 2300 461 4 Bottom glass 2312 018 5 Burner 2312 007 Y 6 Pilot Assembly See Following Page 7 Shield Pilot 2300 195 8 Glass Assembly Qty 2 req GLA 36 HNG 9 Shield Bottom Glass w vent 2312 179 Shield Bottom Glass 2313 179 10 Panel Bottom w vent 2312 147 Panel Bottom 2313 147 11 Rock Tray 2312 151 12 Rail B...

Page 24: ...N COMMENTS PART NUMBER 1 Non combustible Board Top 2300 460 2 Standoff Top Qty 4 req 2300 199 3 Non combustible Board Side Qty 2 req 2300 461 4 Bottom glass 2300 018 5 Burner 2300 007 Y 6 Pilot Assembly See Following Page 7 Shield Pilot 2300 195 8 Glass Assembly GLA 48 HNG 9 Shield Bottom Glass 2300 179 10 Panel Bottom 2300 147 11 Rock Tray 2300 151 12 Rail Burner Qty 2 req 2300 338 13 LED Light A...

Page 25: ...on combustible Board Top Qty 2 req 2300 460 2 Standoff Top Qty 4 req 2300 199 3 Non combustible Board Side Qty 4 req 2300 461 4 Bottom glass 2300 018 5 Burner 2300 007 Y 6 Pilot Assembly See Following Page 7 Shield Pilot 2300 195 8 Glass Assembly Qty 2 req GLA 48 HNG 9 Shield Bottom Glass w vent 2300 179 Shield Bottom Glass 2301 179 10 Panel Bottom w vent 2300 147 Panel Bottom 2301 147 11 Rock Tra...

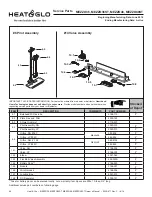
Page 26: ...300 163 6 3 3 Hole Grommet 2118 420 6 4 Pilot Assembly NG 2090 012 Y Pilot Assembly LP 2090 013 Y 6 5 Orifice NG 36C Mezzo36 582 836 Y Orifice LP 52C 582 852 Y Orifice NG 124 Mezzo48 582 8124 Y Orifice LP 49C 582 849 Y 14 1 Valve NG 2166 302 Y Valve LP 2166 303 Y 14 2 Elbow 4021 045 14 3 Flex Ball Valve Assembly 492 320A Y 14 4 Battery Pack 2166 323 Y 14 5 Module 2166 307 Y 14 6 Wire Harness 2166 ...

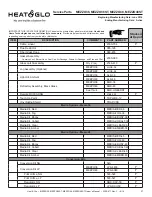
Page 27: ...Assembly Optional MEZZO36 LOGS 36 MEZZO48 LOGS 48 Light Kit Ambient MEZZO36 ALK 36 MEZZO48 ALK 48 Refractory Assembly Black Glass MEZZO36 BGK 36 MEZZO48 BGK 48 See thru s BGK LINEARST Remote RC300 HNG 2166 330 Y Touch Up Paint TUP GBK 12 Vinyl Siding Shield TRAP VSS Media Options Mezzo36 Media Kit Red MEDIA RED 36 Media Kit Fog MEDIA FOG 36 Media Kit Ebony MEDIA EBONY 36 Media Kit Cobalt MEDIA COB...

Page 28: ...____________________________________________ ________________________________________________________________________________ ________________________________________________________________________________ ________________________________________________________________________________ ________________________________________________________________________________ DO NOT DISCARD THIS MANUAL NOTI...

Reviews: