background image

91

Heat & Glo  •  SL-750TRS-IPI-E, SL-550TRS-IPI-E, SL-350TRS-IPI  •  2120-901 Rev. U  •  11/13

Service Parts

Beginning Manufacturing Date: June 2007 

IPI Ending Manufacturing   Date: Nov 2013

SL-550TRS-E, SL-750TRS-E

IMPORTANT: THIS IS DATED INFORMATION. Parts must be ordered from a dealer or distributor.

Hearth and Home Technologies does not sell directly to consumers.

 Provide model number 

and serial number when requesting service parts from your dealer or distributor.

Stocked

at Depot

ITEM

DESCRIPTION

COMMENTS

PART NUMBER

15.1

Pilot Assembly NG

2103-010

Y

Pilot Assembly LP

2103-011

Y

Pilot Tube

SRV485-301

Y

Thermocouple

2103-511

Y

Thermopile

2103-512

Y

15.2

Valve Bracket

2118-104

15.3

Flex Ball Valve Assembly

302-320A

Y

15.4

Valve NG 

230-0710

Y

Valve LP

230-0720

Y

15.5

Piezo Ignitor

291-513

Y

15.6

Thermostat Wire Assembly

2045-024

Y

15.7

Flexible Gas Connector

530-302A

Y

15.8

Ori

fi

 ce NG (#40C)

SL-550TRS-E

582-840

Y

Ori

fi

 ce LP (#53C)

582-853

Y

Ori

fi

 ce NG (#37C)

SL-750TRS-E

582-837

Y

Ori

fi

 ce LP (#52C)

582-852

Y

Additional service part numbers appear on following page.

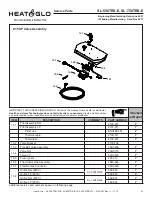
15.1

15.2

15.3

15.4

15.5

15.6

15.7

15.8

#15 SP Valve Assembly

Summary of Contents for SL-350TRS-IPI

Page 1: ...ith party responsible for use and operation DO NOT DISCARD Important operating and maintenance instructions included Read understand and follow these instructions for safe installation and operation I...

Page 2: ...rial Number Type of Gas Model Number Not Not for for use use with with solid solid fuel fuel Ne Ne doit doit pas pas entre entre utilise utilise avec avec un un combustible combustible solide solide T...

Page 3: ...tions 19 C Tools and Supplies Needed 19 D Inspect Appliance and Components 19 5 Framing and Clearances A Selecting Appliance Location 20 B Constructing the Appliance Chase 21 C Clearances 21 D Mantel...

Page 4: ...63 B Remove the Shipping Materials 63 C Clean the Appliance 63 D Accessories 63 E Lava Rock Mineral Wool Ember Placement 63 F Install Refractory 64 G Install the Log Assembly 65 H Fixed Glass Assembl...

Page 5: ...of original purchase In the case of new home construction warranty coverage begins on the date of first occupancy of the dwelling or six months after the sale of the product by an independent authoriz...

Page 6: ...WARRANTY SPECIFIED ABOVE WARRANTY EXCLUSIONS This warranty does not cover the following Changes in surface finishes as a result of normal use As a heating appliance some changes in color of interior...

Page 7: ...to determine proper orifice size NOTICE This installation must conform with local codes In the absence of local codes you must comply with the National Fuel Gas Code ANSI Z223 1 latest edition in the...

Page 8: ...cification Materials made of or surfaced with wood compressed pa per plant fibers plastics or other material that can ignite and burn whether flame proofed or not or plastered or unplastered shall be...

Page 9: ...ed gas fu eled heating appliance or equipment The sign shall read in print size no less than one half 1 2 in in size GAS VENT DIRECTLY BELOW KEEP CLEAR OF ALL OB STRUCTIONS Inspection The state or loc...

Page 10: ...ling down Teach children to NEVER touch the fireplace WARNING A barrier designed to reduce the risk of burns from the hot viewing glass is provided with this appliance and shall be installed DO NOT op...

Page 11: ...Controls Wall Controls and Wall Switches Follow the instructions supplied with the control installed to operate your fireplace For safety Install a switch lock or a wall remote control with child pro...

Page 12: ...next to the floor because some gas is heavier than air and will settle on the floor WHAT TO DO IF YOU SMELL GAS DO NOT try to light any appliance DO NOT touch any electric switch do not use any phone...

Page 13: ...es fireplace please refer to www fireplaces com A This appliance has a pilot which must be lighted by hand When lighting the pilot follow these in structions exactly B BEFORE LIGHTING smell all around...

Page 14: ...e appliance is al lowed to burn for 20 to 40 minutes Odor from appliance When first operated this appliance may release an odor for the first several hours This is caused by the curing of the paint an...

Page 15: ...ning may be required due to lint from carpeting or other factors Control compartment burner and circulating air passageway of the fireplace must be kept clean CAUTION Risk of Burns The fireplace shoul...

Page 16: ...ment and Firebox Top Frequency Annually By Qualified Service Technician Tools needed Protective gloves vacuum cleaner dust cloths Vacuum and wipe out dust cobwebs debris or pet hair Use caution when c...

Page 17: ...17 Heat Glo SL 750TRS IPI E SL 550TRS IPI E SL 350TRS IPI 2120 901 Rev U 11 13 Either cobrahead or SIT PRODUCT SPECIFIC Figure 3 1 IPI Pilot Flame Patterns Figure 3 2 Standing Pilot Flame Patterns...

Page 18: ...NETRATES ROOF PREFERABLY WITHOUT AFFECTING ROOF RAFTERS SECTION 8 C FRAMING HEADED OFF IN CEILING JOISTS SECTION 8 C GAS LINE SECTION 11 MANTEL AND MANTEL LEG SECTION 5 D SURROUND HEARTH EXTENSION VEN...

Page 19: ...ire or Explosion Damaged parts could impair safe operation DO NOT install damaged in complete or substitute components Keep appliance dry C Tools and Supplies Needed Before beginning the installation...

Page 20: ...FOR DESIGN PURPOSES ONLY Illustrations diagrams are not drawn to scale Actual installation may vary due to individual design preference Figure 5 1 Appliance Locations K C A L I B G D J J G A F H M Mo...

Page 21: ...erial other than wood WARNING Risk of Fire Maintain specified air space clearances to appliance and vent pipe Insulation and other materials must be secured to prevent accidental contact The chase mus...

Page 22: ...gure 5 5 Mantel Leg Acceptable on both sides of opening Figure 5 3 Clearances to Mantels or other Combustibles above Appliance 5 6 7 8 9 10 3 4 5 12 11 10 9 8 7 6 TOP OF HOOD OR FIREPLACE OPENING 4 12...

Page 23: ...T MIN 20 INCHES MIN H MIN MINIMUM HEIGHT FROM ROOF TO LOWEST DISCHARGE OPENING 6 6 Termination Locations Fire Risk Maintain vent clearance to combustibles as specified DO NOT pack air space with insul...

Page 24: ...H or i V G X V H A V V H Electrical Service V K V K V L C V N 6 inches non vinyl sidewalls 12 inches vinyl sidewalls O 18 inches non vinyl soffit and overhang 42 inches vinyl soffit and overhang P 8...

Page 25: ...ertical run A length of straight pipe is allowed between two 45 elbows see Figure 7 1 Figure 7 1 7 7 Vent Information and Diagrams B Vent Table Key The abbreviations listed in this vent table key are...

Page 26: ...ts A support is required at each change in venting direction and in any location where it is necessary to maintain the necessary clearance to combustibles A simple up and out installation Fig ure 5 3...

Page 27: ...15 ft 4 6 m 15 ft 4 6 m H1 Maximum 15 ft 4 6 m V1 H1 Maximum 40 ft 12 2 m See warning below Note Use SLP Series components only Note There MUST be a 25 reduction in total H when using flex vent except...

Page 28: ...ing below Note Use SLP Series components only Note There MUST be a 25 reduction in total H when using flex vent except when using the simple up and out installation see Figure 7 3 Fire Risk When using...

Page 29: ...762 mm 5 ft 1 5 m 10 ft 3 0 m 5 ft 1 5 m 10 ft 3 0 m 3 1 2 ft 1 1 m 7 ft 2 1 m 14 ft 4 3 m 7 ft 2 1 m 14 ft 4 3 m 4 1 2 ft 1 4 m 14 ft 4 3 m 14 ft 4 3 m 14 ft 4 3 m 14 ft 4 3 m V1 H1 V2 H2 Maximum 40...

Page 30: ...n has a total vertical of 15 60 feet an exhaust restrictor may be needed The exhaust restrictor can be located in the appliance manual bag Exhaust restrictor Instructions 1 Install the exhaust restric...

Page 31: ...ft 762 mm 2 ft 610 mm 4 ft 1 2 m 4 ft 1 2 m 3 ft 914 m 6 ft 1 8 m 6 ft 1 8 m 4 ft 1 2 m 8 ft 2 4 m 8 ft 2 4 m 5 ft 1 5 m 15 ft 4 6 m 15 ft 4 6 m H1 Maximum 15 ft 4 6 m V1 V2 H1 Maximum 40 ft 12 2 m N...

Page 32: ...t 152 mm 1 ft 305 mm 1 1 2 ft 457 mm 2 ft 610 mm 2 1 2 ft 762 mm 4 ft 1 2 m 3 1 2 ft 1 1 m 6 ft 1 8 m 4 1 2 ft 1 4 m 14 ft 4 3 m H1 Maximum 14 ft 4 3 m No specific restrictions on this value EXCEPT V1...

Page 33: ...on continued Four 90 Elbows V1 Min H1 Max V2 Min H2 Max V3 Min 1 1 2 ft 457 mm 4 ft 1 2 m 4 ft 1 2 m 4 ft 1 2 m 3 1 2 ft 1 0 m V1 V2 V3 H1 H2 Maximum 40 ft 12 2 m Note Use SLP Series components only N...

Page 34: ...ft 914 mm 6 1 2 ft 2 0 m 5 1 2 ft 1 7 m 2 ft 610 mm 5 ft 1 5 m 10 1 2 ft 3 2 m 7 1 2 ft 2 3 m 3 ft 914 mm 6 1 2 ft 2 1 m 14 ft 4 3 m H1 Maximum 7 1 2 ft 2 3 m H1 H2 Maximum 14 ft 4 3 m V1 H1 H2 40 ft...

Page 35: ...m 2 ft 610 mm 4 ft 1 2 m 9 1 2 ft 2 9 m 7 1 2 ft 2 3 m 3 ft 914 mm 6 ft 1 8 m 13 1 2 ft 4 1 m H1 Maximum 7 1 2 ft 2 3 m H1 H2 H3 Maximum 13 1 2 ft 4 1 m V1 H1 H3 40 ft 12 2 m V1 H1 One 90 Elbow V1 Min...

Page 36: ...t 1 5 m 10 1 2 ft 3 2 m 7 1 2 ft 2 3 m 3 ft 914 mm 7 ft 2 1 m 14 1 2 ft 4 4 m H1 Maximum 7 1 2 ft 2 3 m V1 V2 H1 H2 Maximum 40 ft 12 2 m Rear Vent Vertical Termination continued H1 H2 Maximum V1 Minim...

Page 37: ...essionals Hearth Home Technologies recommends that NFI or CSIA certified professionals or technicians under the direction of certi fied professionals conduct a minimum of a NFPA 211 Level 2 inspection...

Page 38: ...ing screws See Figure 7 20 Rear Vent Remove the rear seal cap and insulation if equipped Connect the DVP 2SL adapter to the vertically positioned elbow Follow installation instructions included with D...

Page 39: ...arance 1 in 25 mm clearance around vertical sections B Wall Penetration Framing Combustible Wall Penetration Whenever a combustible wall is penetrated you must frame a hole for the wall shield firesto...

Page 40: ...he ceiling firestop may be installed above or below the ceiling joists when installed with a attic insulation shield It must be under joists between floors that are not insulated Refer to Figure 8 4 S...

Page 41: ...hese tabs must be used to prevent blown insulation from getting between the shield and vent pipe and to maintain air space clearance Figure 8 5 Attic Insulation Shield Vaulted Ceiling Installation Rem...

Page 42: ...l position as shown above The heat shield must remain in the vertical position Figure 9 4 Remove the seal cap Figure 9 5 Remove the insulation basket and white insula tion from the center vent pipe Fi...

Page 43: ...to remove the seal cap Figure 9 11 Discard the seal cap remove and discard the insulation basket Note Once the seal cap has been removed it CANNOT be reattached Figure 9 12 Attach the first vent secti...

Page 44: ...fire The diagram shows how to properly position and secure the appliance see Figure 9 13 Nailing tabs are provided to secure the appliance to the framing members Bend out nailing tabs on each side Pla...

Page 45: ...lling holes DO NOT penetrate inner pipe For 90 and 45 elbows that are changing the vent direction from horizontal to vertical one screw minimum should be put in the outer flue at the horizontal elbow...

Page 46: ...slip section elbow and cap outer flues shall be sealed in this manner unless otherwise stated Figure 10 5 Adding Venting Components WARNING Risk of Fire or Explosion DO NOT break silicone seals on sl...

Page 47: ...supported every 8 ft 2 44 m after the maximum allowed 25 ft 7 62 m of unsupported rise Vertical runs originating off the rear of the appliance or after any elbow must be supported every 8 ft 2 44 m Ho...

Page 48: ...of the cathedral ceiling support box on the outside roof Remove shingles or other roof covering as necessary to cut the rectangular hole for the support box Cut the hole 1 8 in 3 mm larger than the s...

Page 49: ...UM HEIGHT FROM ROOF TO LOWEST DISCHARGE OPENING NOTICE Failure to properly caulk the roof flashing and pipe seams may permit entry of water Caulk the gap between the roof flashing and the outside diam...

Page 50: ...ation WARNING Risk of Fire To prevent overheating and fire heat shields must extend through the entire wall thick ness DO NOT remove the heat shields attached to the wall shield firestop and the horiz...

Page 51: ...ate for siding material at outside edges of cap When installing a horizontal termination cap follow the cap location guidelines as prescribed by current ANSI Z223 1 and CAN CGA B149 installation codes...

Page 52: ...eak check solution DO NOT use open flame Fittings and connections could have loos ened during shipping and handling WARNING Risk of Fire DO NOT change valve settings This valve has been preset at the...

Page 53: ...e and 110 120 VAC voltage cannot be shared within the same wall box WARNING Risk of Shock or Explosion DO NOT wire 110V to the valve or to the appliance wall switch Incorrect wiring will damage contro...

Page 54: ...at NOTE 1 Ignition module valve pilot and wall switch operate on 3 volts 110 120 VAC is required at junction box unless equipped with battery back up TRANSFORMER 3 VAC PLUG IN PLUG IN BLACK RED BATTER...

Page 55: ...ITE VALVE PILOT THERMOCOUPLE THERMOPILE E Electrical Service and Repair WARNING Risk of Shock Label all wires prior to dis connection when servicing controls Wiring errors can cause improper and dange...

Page 56: ...to the red switch leg wire route it through the knockout in the face of the junction box and connect to the top fan switch connector 1 4 in male as shown Figure 12 5 Junction Box Detail NOTICE DO NOT...

Page 57: ...ter Guard Step 2 Crease flap on top side of splatter guard using the scored line as the guide See Figure 13 2 Figure 13 2 Step 3 Crease flaps on left and right sides of splatter guard using the scored...

Page 58: ...ound holes on the front of the splatter guard See Figure 13 7 Pull out and fold up the panel as shown in Figure 13 8 Disengage the tabs on left and right bottom of splatter guard and fit them into the...

Page 59: ...Leg Acceptable on both sides of opening 5 6 7 8 9 10 3 4 5 12 11 10 9 8 7 6 TOP OF HOOD OR FIREPLACE OPENING 4 12 13 11 32 CEILING Note Clearance from opening to perpendicular wall All measurements ar...

Page 60: ...des using a 300 F minimum sealant Refer to Figure 13 16 WARNING Risk of Fire DO NOT apply combustible materials beyond the minimum clearances Comply with all minimum clearances to combustibles as spec...

Page 61: ...ERIAL THICKNESS SEE FIGURE X Y Aero 28 Inside 4 inches Max 13 17 N A N A Aero 32 Inside 4 inches Max 13 17 N A N A Aero 36 Inside 4 inches Max 13 17 N A N A Chad 28E Overlap 1 inch Max 13 18 N A N A C...

Page 62: ...and Rough Opening Height Figure 5 2 Note 2 Verify Marble Cut Lengths on site prior to cutting Note 3 Dimensions assume use of a 3 4 in Hearth Pad MODEL DESCRIPTION PART ELEVATED APPLIANCE DIMENSION Se...

Page 63: ...ember material annually Improperly placed embers interfere with proper burner operation Placing the Lava Rock SL 350TRS IPI only See Section 14 H for Lava Rock placement instructions Placing the Ember...

Page 64: ...TAB RETAINER TAB Step 4 Install logs according to the install manual CAUTION Refractory is fragile Carefully remove the refractory from the packaging Step 1 Remove the logs from the fireplace Place th...

Page 65: ...tab Left rear log tab Left rear log tab Groove used to locate log 2 Groove used to locate log 2 2 2 Mate log with tine Mate log with tine Mate log with groove on log 1 Mate log with groove on log 1 Ti...

Page 66: ...with notch Log 4 SRV2113 703 Locate the notch on the bottom of log 4 Mate the notch with the shoulder screw that is located on the burner top Mate the rear groove with the far right grate tine as show...

Page 67: ...ogs from the packaging 1 1 2 2 STEP 2 LOG 1 SRV2117 701 Place log 1 on left flat side of the burner assembly Pull the log and slide it to the right until the notches under the log are in the burner gr...

Page 68: ...of the log will sit on the left grate tine and also contact the vertical portion of the grate tine as shown in Figure 4 The burned part of the log should be pointed downward STEP 6 LOG 5 SRV2117 705 P...

Page 69: ...2117 701 Place log 1 on left flat side of the burner assembly Pull the log forward and slide it to the right until the notches under the log are in the burner grooves STEP 3 LOG 2 SRV2120 702 Place lo...

Page 70: ...WARD Figure 3 MATE WITH FLAT AREAS HERE NOTCH STEP 4 LOG 3 SRV2120 703 Place log 3 on right flat side of burner assembly The notch on the log should fit over the bar on the far right side of the grate...

Page 71: ...and the appliance when applicable to the model GLASS ASSEMBLY LATCHES BOTH BOTTOM AND TOP Shutter Settings SHUTTER ADJUSTMENTS J Air Shutter Setting SL 550TRS IPI and SL 750TRS IPI ONLY This applianc...

Page 72: ...thermocouple connection at the gas valve is fully in serted and tight hand tighten plus 1 4 turn Verify proper voltage output from the thermocouple to the valve Place one millivolt meter lead wire on...

Page 73: ...Refill the fuel tank B Improper gas inlet pressure Natural gas should be 5 14 in w c Propane should be 10 14 in w c Verify pressure with manometer C Inner vent pipe leaking exhaust gases back into the...

Page 74: ...d plugged into module Check voltage of transformer under load at spade connection on module with ON OFF switch in ON position Acceptable readings of a good transformer are between 3 2 and 2 8 volts AC...

Page 75: ...Verify cor rect pilot orifice is installed and gas inlet is set to pressure specifications Clean flame sensing rod with emery cloth to remove any contaminants that may have accumulated on flame sensin...

Page 76: ...1 16 815 D 16 406 18 1 16 459 21 1 2 547 E 29 1 8 740 31 1 8 790 34 5 8 879 F 3 1 2 90 3 9 16 90 3 9 16 90 G 6 7 8 175 6 7 8 174 6 7 8 174 H 21 3 8 543 23 3 8 593 26 7 8 683 I 32 3 8 822 34 3 8 873 3...

Page 77: ...2 in 267 mm 10 7 8 in 276 mm 45 7 3 8 in 187 mm 11 3 8 in 289 mm 1 1 4 in 32 mm 9 1 4 in 235 mm 13 1 4 in 337 mm 1 2 in TYP DVP90ST 90 Elbow 10 in 254 mm 10 in 254 mm 1 in 25 mm 12 in 305 mm 14 in 356...

Page 78: ...ax Effective Length Note Heat shields MUST overlap by a minimum of 1 1 2 in 38 mm The heat shield is designed to be used on a wall 4 in to 7 1 4 in 102 mm to 184 mm thick If wall thickness is less tha...

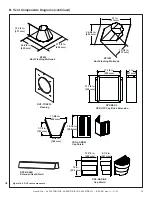
Page 79: ...m RF6M Roof Flashing Multi pak 31 in 787 mm 24 5 8 in 625 mm 13 1 4 in 337 mm RF12M Roof Flashing Multi pak Cap Shield DRC RADIUS 13 7 8 in 352 mm 9 1 2 in 241 mm 14 in 356 mm COOL ADDM Cap Shield 11...

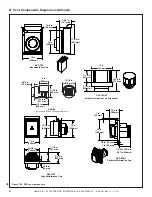
Page 80: ...1 4 in 133 mm 12 1 2 in 318 mm DVP TVHW VerticalTermination Cap Highwind 14 in 356 mm 12 in 305 mm 12 1 8 in 314 mm 7 1 8 in 181 mm 8 3 4 in 222 mm 1 5 8 in 41 mm 16 7 8 in 429 mm DVP HPC High Perform...

Page 81: ...6 mm 10 7 8 in 276 mm 10 1 2 in 267 mm 3 87 Effective Length 5 3 4 to 8 3 8 in 146 to 213 mm 5 1 2 in 140 mm 8 3 8 in 213 mm 13 in 330 mm 15 in 381 mm 8 1 8 in 206 mm 10 7 8 in 276 mm 10 1 2 in 267 mm...

Page 82: ...iling Firestop SLP WS Wall Shield Firestop 10 7 8 in 276 mm 8 7 8 in 225 mm 1 1 2 in 38 mm 8 11 16 in 220 mm 8 11 16 in 220 mm 1 1 2 in 38 mm 12 in 305 mm 12 in 305 mm 5 1 2 in 146 mm B Vent Component...

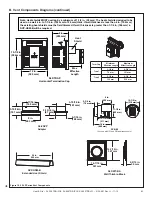
Page 83: ...lds MUST overlap by a minimum of 1 1 2 in 38 mm The heat shield is designed to be used on a wall 4 in to 7 1 4 in 102 mm to 184 mm thick If wall thickness is less than 4 in 102 mm the existing heat sh...

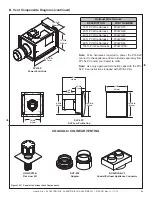
Page 84: ...rizontal Termination Kit 14 in 356 mm 14 1 16 in 357 mm 7 1 2 in 192 mm 10 3 4 in 273 mm SLP CCS BK Cathedral Ceiling Support Box Black SLP DCF BK Ceiling Firestop Black SLK SNKD Snorkel Termination C...

Page 85: ...PV Wire Harness PVI WH40 60 ft PV Wire Harness PVI WH60 80 ft PV Wire Harness PVI WH80 100 ft PV Wire Harness PVI WH100 PVI SLP Power Vent Inline SLP LPC SLP Low Profile Cap Note Wire harnesses requir...

Page 86: ...113 702 3 Log 3 SRV2113 704 4 Log 4 SRV2113 703 5 Burner Assembly 2113 007 Y 6 Base Pan Grate Assembly 2113 015 7 Glass Door Assembly GLA 3504TRS Y 8 Junction Box 4021 013 Y Exhaust Restrictor 530 299...

Page 87: ...Bracket Assembly 2118 121 Y 9 3 Battery Pack 593 594A Y 9 4 Flex Tube Assembly 7000 156 Y 9 5 3 Volt Transformer 593 593A Y 9 6 Module Wire Assembly 593 590A Y 9 7 Thermostat Wire Assembly 2118 170 Y...

Page 88: ...og 1 SRV2117 701 2 Log 2 SRV2117 702 3 Log 3 SRV2117 703 4 Log 4 SRV2117 704 5 Log 5 SRV2117 705 Refractory Kit BRICK 550TRSD2 6 Refractory Right Side SRV2044 712 7 Refractory Back SRV2044 711 8 Refra...

Page 89: ...1 SRV2117 701 2 Log 2 SRV2120 702 3 Log 3 SRV2120 703 4 Log 4 SRV2120 704 5 Log 5 SRV2117 705 Refractory Kit BRICK 750TRSD2 6 Refractory Right Side SRV2045 712 7 Refractory Back SRV2045 711 8 Refract...

Page 90: ...OMMENTS PART NUMBER 15 1 Pilot Assembly NG 2090 012 Y Pilot Assembly LP 2090 013 Y Pilot Tube SRV485 301 Y 15 2 Orifice NG 40C SL 550TRS IPI E 582 840 Y Orifice LP 53C 582 583 Y Orifice NG 37C SL 750T...

Page 91: ...ed at Depot ITEM DESCRIPTION COMMENTS PART NUMBER 15 1 Pilot Assembly NG 2103 010 Y Pilot Assembly LP 2103 011 Y Pilot Tube SRV485 301 Y Thermocouple 2103 511 Y Thermopile 2103 512 Y 15 2 Valve Bracke...

Page 92: ...air passage gaskets SL 750TRS 2118 080 Glass Latch Assembly Pkg of 2 33858 2 Y Mineral Wool 050 721 Non combustible Board 547 401 Touch up Paint Unit TUP GBK 12 Touch up Paint Logs Bark Brown SRV999 4...

Page 93: ..._____________________________________ ________________________________________________________________________________ ________________________________________________________________________________...

Reviews: