6
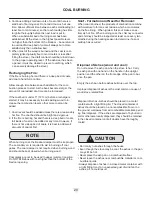
Tool Rack- fasten
to rear of shelf
using screws and
nuts provided.
Remove screws and
washers from top
back flange of top,
2 places
Remove machine
screws from the
top (2 each side)
Machine
Screw
Shelf
Bracket
Shelf assembly to stove top:
Remember when working with the shelf it is top heavy.
Use your hand to support it during installation. Remove the
shelf assembly from the skid by removing the 2 screws and
cutting the banding strap. Lift the shelf assembly by the
bracket area that is circled and set on the floor or a table
top. Unwrap the shelf assembly.
Remove the washers and screws from the rear edge of the
stove top. (2 places). Also remove the 4 machine screws
from the top of the stove top.
With a helper lift the shelf assembly (by the circled bracket
area and supporting the top of the shelf) and place the shelf
into position on the stove top (see diagram above). Line up
the bracket holes with the 4 holes in the stove top while a
helper supports the shelf.
Secure the shelf to the stove top with the 4 machine screws
and the 2 screws and washers. To prevent chipping do not
overtighten screws or use power tools.
!
WARNING
WARNING-
The stove is very heavy. Since
the legs may dig into a soft floor, do not locate the
stove, or even set it to rest, on a surface that could
be imprinted. We recommend that 3 or 4 persons be
available to assist in the lifting of the stove, and that
gloves should be worn to protect hands from cuts.
Unpacking:
1) Cut the banding holding the stove to the skid.
2) Remove the 3 screws at each corner which hold the
crate to the skid. (See crate diagram fastened to crate).
Lighten the stove by removing the keyplate and lids.
3) With 2 persons minimum on the heavier, firebox side
(left), and one person on the other side, lift the stove up,
off of the skid and onto its new location.
4) If possible, have a fourth person remove the skid while
the others lift.
INSTALLATION INSTRUCTIONS
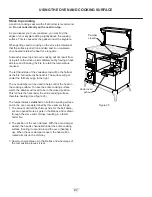
Figure 5


