Healthmark FIS-001 Instructions For Use Manual Download Page 6


FIS-001 

Page 6 of 33 


4.3.6


Determine System Architecture of target computer: 

Determine whether your computer is running a 32-bit version or 64-bit version of 
the Windows operating system. If you need more information regarding how to 
check, you may refer to http://support.microsoft.com/kb/827218 for more details. 

4.3.7


Locate the proper device driver installer: 

Open the Healthmark  folder. Depending on 32-bit or 64-bit system architecture, 
double click and open the “32bit_driver” or “64bit_driver” folder accordingly. 

4.3.8


Initiating the driver installer - double click and run the following file: 

4.3.8.1


For 32-bit system: 

Cy2510Installation.msi 

4.3.8.2


For 64-bit system:  

Cy2510Installation_x64.msi 
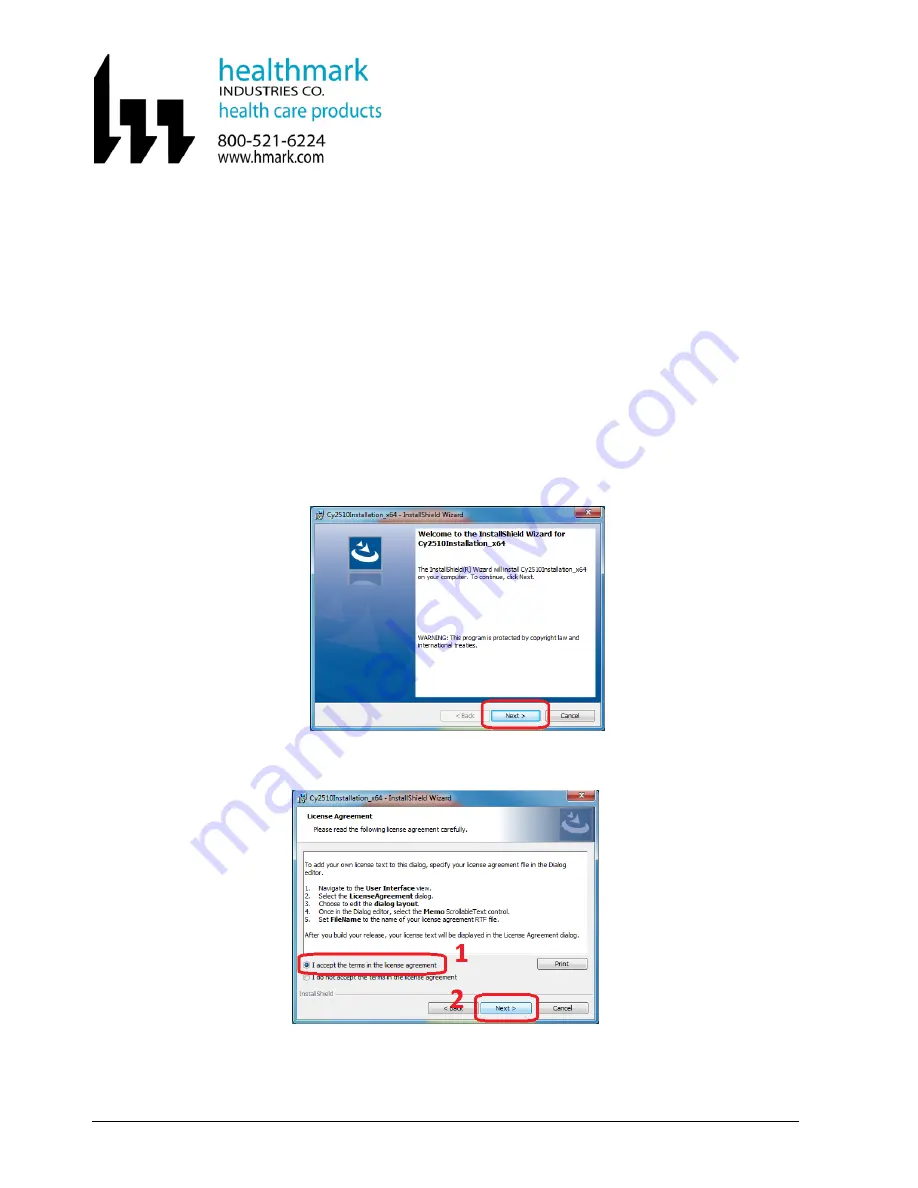
4.3.8.3


Then proceed as guided by a series of pop-up dialog boxes from the 
InstallShield Wizard.  Click the “Next” Button to continue. 


4.3.8.4


Review and accept the License Agreement.  Click the “Next” Button to 
continue. 


Summary of Contents for FIS-001

Page 1: ...FIS 001 Page 1 of 33 Instructions for Use Healthmark Inspection Scope Camera FIS 001...

Page 2: ...General Description 3 4 0 Software Installation 5 5 0 Mitigating Residual Device Risks 15 6 0 Troubleshooting 16 7 0 Mounting The Handle on a Tripod 22 8 0 Preparation Power Up 22 9 0 Graphical User I...

Page 3: ...f you have any question or comment about any information in this IFU please contact Healthmark at 800 521 6624 x6657 or e mail at hmitdesk hmark com 3 0 GENERAL DESCRIPTION The Healthmark Inspection C...

Page 4: ...FIS 001 Page 4 of 33 Healthmark Inspection Camera Handle Extrusion Proximal End Distal End Distal Tip Camera Handle...

Page 5: ...Installation and 2 Application Software Installation 4 3 Device Driver Installation 4 3 1 Turn on the Target Computer 4 3 2 Proceed to log into the Windows desktop environment 4 3 3 Do not connect an...

Page 6: ...taller Open the Healthmark folder Depending on 32 bit or 64 bit system architecture double click and open the 32bit_driver or 64bit_driver folder accordingly 4 3 8 Initiating the driver installer doub...

Page 7: ...rmation page enter the desired information Then click the Next button 4 3 8 6 On the Setup Type page choose Complete option to install all necessary components Then click the Next Button 4 3 8 7 Click...

Page 8: ...nknown publisher to make changes to this computer Program name Cy2510Installation_x msi In case this Windows dialog box pops up click the Yes Button to continue 4 3 8 9 Another Windows Security pop up...

Page 9: ...using the provided USB cable 4 3 10 A Windows balloon message may pop up at the lower right hand corner and display a message Installing device driver software 4 3 11 When the Windows finishes instal...

Page 10: ...k_Install_Package folder and locate the file setup exe 4 6 Double click and run the file setup exe from the HealthMark_Install_Package folder 4 7 Install NET Microsoft Framework 4 0 if prompted If the...

Page 11: ...f Microsoft NET Framework 4 0 or above are installed successfully proceed by clicking the Next Button 4 9 Review and accept the License Agreement Click the Next Button to continue 4 10 On the Customer...

Page 12: ...nstall Button on the next dialog box screen Ready to Install the Program 4 13 A Windows User Account Control pop up dialog box may appear and display a question Do you want to allow the following prog...

Page 13: ...to the computer 4 16 Starting the Program Double click the HealthMark1 0 6 14 exe shortcut from the Desktop to run the program If the shortcut is not available navigate to the folder C Sanovas Health...

Page 14: ...FIS 001 Page 14 of 33 4 18 The Main window of the camera software will now appear If any of the above pop up dialog box does not come up please refer to troubleshooting or contact Sanovas for support...

Page 15: ...nto any port other than a USB2 0 or later version port on a computer 5 10 Use only the USB cable provided with the device Using other cables may lead to interference with surrounding electronic device...

Page 16: ...7 3 Administration Privileges Administration privileges are necessary in order to install Healthmark software on a computer Please contact your IT administrator for support 7 4 Device driver installa...

Page 17: ...ither Windows XP or Windows 7 However if it is necessary to install it on a Windows 8 system the driver signature verification will need to be disabled in order to install unsigned drivers Follow the...

Page 18: ...settings link 7 5 3 When the Control Panel opens click and switch to the Update recovery section 7 5 4 Click on the Recovery option on the left hand side 7 5 5 Once selected you will see an advanced s...

Page 19: ...FIS 001 Page 19 of 33 7 5 6 Once the computer has been rebooted choose the Troubleshoot option 7 5 7 Click on Advance options...

Page 20: ...FIS 001 Page 20 of 33 7 5 8 Click Startup Settings 7 5 9 Click Restart...

Page 21: ...ings will be shown Press F7 to choose Disable driver signature enforcement 7 5 11 The computer will then reboot and the unsigned drivers should be able to install without any Windows error message 7 5...

Page 22: ...rew can be used to mount the handle 9 0 PREPARATION POWER UP 9 1 Turn ON the PC the Software is installed on 9 2 Plug the Type Mini B side of the provided USB 2 0 Cable to the camera handle The Mini B...

Page 23: ...lso be executed from this folder The information pop up window will appear with the following information If the Information Popup Box does not come up try restarting the application or reinstalling t...

Page 24: ...changed so that each video and image taken can be stored in a user defined location To do this click on the box that says Enter Surgical Instrument Information A key board will popup enabling the use...

Page 25: ...UI To take a still image snapshot click the PHOTO button once Each time a photo is captured the capture count will be incremented under the button If the Capture Photo as Reference radio button is NOT...

Page 26: ...of the year 18 is the day of the month 113255000 is the time of day the image is taken 10 3 Taking Photo s using the button on the device handle To capture a still image using the Control Handle press...

Page 27: ...under the button this will be for the last video that is being recorded When recording video the button color will change to red The videos will be stored in the VidTimeStamp avi format For example Vi...

Page 28: ...be the same Record Button on handle is as follows User will observe the behavior in the GUI as previously explained 10 7 Stop Recording Video s Using Button on Handle To stop recording video using th...

Page 29: ...se the brightness of the camera LEDs press the Up Arrow on the Control Handle This will be equivalent to using the GUI and the Illumination change results will be the same Up Down Button on handle is...

Page 30: ...will be turned ON at 100 10 11 Decreasing the Illumination Level Using Button on Device Handle The Down Arrow next to Illumination button can be clicked to decrease the brightness of the camera LEDs T...

Page 31: ...eo select the MENU button with a single click A single click on the MENU button will take user to Tools Box Under the Tools Box select REVIEW button with a single click A new window with all working f...

Page 32: ...g user to select an image or video to replay Select the file to be reviewed by double clicking on it The image video will be displayed in a new window To quit select the x button in the Setup Box and...

Page 33: ...Field Wiring Terminal Boxes 13 3 The device does NOT produce Ionizing Radiation 13 4 The device is RoHS Compliant 13 5 The device handle may get warm to the touch This is normal 13 6 The device has N...

Reviews: