background image

Description of Function Icons


1.  Long press

key to enter the settings menu.

2.  


press 


 key to shift the blue cursor, choose the function.

3.  Press 


 key to choose the needed function, press 


 again. 

4.  After Pressing 


 key it will automatically return to the main menu.

5.  When the AV OUT and HDMI do not access, the four key 

【        】【       】【       】 

and

【       】 

will


be


locked

.


To avoid the misoperation when recording.

SIZE:
    

1920 X 1080p 30 frame per second  (fps) 


bit rate: 15 Mbit/s, Field of View:

    1280 X  720p  60 frame per second  (fps)


bit rate: 15 Mbit/s, 

110°

(

Default

)

.

Field of View:135°.

TV OUT:

Choose


the


correct


video


output


system


when


connecting


AV OUT


to


TV

The


image


on


the


TV


will


be

flickering


if


the


TV


system


is


incorrect

Choose


PAL


or


NTSC

(

Default

)

.

VOLUME:

The volume of internal MIC can be set and there are 0- 7 grades to be selected,7 grades

(

Default

)

.

RECYCLE:

When


set


as


the


mode

the


video


will


default


to


30 minute


per


file

When


the


card

is


full


it


will


start


overwriting


the


earliest


recorded


files

,

 YES 

 NO 

(

Default

)

.

9

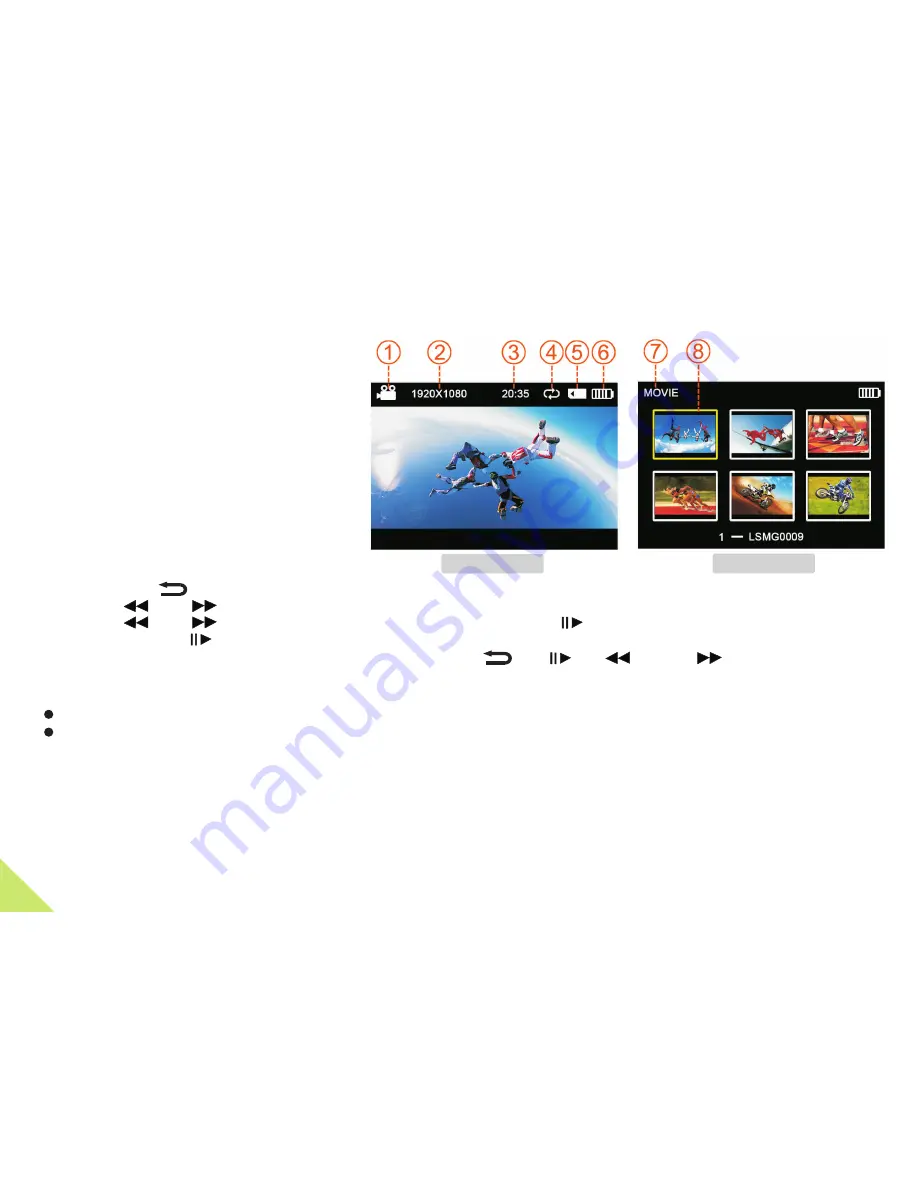
1. Record Mode
2. Video Resolution
3. System


time

6. Battery Life
7. 

4. Record


Overwrite Mode

5. SD card icon

Video Mode

8. Current Selection video file

System function settings

Video Mode

Record Mode

Summary of Contents for HD MAX-Q82

Page 1: ...USER MANUAL RoHS ...

Page 2: ...es as doing so could damage the housing and main components Take care to only use the camera within its operating temperature range Your camera includes a class 2 laser pointing device CDRH Class II IEC Class 2 Routine care Clean your HD Max Cam with a soft cloth Do not use abrasive powders or solvents such as benzene or thinner Disclaimer HD Max Cam will not under any circumstances be responsible...

Page 3: ...gn rotates 200 to allow multiple camera mounting positions 11 Video Rotation 180 12 Built in microphone single channel Adjustable recording volume level 13 USB 2 0 HDMI 3 5 AV OUT 1 4 inch to 20 tripod thread 14 Support external Micro SD Card up to 32Gb Class 6 15 Overwrite recording Real time stamp 16 System Language English русский Italiano Deutsch 日本語 中文 17 PC Compatibility Windows XP Vista Win...

Page 4: ...rding indicator 5 Power Memory Status indicator 6 Turn on or turn off the Cross laser positioning 7 Recording key 8 Press and Hold for 3 seconds to power on or power off the Cam 9 Press and Hold for 3 seconds to Menu Return key Delete key 10 Play Stop key 11 FWD Select key 12 REV Select key 3 ...

Page 5: ...y of rear cover 14 Recording indicator 15 USB 2 0 Port file transfer charging 16 Micro SD Holder 17 AV OUT connectors 18 Battery Holder 19 HDMI Port cable not included 20 Recording indicator 21 Battery Latch 22 1 4 inch to 20 tripod thread 23 LEASH 4 ...

Page 6: ...itch it back off press the record button again ABOUT THE CAMERA Quick Start Guide Choose the appropriate mount and ensure it is fitted securely and tightly so that it can not come loose while shooting your videos Press key and hold for 3 seconds to power up the camera Adjust the lens to the proper angle Face a blank surface and press the laser button to turn on the lasers The lasers will disappear...

Page 7: ...ax is compatible with SDHC high capacity class 4 6 or 10 microSD Cards up to a maximum capacity of 32GB All microSD Cards must be formatted before use in the HD Max camera Installing the battery Slide the lock on the rear cover and it will automatically open Follow the instructions Insert the battery with the correct Polarity Push the rear cover closed NOTE If you do not intend to use the product ...

Page 8: ... in HDMI mode Press to switch to Play Mode the screen shows 6 video files per page in grid form Press to choose which video to play the video will be highlighted with yellow borders press to start recording and press again to stop When playing video user can Long press to Fast forward or reverse at X2 X4 X8 When playing video user can Long press to delete video file Press to stop playback and retu...

Page 9: ...be fixed on other 1 4 tread mounts Refer to picture 2 picture 1 Recharging the battery from your computer If the camera fails to start recording the battery has probably run down and needs to be recharged Recharge the battery as follows Connect the USB cable supplied to the mini USB port of your camera Connect the cable USB connector to your computer in most cases your computer must be switched on...

Page 10: ...it rate 15 Mbit s 110 Default Field of View 135 TV OUT Choose the correct video output system when connecting AV OUT to TV The image on the TV will be flickering if the TV system is incorrect Choose PAL or NTSC Default VOLUME The volume of internal MIC can be set and there are 0 7 grades to be selected 7 grades Default RECYCLE When set as the mode the video will default to 30 minute per file When ...

Page 11: ...ting We suggest you format your memory card on a regular basis Should you have a problem with your camera formatting the memory card will quite often solve the issue N Default SYS RESET Choose and press REC key to sys reset When select this function item all settings shall be reset to the ex factory values YES O Note N Default VERSION The user may view the software version LANGUAGE Select the need...

Page 12: ...for waste electrical and electronic equipment or return it to the retailer on a one for one basis when buying a new similar product By correctly separating this product for recycling processing or environmentally friendly disposal you will be helping to prevent possible negative impacts on the environment and human health and contributing to the recycling of its component materials Users who dispo...

Page 13: ...no liability for any accident injury death loss or other claim related to or resulting from the use of this product In no event shall HD Max be liable for incidental or consequential damages relating to or resulting from the use of this product or any of its parts Because of possible user resealing error this product is not warranted against water housing leakage or any resulting damage Free maint...

Page 14: ...Recycled paper Copyright c 2011 All rights reserved ...

Reviews: