background image

211065 (DT-6920)

12

Vedpak 92_Version 2_021009

13

GB

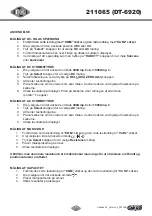
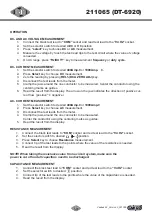
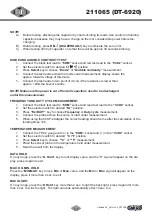
RElATIvE mEASuREmENT

Press the “

REl      

“ key, you can measure the relative value and “


“ sign will appear on the display, the 

auto range mode will be changed to manual range mode. Press it again to exit relative measurement 

and “


“ sign dissapears, but you can not go back to autorange mode. 

This function can be used to zero the reading on 

DCA

 range. 

This function is non effective on 

Hz/DuTy

 measurement.

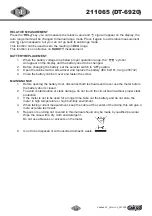
bATTERy REPlACEmENT

1.  When the battery voltage drop below proper operation range, the “        “ symbol  

will appear on the display and the battery need to be changed.

2.  Before changing the battery, set the selector switch to “

off

” position.

3.  Open the cabinet with a screwdriver and replace the battery (IEC 6LR61, Cargo 200742)

4.  Close the battery cabinet cover and fasten the screw.

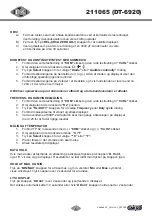
mAINTANANCE 

1.  Before opening the battery door, disconnect both test leads and never use the meter before 

the battery door is closed.

2.  To avoid contamination or static damage, do not touch the circuit board without proper static 

protection.

3.  If the meter is not to be used for a longer time, take out the battery and do not store the 

meter in high temperature or high humidity enviroment.

4.  When taking current measurement, keep the cable at the center of the clamp, this will give a 

more accurate test result.

5.  Repairs or servicing not covered in this manual should only be made by qualified personal.


Wipe the case with a dry cloth and detergent.  

Do not use abrasives or solvents on the meter.

6.  Is not to be disposed of with unsorted domestic waste.  


Summary of Contents for 211065

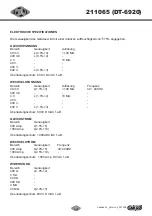
Page 1: ...vil multimeteret g p stand by Tryk p en vilk rlig knap for at forlade stand by tilstand Ved genstart af multimeteret kan man frav lge automatisk slukkefunktion ved at trykke p select knappen og holde...

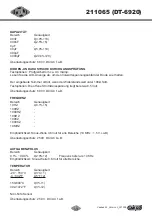
Page 2: ...ng Omr de N jagtighed Impedans Frekvens 40 mV 1 5 3 100 M 40 400HZ 400 mV 4 V 1 0 2 10 M 40 V 400 V 600 V 1 5 3 Overbelastningssikring 600V DC AC rms DC Str mstyrke Omr de N jagtighed 400 Amp 1 5 5 10...

Page 3: ...er lavere end 100 Pr vesp nding cirka 0 5 V Overbelastningssikring 600 V DC AC rms Frekvens Omr de N jagtighed 10HZ 0 1 5 100HZ 1000HZ 10KHZ 100KZ 1000KZ 10MHZ F lsomhed Sinus kurve 0 6V rms 10MHZ 1...

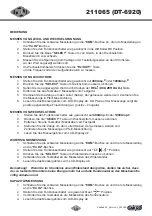
Page 4: ...fl s resultatet p displayet Pilen p k berne viser retningen af str mmen positiv _ negativ M ling af AC str mstyrke 1 Drej v lgeren til det nskede omr de 400Amp eller 1000Amp 2 Tryk p Select knappen fo...

Page 5: ...inkelm ling 1 Forbind den sorte testledning til COM stikket og den r de testledning til V Hz stikket 2 Drej v lgeren til den nskede Hz position 3 Tryk p Hz DUTY knappen for at v lge Frequency eller Du...

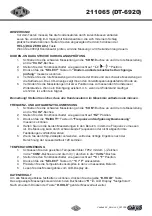
Page 6: ...eriet med samme type batteri IEC 6LR61 Cargo 200742 4 Luk batteril get og fastg r med skruen Vedligeholdelse 1 Inden bning af batterid kslet skal testledninger v re afmonteret og multimeteret m ikke a...

Page 7: ...easurement exeeds 10 min without switching mode and pressing key the meter will switch to standby mode Press any key or switch selector switch to exit standby mode When restarting the system press and...

Page 8: ...VOLTAGE Range Accuracy Resolution Frequency 40 mV 1 5 3 100 M 40 400HZ 400 mV 4 V 1 0 2 10 M 40 V 400 V 600 V 1 5 3 Overload protection 600V DC AC rms DC CURRENT Range Accuracy 400 Amp 1 5 5 1000 Amp...

Page 9: ...zzer sounds if resistance is less than 100 Test condition Open circuit voltage approx 0 5 V Overload protection 600 V DC AC rms FREQUENCY Range Accuracy 10HZ 0 1 5 100HZ 1000HZ 10KHZ 100KZ 1000KZ 10MH...

Page 10: ...ent flow positive _ negative AC CURRENT MEASUREMeNT 1 Set the selector switch to desired 400Amp or 1000Amp 2 Press Select key to choose AC measurement 3 Disconnect the test leads from the meter 4 Clam...

Page 11: ...D DUTY CYCLE MEASUREMENT 1 Connect the black test lead to COM socket and read test lead to the V Hz socket 2 Set the selector switch to desired Hz position 3 Press Hz DUTY key to choose Frequency or D...

Page 12: ...abinet with a screwdriver and replace the battery IEC 6LR61 Cargo 200742 4 Close the battery cabinet cover and fasten the screw mAINTANANCE 1 Before opening the battery door disconnect both test leads...

Page 13: ...endruck vorgenommen wird geht das Messger t automatisch in den Stand By Modus ber Dr cken Sie eine Taste oder drehen Sie an dem Einstellrad um den Stand By Modus zu verlassen Nachdem das Ger t neu ges...

Page 14: ...AC f a B wECHSELSPANNUNG Bereich Genauigkeit Aufl sung Frequenz 40 mV 1 5 3 100 M 40 400HZ 400 mV 4 V 1 0 2 10 M 40 V 400 V 600 V 1 5 3 berlastungsschutz 600V DC AC f a B gLEICHSTROM Bereich Genauigke...

Page 15: ...swert unter 100 f llt Testoptionen Die offene Stromkreisspannung liegt bei etwa 0 5 Volt berlastungsschutz 600 V DC AC f a B FREQUENZ Bereich Genauigkeit 10HZ 0 1 5 100HZ 1000HZ 10KHZ 100KZ 1000KZ 10M...

Page 16: ...gegenw rtige Flussrichtung an positiv _ negativ Messen von Wechselstrom 1 Stellen Sie den Funktionsschalter wie gew nscht auf 400Amp oder 1000Amp 2 Dr cken Sie die SELECT Taste um Wechselstrom messen...

Page 17: ...alle Kondensatoren im Messkreis entladen sein m ssen Frequenz und Aufgabenzyklusmessung 1 Schlie en Sie die schwarze Messleitung an die COM Buchse an und die rote Messleitung an die V Hz Buchse 2 Ste...

Page 18: ...schalter in die OFF Position 3 ffnen Sie das Geh use mit einem Kreuzschlitzschraubendreher und ersetzen Sie die Batterie IEC 6LR61 CARGO 200742 4 Schlie en Sie das Batteriefach und ziehen Sie die Schr...

Page 19: ...changez pas de mode ou n appuyez pas sur un bouton En appuyant sur n importe quel bouton ou interrupteur vous sortirez du mode coupure Lorsque vous relancez le syst me appuyer sur le bouton select po...

Page 20: ...mesure Pr cision R solution Fr quence 40 mV 1 5 3 100 M 40 400HZ 400 mV 4 V 1 0 2 10 M 40 V 400 V 600 V 1 5 3 Protection de survoltage 600V DC AC rms COURANT continu chelle de mesure Pr cision 400 Amp...

Page 21: ...test Voltage en circuit ouvert approximativement 0 5 V Protection de survoltage 600 V DC AC rms FR QUENCE chelle de mesure Pr cision 10HZ 0 1 5 100HZ 1000HZ 10KHZ 100KZ 1000KZ 10MHZ Sensibilit Onde s...

Page 22: ...flot de courant positive positive _ n gatif mESURE DU COURANT AC 1 Mettre l interrupteur sur ce que vous d sirez 400Amp ou 1000Amp 2 Appuyer sur le bouton Select pour choisir la mesure AC 3 D connect...

Page 23: ...oir sur la fiche COM et le fil rouge sur la fiche V Hz 2 Placer le selecteur sur Hz pour choisir la fonction d sir e 3 Appuyer sur Hz DUTY pour choisir la mesure de la Fr quence ou du coefficient d ut...

Page 24: ...et remplacer la batterie IEC 6LR61 Cargo 200742 4 Fermer le bo tier et remetter les vis mAINTANANCE 1 Avant d ouvrir la porte de la batterie d connecter les fils tests et n utiliser jamais le multim t...

Page 25: ...biare modalit e premere alcun pulsante di funzione lo strumento passa in modalit standby Premere un qualsiasi pulsante di funzione o commutare il selettore per uscire dalla modalit standby Quando si r...

Page 26: ...recisione Risoluzione Frequenza 40 mV 1 5 3 100 M 40 400HZ 400 mV 4 V 1 0 2 10 M 40 V 400 V 600 V 1 5 3 Protezione al sovraccarico 600V DC AC rms CORRENTE IN CONTINUA DC Scala Precisione 400 Amp 1 5 5...

Page 27: ...tegrato suona se la resistenza inferiore a 100 Condizioni di test Circuito aperto circa 0 5 V Protezione al sovraccarico 600 V DC AC rms FREQUENZA Scala Precisione 10HZ 0 1 5 100HZ 1000HZ 10KHZ 100KZ...

Page 28: ...indica la direzione positiva del flusso di corrente positivo _ negativo Misure di corrente AC 1 Posizionare il selettore sulla posizione desiderata 400Amp o 1000Amp 2 Premere il pulsante Select e sele...

Page 29: ...legare il puntale nero alla presa COM ed il puntale rosso alla presa V Hz 2 Posizionare il selettore su Hz 3 Premere il pulsante Hz DUTY per per selezionare frequenza o duty cycle 4 Collegare i puntal...

Page 30: ...vite e sostituire la batteria IEC 6LR61 Cargo 200742 4 Richiudere il coperchio e fissare la vite MANUTENZIONE 1 Prima di aprire lo sportellino della batteria scollegare entrambe i puntali e non usare...

Page 31: ...31 Vedpak 92_Version 2_021009...

Page 32: ...32 Vedpak 92_Version 2_021009 DK Automotive components since 1963 Vedpak 92_Version 2_040909 211065 DT 6920 RET TIL NDRINGER FORBEHOLDES...

Reviews: