16
IMPORTANT TIPS
Periodically check the water flow/vacuum to be sure that your
Cleaner is operating as efficiently as possible.
Remember, too much vacuum is just as bad as too little.
Periodically check to make sure that the Cleaner hose is securely
attached to its suction source (i.e. Skimmer, Vac Lock, etc.)
Disconnect the Cleaner hose from the Skimmer/Regulator Valve,
or, if using a “dedicated line,” turn cleaner valve off prior to
“backwashing”, so as not to restrict water flow.
DO NOT COIL HOSE
When storing your Cleaner, the hose sections must be stored
straight. A coiled hose will create a memory in the hose that will
impede the Cleaner’s ability to move properly.
Coiled hoses are not covered under the Hayward Warranty.
Use only original Hayward spare parts and hoses to insure proper
operation.
Summary of Contents for NAVIGATOR POOLVAC V-Flex
Page 20: ...19 Étape 2 Étape 1 Remplacement des semelles ...
Page 21: ...20 Remplacement des ailes Étape 1 Étape 2 CONSEILS DE MAINTENANCE ...
Page 22: ...21 Étape 3 Étape 4 ...
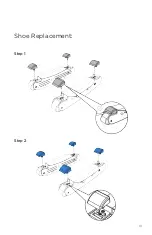
Page 45: ...19 Step 2 Step 1 Shoe Replacement ...
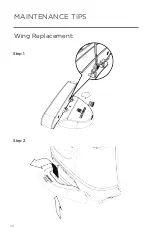
Page 46: ...20 Wing Replacement Step 1 Step 2 MAINTENANCE TIPS ...
Page 47: ...21 Step 3 Step 4 ...
Page 48: ...22 MAINTENANCE TIPS Easy Opening Bottom For Turbine Access and Inspection Step 1 Step 2 ...
Page 70: ...19 Etapa 2 Etapa 1 Cambio de las suelas ...
Page 71: ...20 Cambios de las aletas Etapa 1 Etapa 2 CONSEJOS DE MANTENIMIENTO ...
Page 72: ...21 Etapa 3 Etapa 4 ...
Page 93: ...17 Desligar o tubo principal da cabeça do robô assim que este saia da piscina ...
Page 95: ...19 Etapa 2 Etapa 1 Substituição das sapatas ...
Page 96: ...20 Substituição das asas Etapa 1 Etapa 2 SUGESTÕES DE MANUTENÇÃO ...
Page 97: ...21 Etapa 3 Etapa 4 ...
Page 120: ...19 Schritt 2 Schritt 1 Austausch der Gleitschuhe ...
Page 121: ...20 Austausch der Flügel Schritt 1 Schritt 2 HINWEISE FÜR DIE WARTUNG ...
Page 122: ...21 Schritt 3 Schritt 4 ...
Page 143: ...17 Koppel de hoofdslang los van de robotkop zodra de robot uit het zwembad wordt verwijderd ...
Page 145: ...19 Stap 2 Stap 1 Glijblokjes vervangen ...
Page 146: ...20 Vleugels vervangen Stap 1 Stap 2 ONDERHOUDSTIPS ...
Page 147: ...21 Stap 3 Stap 4 ...
Page 170: ...19 Fase 2 Fase 1 Sostituzione dei piedini ...
Page 171: ...20 Sostituzione delle alette Fase 1 Fase 2 CONSIGLI DI MANUTENZIONE ...
Page 172: ...21 Fase 3 Fase 4 ...
Page 177: ...Hayward is a registered trademark of Hayward Industries Inc 2016 Hayward Industries Inc ...


