background image

03/21     

Model SP158.15 


       Page 5 of 8 

STEP 5:  Insulation 

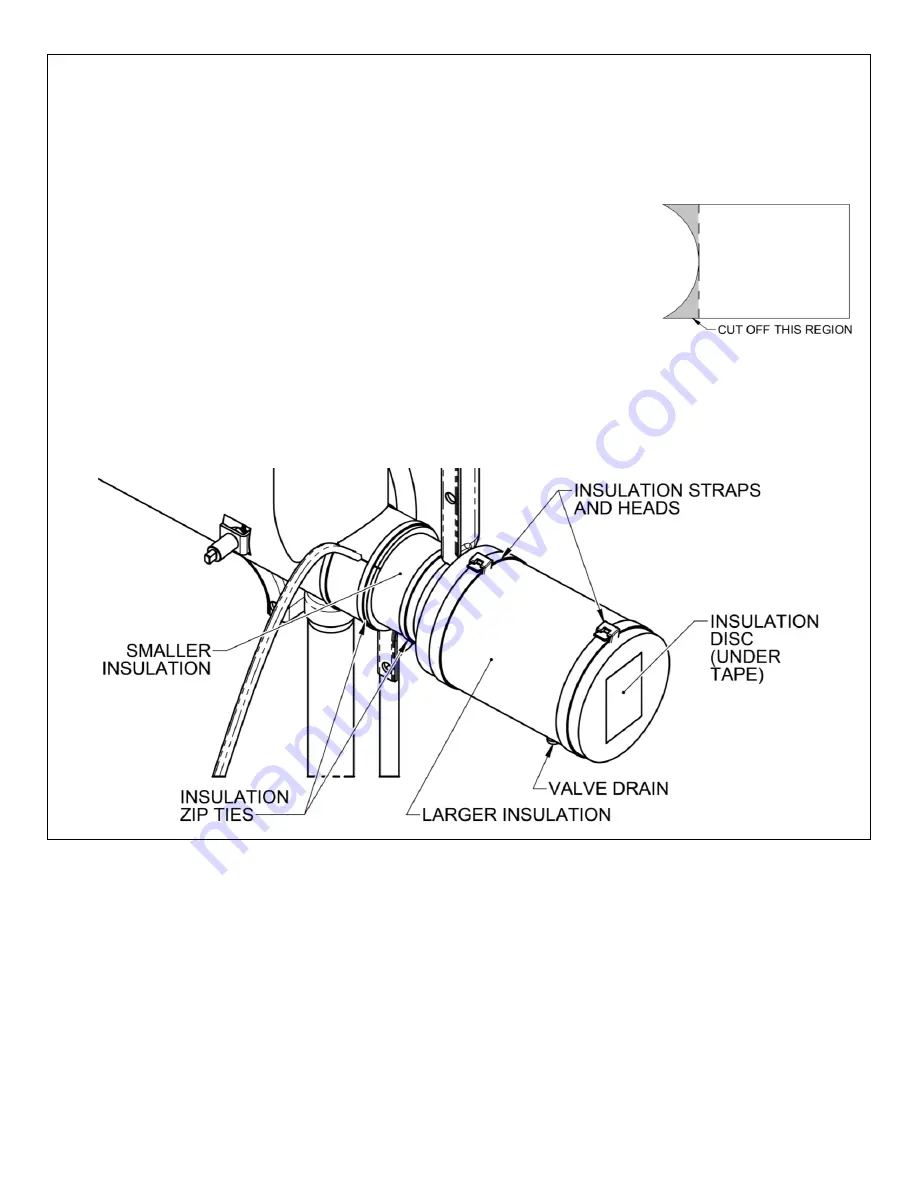
a)  Place the smaller insulation ring around the bare auxiliary piping within the jacketing, using both the 

integral adhesive strips on the insulation to close it up.  Be sure this new piece is butted fully against the 
factory insulation.  Use the insulation zip ties (found in a bundle of 4) to secure the new piece, and to 
replace the ones previously cut.  Tighten each zip tie only enough to close the insulation around the piping.   

b)  Note the large radius found on one end of the larger insulation.  For this 

application, carefully cut the radiused portion away with a serrated knife or 
saw.  Do not cut off any more than is necessary.  Place the insulation around 
the freeze valve assembly, noting the opening for the freeze valve drain.   

c)  Place the new insulation disc into the open end of the larger insulation.  Apply 

the seam tape over it to hold it in place. 

d)  Use both the integral adhesive strips on the larger insulation to close it up.  

Use the insulation straps and heads on the two ends of the larger insulation to 
further hold it in place 

– only tighten the straps enough to close the insulation 

around the plumbing (and insulation disc).   

e)  If the insulation is to be exposed to severe levels of UV (e.g. a rooftop installation), consider applying a 

protective coating or cladding (such as K-FLEX 374 or K-FLEX Clad) to the insulation. 

f)  If desired, connect the valve drain to a drain line. 


Summary of Contents for SP158.15

Page 1: ...upon written authority from HAWS Sparks Nevada HAWS will not be liable for any damages caused by defective materials or poor workmanship except for replacements as provided above Buyer agrees that Haw...

Page 2: ...trofit installations Wire cutters Pipe wrench and slip joint pliers if possible Pipe joint sealant Loctite PST 567 recommended Serrated knife or saw only for installing without the SP121 Insulation co...

Page 3: ...iping Carefully clip the zip ties holding this coil together taking care not to damage the heat trace c This extra heat trace will soon be pulled rearward so it can run out the back of the unit Clip t...

Page 4: ...ough the open square cut in the grommet and feed the excess length back within the jacket The heat trace must run along the opposite side of the auxiliary outlet plumbing until it rejoins the vertical...

Page 5: ...errated knife or saw Do not cut off any more than is necessary Place the insulation around the freeze valve assembly noting the opening for the freeze valve drain c Place the new insulation disc into...

Page 6: ...5 After cleaning lubricate all three O rings with an appropriate food grade lubricant such as Dow Corning 111 and confirm that the small O ring is in place 6 Reinstall the thermostat cartridge and ch...

Page 7: ...APPROVED DRAWN PART NUMBER SCALE REVISION JL 09 17 20 2 SP158 15 FREEZE PROTECTION VALVE 1 1 JL 04 19 21 DRAWING TYPE SIZE A 5588 BY BJM PARTS BREAKDOWN DATE DATE REV ECN 5661 CHK D MODEL S 1455 KLEPP...

Page 8: ...AL CODES SHOULD BE ADHERED TO 2021 Haws Corporation All Rights Reserved HAWS and other trademarks used in these materials are the exclusive property of Haws Corporation THIS DOCUMENT IS TRUE AND CORRE...

Reviews: