background image

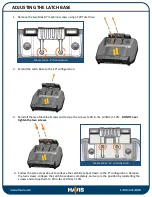
2. Extend the Latch Base to the 10” configuration. 

3. Reinstall the two Machine Screws and torque the screws to 20 in-lbs. (2.3Nm) ± 10%.  DO NOT over 

tighten the two screws.

ADJUSTING THE LATCH BASE 

1. Remove the two M4x0.7 machine screws using a T20 Torx Drive

4. Follow the same steps above to collapse the Latch Base back down to the 8” configuration. Remove 

the two screws, collapse the Latch Base down completely, and secure the position by reinstalling the 
screws and torque them to 20 in-lbs. (2.3Nm) ± 10%.  

ZEB-300 SERIES – 8” CONFIGURATION

ZEB-300 SERIES – 10” CONFIGURATION

Summary of Contents for DS-ZEB-300 Series

Page 1: ...S ZEB 302 ISO DS ZEB 303 DS ZEB 304 DS ZEB 305 ISO DS ZEB 300 SERIES_OMN_01 23 Owner s Manual Havis Docking Station For Zebra ET4X 8 Tablet with Zebra s 8 Rugged Boot Required and ET4X 10 Tablet with Zebra s 10 Rugged Boot Required ...

Page 2: ...ot or 10 Rugged Boot installed on their respective devices The Zebra ET4X tablets must have their respective Rugged Boots installed to ensure safe and proper function of the dock and tablet solution READ ALL INSTRUCTIONS THOROUGHLY BEFORE BEGINNING INSTALLATION DO NOT STORE INSTALL OR OPERATE THE DOCKING STATION WHERE WATER MOISTURE STEAM DUST ETC ARE PRESENT FOR THE DS ZEB 303 DO NOT CONNECT THE ...

Page 3: ...a ET4X 10 Tablet with Zebra s Rugged Boot Model DS ZEB 30X where X may be any alphanumeric character and which describes product options May be followed by any alphanumeric characters which describe product options Product Options This declaration covers all options of the above product which bear the UKCA Marking Supplementary Information The object of the declarations described above is in confo...

Page 4: ...8 630 219 mm Latched 7 221 183 mm Unlatched 7 662 196 mm 3 551 90 mm Dock Centerline VESA 75 Mounting Pattern M4 x 0 7 Thread 2 895 74 mm DS ZEB 300 SERIES 8 CONFIGURATION SIZE SPECIFICATIONS ...

Page 5: ...DS ZEB 300 SERIES 10 CONFIGURATION SIZE SPECIFICATIONS 8 630 219 mm 2 895 74 mm Latched 8 321 211 mm Unlatched 8 762 253 mm Dock Centerline VESA 75 Mounting Pattern M4 x 0 7 Thread 3 551 90 mm ...

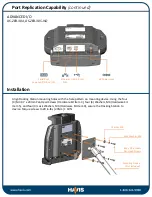
Page 6: ...attern M4 X 0 7 Threaded Inserts LED Power Indicator 6 POWER CABLE with Cigarette Adapter Havis P N DS DA 317 Alignment Tabs 6 POWER CABLE with Bare Wire Havis P N DS DA 336 Included with DS ZEB 301 DS ZEB 304 Included with DS ZEB 302 ISO DS ZEB 305 ISO Adjustable Latch Base Latch Base Adjustment Screws M4 X 0 7 x 16mm Long Screws ...

Page 7: ...udes 1 Zip Ties 4 2 Keys 2 3 M4 x 0 7 x 20mm long Pan Head Screws 5 4 Split Lock Washers 5 5 Washers M4 5 Tools required for installation 2 Phillips For M4 Pan Head Screws j k m l n Port Replication Capability STANDARD I O DS ZEB 301 DS ZEB 302 ISO USB 2 0 DC Power Input ...

Page 8: ... x 0 7 x 20mm Pan Head Screws Lock Washer M4 Mounting Device Not included Align Docking Station mounting holes with the hole pattern on mounting device Using the four 4 M4 0 7 x 20mm Pan Head Screws Hardware Kit Item 3 four 4 Washers M4 Hardware Kit Item 5 and four 4 Lock Washers M4 Hardware Kit Item 4 secure the Docking Station to device Torque screws to 20 in lbs 2 3Nm 10 ...

Page 9: ... LATCH BASE 1 Remove the two M4x0 7 machine screws using a T20 Torx Drive 4 Follow the same steps above to collapse the Latch Base back down to the 8 configuration Remove the two screws collapse the Latch Base down completely and secure the position by reinstalling the screws and torque them to 20 in lbs 2 3Nm 10 ZEB 300 SERIES 8 CONFIGURATION ZEB 300 SERIES 10 CONFIGURATION ...

Page 10: ... and reduce risk of accidental disconnects and damage 4 Create a service loop with cables to ensure that no tension is on the connectors and to enable intended motion 5 Tie off cables onto a stationary part of the mounting system 4 5 This loop must be large enough to allow full range of expected rotation and extension without stressing connections Collect cables to secure to the mounting system No...

Page 11: ...ment Posts on the DS ZEB 100 Series DS ZEB 200 Series Docking Station Alignment Sockets on the bottom of ZEBRA ET4X Tablet with Rugged Frame THE ZEBRA ET4X RUGGED BOOT EXOSKELETON FOR THE 8 AND OR 10 ZEBRA ET4X TABLET DEVICE MUST BE INSTALLED ONTO THE TABLET PRIOR TO DOCKING AND OPERATION RUGGED BOOT EXOSKELETON IS REQUIRED TO ENSURE SAFE AND PROPER FUNCTION OF THE DOCK AND TABLET SOLUTION ZEBRA E...

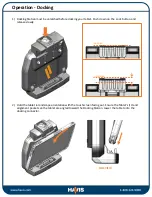
Page 12: ...down on the Lock button and release slowly Latched Unlatched 2 Hold the tablet in landscape orientation with the touchscreen facing out Ensure the Tablet s I O and alignment pockets on the tablet are angled toward the Docking Station Lower the tablet onto the docking connector SIDE VIEW ...

Page 13: ...ch Handle to secure the tablet in place You will hear an audible click when Latch Hook is fully engaged Tug up on the latch to ensure it is fully engaged 4 For theft deterrence secure tablet by locking the Docking Station with supplied key Hardware Kit Item 2 Operation Docking ...

Page 14: ...Push down on the Lock button and release quickly taking care not to obstruct the travel of the Latch Hook If the Latch Hook does not extend fully to its unlatched position lift up lightly on the front of the Latch Hook to fully release 3 Once unlatched pull the tablet forward and carefully lift out of Docking Station Operation Undocking ...

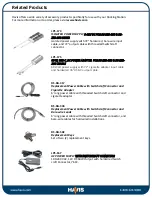
Page 15: ...Replacement Power Cable with Switchcraft Connector and Cigarette Adapter 6 long power cable with threaded Switchcraft connector and cigarette adapter LPS 174 ISOLATED POWER SUPPLY 9 32V DC FOR DS ZEB 100 DS ZEB 200 SERIES Isolated power supply with 72 hardwired bare wire input cable and 72 output cable with threaded Switchcraft connector LPS 175 60 W USB C DC POWER ADAPTER FOR DS ZEB 103 DS ZEB 20...

Reviews: