background image

Need help? Contact us at [email protected]

+

1

+

2

+

3

+

4

1

Charging

Plug the included 

charging cable

 (USB end) into the included 

power adapter

. Open the HAVEN 

Control Panel


cover 

(C) 

and plug the charging cable into the 

Charging Port


(D)

Allow HAVEN to fully charge 6-8 

hours before use. 

This is a good time to set up your account at www.myhavenlock.com or on the mobile 

app.

2

Cycling the Lock

Cycling the lock a minimum of 10 times prior to installation ensures that the nylon straps inside the lock 

are properly stretched and calibrated

. During shipment parts can settle and this cycling allows the parts to 

“stretch” and maximize their effectiveness. A “cycle” is simply locking and unlocking the lock via the foot pedal 

(F)

 and lock gate 

(E)

. Cycling the lock via the key fob or app a minimum of 5 times helps ensure the servo 

motor is properly engaged and ready for use.


3

Remove Locking Gate Cover

 (E)

If you are ready to mount and install the HAVEN Connect, 

remove the HAVEN locking gate cover by 

removing the 4 small screws (Phillips head screwdriver) on the back of the locking gate, as seen below: 

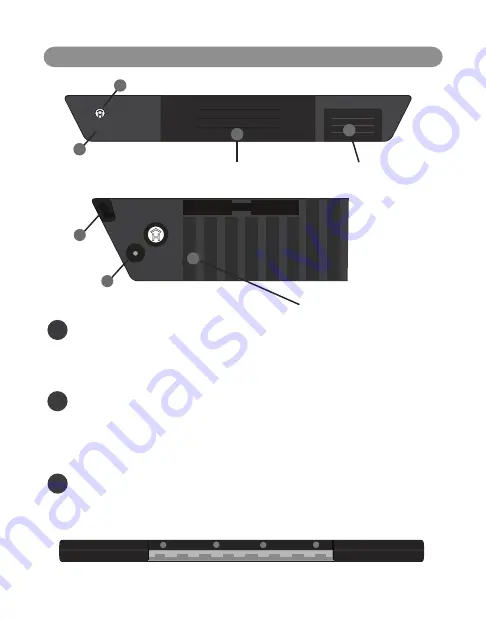
D

Charging Port

B

Admin Button

Control Panel (with cover lifted)

R

Factory Reset (using pin)

C

Control Panel Cover

A

Status Indicator LED

E

Locking Gate

F

Manual Foot Locking Pedal

PREPARING YOUR HAVEN CONNECT

   HAVEN 

CONNECT

Summary of Contents for HAVEN CONNECT

Page 1: ...ropean Patent Number 3 194 692 HAVEN CONNECT High strength Bluetooth enabled smart lock Safety Warnings Regulations Warranty Getting Started Preparing Your HAVEN Mobile Application Setup Key Fob Pairing Installation Notes Troubleshooting 1 3 4 5 6 7 8 9 10 Quick Start Guide ...

Page 2: ...roviding alternative access to the building in the event of fire potential smoke inhalation carbon dioxide event or other home emergency not listed explicitly here Owner is responsible to ensure proper fit and correct installation Owner is responsible for safety of themselves and others If you are unsure if this product is right for you please consult our Help Team at support havenlock com or other ...

Page 3: ...ration is subject to the following two conditions 1 This device may not cause harmful interference and 2 this device must accept any interference received including interference that may cause undesired operation HAVEN Lock Connect HavenLock Inc Model HL1 CNT 001 FCC ID 2ARFQHL1CNT001 IC 24389 HL1CNT001 REGULATORY INFORMATION NOTICE To avoid damage to the unit do not use on wet surfaces or damp lo...

Page 4: ...red by this warranty Limited Warranty Subject to terms and conditions of this warranty HAVEN provides a one year warranty on the product caused by manufacturers defects in the mechanical and electronic components of the product Normal wear and tear daily use and damage to the product not caused by workmanship defects are not covered by the warranty What HAVEN Will Do Upon return of the defective p...

Page 5: ...ion please see our advanced tutorials at install havenlock com Door Spacer Plastic spacer used during installation to measure the proper distance from the base of door Charging Cable USB Charging cable used to charge your HAVEN Connect Power Adapter 120v AC USB Adapter for use with included charging cable Installation Riser Optional riser used for thresholds that are higher than 0 8 and as a templ...

Page 6: ...s can settle and this cycling allows the parts to stretch and maximize their effectiveness A cycle is simply locking and unlocking the lock via the foot pedal F and lock gate E Cycling the lock via the key fob or app a minimum of 5 times helps ensure the servo motor is properly engaged and ready for use 3 Remove Locking Gate Cover E If you are ready to mount and install the HAVEN Connect remove the...

Page 7: ...the icon to expand the menu Select Pair A Device and follow the on screen instructions 3 Prepare to pair your device 2 Launch app and setup account Launch the HAVEN app and follow the steps on screen to setup your HAVEN account You will receive a confirmation email to complete the setup Note be sure to check your spam folder in your email if you do not receive the email within 5 10 minutes 1 Get pr...

Page 8: ...green a Press and release the HavenLock Admin button K then quickly press and release the Lock button J on the fob b Lights on both the HavenLock and fob should begin flashing white and the HavenLock will beep to show success in pairing Unpairing 1 Hold down the Lock button J for 15 seconds until the fob LED H flashes red blue then release 2 Within 5 seconds press and hold the Unlock button I for 10...

Page 9: ...injury or death for you or anyone around the installation area If you are not comfortable installing HAVEN Lock we advise you to seek out a professional skilled worker with home construction experience to assist you install havenlock com 1 A Center lock on door B Confirm height Measure 2 A Drill pilot holes B Clean surface Drill 3 A Place unit B Drill in screws Secure Installation Overview Where is...

Page 10: ...nlock com Make sure to turn on notifications in your HAVEN Lock app as well as your smartphone settings This will help you keep track of any changes that occur to your HAVEN Lock You can receive alerts when someone is coming and going but most importantly you will be notified of any admin actions that occur IMPORTANT SAFEGUARDS Personal Security HAVEN Connect only works as well as its user Taking pe...

Page 11: ...to the top of the pedal inward with your toes first This can take some practice to get it right HAVEN Connect Issues I need to reset my HAVEN Can I perform a factory reset To factory reset your HAVEN restore original firmware and disconnect all devices you have to hold down both the admin B and reset button R and release the reset button while still holding the admin button for 10 seconds This proce...

Page 12: ...HavenLock Inc Patent Protected European Patent Number 3 194 692 Nashville TN www havenlock com ...

Reviews: