Hauff-Technik MIS40 Assembly Instruction Manual Download Page 17

16

17

Art. Nr.: 3030335112     Rev.: 00/2020-04-28

MIS40

EN

3

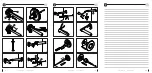
On the inside of the building, place the loosened 

quick tensioning device on the wall entry pipe.

The resin fi ller tube is inserted in the opening at the 

top (see fi g.: 8).

Legend for fi g.: 8

1

Quick tensioning device MIS40 SVS

2

Resin fi ller tube

Guide the neck of the quick tensioning device into 

the drilled hole and fi x it in place by tightening the 

vertical screw (see fi g.: 9).

Legend for fi g.: 7

1

Butyl tape

2

Pull the protective foil off the butyl tape of the 

rubber fl ange, push the MIS as far as the outer wall 

of the building and press slightly (see fi g.: 7).

Legend for fi g.: 9

1

Vertical screw

2

Horizontal screws

4

► 

The wall entry pipe is now fi xed in place!

Tighten the two horizontal screws as far as possible 

so that the MIS is pressed tightly against the outer 

wall (see fi g.: 9).

►  

As the quick tensioning device is tightened, the 

butyl tape on the outside of the building 

bulges out around the edge to create a reliable 

seal (

see fi g.:

 10)!

Cut off the resin fi ller tube to 150 mm (measured 

from the inside wall) using a side cutter (the shorter 

the tube, the easier it is to fi ll) (see fi g.: 11).

Legend for fi g.: 11

1

150 mm (inside wall to end of resin fi ller tube)

5

Insert mixer jet in the resin fi ller tube as far as it will 

go (see fi g.: 12).

6

Screw off resin cartridge closing cover (Tangit iM 

3000, 150 ml) (see fi g.: 13).
Screw cartridge onto mixer jet (see fi g.: 14).

7

Remove the bottom cover of the resin cartridge (see 

fi g.: 15).

8

Insert resin cartridge in cartridge gun (see fi g.: 16).

Applying the cartridge gun in even movements, 

inject all the resin from the cartridge into the wall 

entry.

Legend for fi g.: 16

1

Resin cartridge

2

Cartridge gun

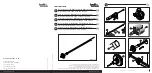
During hardening (5 – 7 minutes), do not separate 

the resin system as a whole from the MIS.

However, the resin cartridge can be taken out of the 

cartridge gun immediately after the resin has been 

injected. The cartridge must then be resealed with 

the bottom cover of the cartridge so as to prevent 

any resin components from dripping out (see fi g.: 

17).

9

Once the hardening time has expired, remove the 

reusable quick tensioning device from the MIS (see 

fi g.: 18).

Legend for fi g.: 18

1

Emptied resin cartridge

2

Quick tensioning device MIS40 SVS

10

After this, the resin fi ller tube is cut off using a side 

cutter so that it is fl ush with the wall (see fi g.: 19).

11

The protruding part of the wall entry pipe is cut off 

carefully using a saw so that it is fl ush with the wall 

(see fi g.: 20).

13

After the wall entry pipe has been cut to length, fi t 

the wall collar over the end of the pipe and push it 

into the core drill hole as far as it will go (see fi g.: 

22).

14

We recommend applying a lubricant to the media 

lines and the openings on the outside of the 

building so that the media lines can slide through 

more easily (see fi g.: 23).

12

It is now possible to pierce through the membrane 

of the entry opening from the outside of the 

building using a suitable tool (e.g. phillips 

screwdriver) (see fi g.: 21).


If only one media line is installed, then only 

one

insertion drill hole must be pushed through.

  In the case of extremely uneven, slanting or 

arched walls, the outer ring of the wall collar 

is removed at the perforation. The inner part is 

mounted as described.

Legend for fi g. 6

1

Resin fi ller tube

  The media lines to be inserted must be clean 

and free of damage at the point where they 

pass through the seals, otherwise correct sealing 

cannot be guaranteed.


The injection procedure must be completed 

within 1 minute.

Summary of Contents for MIS40

Page 1: ...iejscu www hauff technik de Immer Sicher Dicht Immer Sicher Dicht 2 Art Nr 3030335112 Rev 00 2020 04 28 Art Nr 3030335112 Rev 00 2020 04 28 MIS40 Montageanweisung MIS40 2x5 7 K L MIS40 1x9 12 K L f r...

Page 2: ...iejscu www hauff technik de Immer Sicher Dicht Immer Sicher Dicht 2 Art Nr 3030335112 Rev 00 2020 04 28 Art Nr 3030335112 Rev 00 2020 04 28 MIS40 Montageanweisung MIS40 2x5 7 K L MIS40 1x9 12 K L f r...

Page 3: ...Rev 00 2020 04 28 Art Nr 3030335112 Rev 00 2020 04 28 Art Nr 3030335112 Rev 00 2020 04 28 29 4 3 EN Notizen Notes Remarques Opmerkingen Notatki MIS40 MIS40 12 10 13 14 15 9 2 2 1 11 1 19 21 24 22 23 2...

Page 4: ...Rev 00 2020 04 28 Art Nr 3030335112 Rev 00 2020 04 28 Art Nr 3030335112 Rev 00 2020 04 28 29 4 3 EN Notizen Notes Remarques Opmerkingen Notatki MIS40 MIS40 12 10 13 14 15 9 2 2 1 11 1 19 21 24 22 23 2...

Page 5: ...5 Art Nr 3030335112 Rev 00 2020 04 28 MIS40 25 26...

Page 6: ...ein Absinken der Rohre Kabel m glich ist HINWEIS Verletzungsgefahr durch unsachgem e Montage Unsachgem e Montage kann zu Sachsch den f hren F r gemauerte Keller stehen Diamant Bohrkronen f r Trockenan...

Page 7: ...eaning agents containing solvent may be used to clean the MIS40 We recommend using cable cleaner KR M T X For details of other accessories and further information see www hauff technik de and the tech...

Page 8: ...C optimale 15 C jusqu 25 C Avant d installer le MIS 90S vous devez respecter les avertis sements conseils et recommandations suivants AVERTISSEMENT Un montage non conforme peut entra ner un risque de...

Page 9: ...d ventuels dommages dus au transport Si des dommages devaient tre constat s suite au transport veuillez proc der comme suit Ne pas accepter la livraison ou alors l accepter sous r serve Indiquer l ten...

Page 10: ...deling nodig omdat de uitzettende expansiehars voor afdichting zorgt B openingen in het metselwerk of in de wand adviseren w voor de extra bevestiging van de wanddoorvoer het gebruik van een tweede ha...

Page 11: ...ica rozpr na Tangit M3000 Sk adnik B Zawiera izocyjanat PL Nale y uwzgl dni wskaz wki oraz tre aktualnej karty bezpiecze stwa dostarczonej przez producenta Szkodliwa dla zdrowia Zawiera difenylometano...

Page 12: ...szt ywica 2 sk adnikowa 150 ml W zakres dostawy systemu MIS40 1x9 12 do cian o grubo ci 200 900 mm wchodz 1 szt ko nierz zewn trzny 40 1x9 12 1 szt powierzchnia oporowa 1 szt ta ma butylowa 290 mm 1 s...

Page 13: ...h 3 Butylband 4 Membranschlauch 5 Gegenlager 6 Harzeinf llschlauch 7 Mauerdurchf hrungsrohr 8 Wandabschlussrosette 9 Rasterbogen 5 Montage vorbereiten 1 Bohrung mit 40 50 mm Diamant Bohrkrone auf der...

Page 14: ...ehe Abb 16 Mit gleichm igen Bewegungen an der Kartuschen pistole das Harz komplett aus der Kartusche in die Mauerdurchf hrung injizieren Legende zu Abb 16 1 Harzkartusche 2 Kartuschenpistole W hrend d...

Page 15: ...r bei MIS40 2x5 7 Service Telefon 4973221333 0 nderungen vorbehalten 2 Anschlie end Rasterbogen ber die Medienlei tungen in die Aufnahme bis Anschlag schieben siehe Abb 25 3 Rasterbogen in die gew nsc...

Page 16: ...te 9 Tubular guide elbow Drill a hole with 40 50 mm diamond core bit on the inside of the building see g 5 This can be guided manually or using a drill stand It is only possible to drill into solid ma...

Page 17: ...sin cartridge 2 Cartridge gun During hardening 5 7 minutes do not separate the resin system as a whole from the MIS However the resin cartridge can be taken out of the cartridge gun immediately after...

Page 18: ...nto position see g 26 1 Insert adapter for tubular guide elbow on the inside of the building into the wall entry pipe over the media lines so that it is ush with the wall see g 24 7 Installing the tub...

Page 19: ...ble de remplissage de r sine 7 Passage mural 8 Rosace de raccordement mural 9 Coude de guidage 5 Montage vorbereiten 1 R aliser un per age l aide d un foret de 40 50 mm couronne de forage diamant e su...

Page 20: ...git iM 3000 150 ml voir g 13 Visser la cartouche dans la buse m langeuse voir g 14 7 Retirer le couvercle de fond de la cartouche de r sine voir g 15 8 Ins rer la cartouche de r sine dans le pistolet...

Page 21: ...2x5 7 2 Ensuite poussez le coude de guidage du conduites m dias dans le support jusqu la but e voir g 25 3 Tourner le coude de guidage dans la direction souhait e et le courber jusqu ce que le coude...

Page 22: ...raanslang 5 Tegenlager 6 Harsinvoerslang 7 Wanddoorvoerbuis 8 Afsluitende wandrozet 9 Rasterboog 5 Montage vorbereiten Opening met 40 50 mm diamant boorkop aan de binnenkant van het gebouw maken zie a...

Page 23: ...15 8 Harspatroon in het patronenpistool aanbrengen zie afb 16 Met gel kmatige bewegingen met het patronenpis tool de hars compleet uit de harspatroon in de wanddoorvoer inspuiten Legenda bij afb 16 1...

Page 24: ...2x5 7 2 Vervolgens de rasterboog over de transportleidin gen tot aan de aanslag in de opname schuiven zie afb 25 3 Rasterboog in de gewenste richting draaien en net zover buigen totdat de boog complee...

Page 25: ...nierz zewn trzny 3 Ta ma butylowa 4 W membranowy 5 Powierzchnia oporowa 6 W do wype nienia ywic 7 Rura przepustu ciennego 8 cienna rozeta zamykaj ca 9 Kolano segmentowe Wywierci otw r o rednicy 40 50...

Page 26: ...4 7 Zdj doln pokryw wk adu z ywicy patrz ilustr 15 8 Za o y wk ad ywicy do pistoletu patrz ilustr 16 Wykonuj c pistoletem wk adu r wnomierne ruchy ca kowicie wt oczy ywic z wk adu do przepustu cienneg...

Page 27: ...a wkr ci np rub imbusow M4x70 tylko w przypadku systemu MIS40 2x5 7 2 Nast pnie wsun kolano segmentowe z przewo d w doprowadzaj cych media do adaptera tak daleko jak to mo liwe patrz ilustr 25 3 Obr c...

Page 28: ...28 Art Nr 3030335112 Rev 00 2020 04 28 EN Notizen Notes Remarques Opmerkingen Notatki...

Page 29: ...Rev 00 2020 04 28 Art Nr 3030335112 Rev 00 2020 04 28 Art Nr 3030335112 Rev 00 2020 04 28 29 4 3 EN Notizen Notes Remarques Opmerkingen Notatki MIS40 MIS40 12 10 13 14 15 9 2 2 1 11 1 19 21 24 22 23 2...

Page 30: ...iejscu www hauff technik de Immer Sicher Dicht Immer Sicher Dicht 2 Art Nr 3030335112 Rev 00 2020 04 28 Art Nr 3030335112 Rev 00 2020 04 28 MIS40 Montageanweisung MIS40 2x5 7 K L MIS40 1x9 12 K L f r...

Reviews: