Straw Blower
Engine Powered Models
BATTERY
The battery is shipped without electrolyte.
Therefore, the battery must be filled with sul
-
furic acid electrolyte before the Straw Blower
can be used.
SAFETY WARNING!
•
Battery electrolyte can cause se-
vere burns if handled improperly.
•
Observe all poison/ danger warn-
ings on electrolyte cartons and on
the battery.
•
Wear splash-proof goggles and
protective clothing when adding
electrolyte to batteries.
•
Avoid contact of electrolyte with the
skin, eyes, or clothing.
•
KEEP BATTERIES AND ELECTRO-
LYTE OUT OF REACH OF CHIL-
DREN.
•
If electrolyte is spilled or splashed
on the body, IMMEDIATELY FLUSH
WITH WATER.
•
If electrolyte comes into contact
with the eyes, FLUSH WITH WA-
TER FOR 15 MINUTES AND GET
PROMPT MEDICAL ATTENTION.
•
If electrolyte is taken internally,
DRINK LARGE QUANTITIES OF WA-
TER OR MILK, FOLLOWED WITH
MILK OF MAGNESIA, BEATEN
EGGS, OR VEGETABLE OIL.
To fill the battery with electrolyte:
1. Place the battery on a level surface and
remove the vent caps. If the battery
has thin plastic shields in the cell
openings, remove and discard them.
2. Fill the battery with battery grade sulfuric
acids to just above the separators. DO
NOT OVERFILL.
3. Reinstall the vent caps, and charge the
battery as instructed below. AFTER
charging, check the acid level, and fill
to the bottom of the vent well open-
ings. DO NOT OVERFILL.
Charging the battery:
SAFETY WARNING!
•
The battery can produce explosive
gasses.
•
Ventilate when charging or using in
an en-closed space.
•
DO NOT produce sparks from cable
clamps, tools, or other sources; and
•
DO NOT allow flames or smoking in
the vicinity of the battery.
•
Shield eyes when working near the
battery.
•
Always keep the vent caps tight and
level.
1. Make sure the vent caps included with the
battery are installed.
2. Connect the battery to the charger accord-
ing to the manufacturer’s instructions
and charge at 10 amperes for 50 min-
utes, or 2-9 amperes for 2 hours (de-
pending on capabilities of charger).
Installing the battery:
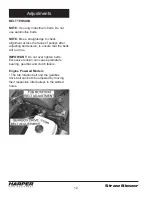
1. Make sure the cable terminals and any
hard hold-down wires are clean. If the
battery is a replacement and the
connectors and hold-down have been
used before, clean them with a wire
brush.
2. Place the battery in the tray, located at the
right rear of the machine, and secure
the battery in position with the hold-
down provided.
9
Summary of Contents for Straw Blower 1800
Page 1: ...Straw Blower Straw Blower 1800 5 2016 OPERATOR S MANUAL...
Page 2: ...Straw Blower...
Page 8: ...Straw Blower 6...
Page 19: ...Straw Blower R R...
Page 20: ...Straw Blower...
Page 35: ...Straw Blower...
Page 41: ...Straw Blower NOTES...


