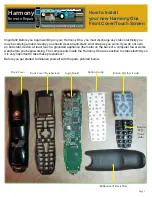
Harmony One How To Install Download Page 6

Page 6


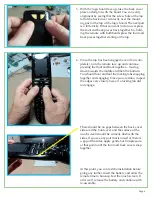
5.  With the logic board face up, take the back cover 

plate and align it with the board. You can verify 
alignment by seeing that the screw hole at the top 
left of the back cover is directly over the mount-
ing post at the top of the logic board. The next part 
is a little tricky. What you want to do now is press 
the front and back pieces back together. So, hold-
ing the remote with both hands press the front and 
back pieces together starting at the top.  


6.  Once the top has been engaged (even if not com-

pletely), turn the remote face up and continue 
pressing the front and back together – moving 
down towards the middle and then the bottom. 
You should hear and feel the locking tabs snapping 
together and engaging. Once you are done, inspect 
the edges very closely to see if a locking tab did 
not engage.  


There should be no gaps between the back cover 
sides and the front cover and the surface of the 
touch screen should be virtually flush with the 
sides. If you see any part that is raised or there is 
a gap at the sides, apply gentle but firm pressure 
at that point until the front and back covers snap 
together.  


At this point, you can test the installation before 
going any further. Insert the battery and allow the 
remote time to boot-up. Test the touch screen. If 
all is well, remove the battery and continue with 
re-assembly.  

Summary of Contents for One

Page 1: ...One you must discharge any static electricity you may be carrying around Ideally you should wear an anti static wrist strap as you work If you do not own an anti static device at least touch a ground...

Page 2: ...stic Start at the top using a pry tool and pry up the left corner Then move to the top right corner and pry that up as well Once the two top corners are free you can move the pry tool to the middle an...

Page 3: ...that the front of the remote is facing you Insert the pry tool into the seam by the Off button and slide down the seam as you did before Note that you may need to do this more than once in order to po...

Page 4: ...not get tugged or pulled It may stick a little at the top so you may need to wiggle it free from the post but then the board can be rolled to the right and removed and this is a little safer than lif...

Page 5: ...tached to the board Make sure that the post at the top of the front cover has been fully inserted into the hole in the logic board Push down gently on the board and reach your hand around to the front...

Page 6: ...he front and back together moving down towards the middle and then the bottom You should hear and feel the locking tabs snapping together and engaging Once you are done inspect the edges very closely...

Page 7: ...nspect the edges If it appears that a side tab did not fully engage simply press the spot sideways and it should click right in There should not be any spaces between this piece and the body of the re...

Reviews: