Page 3
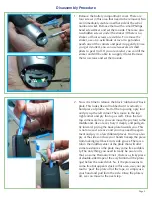
3. Removing the plate will expose three screws; one
at the top left and two at the bottom on either side.
These screws are the same size as the ones you
already removed. So, use your Phillips head screw-
driver and place these screws with the others.
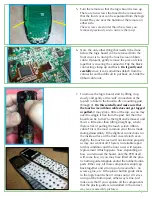
4. Now it is time to separate the two clamshell halves
of the Harmony One. A triangle pry tool is best for
this work and you should not use a screwdriver or
any other kind of sharp tool. If you do not have a pry
tool, then a hard guitar pick works well. Start with
the remote face-up in your hand and take the pry
tool and place it into seam of the clamshell casing at
the top right-hand corner. Then, simply slide down
the seam, with the pry-tool angled slightly. Do this
action quickly and firmly. Then, rotate the remote so
that the front of the remote is facing you. Insert the
pry-tool into the seam by the Off button and slide
down the seam as you did before. Note that you may
need to do this more than once in order to pop all of
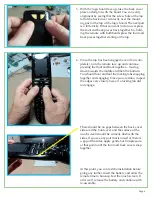
the tabs. Once it appears that the front cover is free,
do not lift the front cover off! There is too much risk
of pulling the touch screen ribbon cable and detach-
ing the delicate leads from the inside surface of the
front cover. To help prevent this, turn the remote
upside-down and lift the back cover up and off of the
front cover. Do this gently and carefully! Watch for
the small plastic ‘window’ that covers the learning
port at the back of the remote. This can sometimes
fall out of the back cover slot. So, make sure you do
the disassembly in a place where you will be able to
find this almost invisible piece should it fall!
When you are done, the back cover of the Harmony
One can be set aside and you are left with the front
cover touch screen and logic board.


