Harman® • P-Series Installation Manual_R3 • 2018 - ___ • 09/20
22
8390-044I
5
5
Appliance Set-Up
A. Unpacking
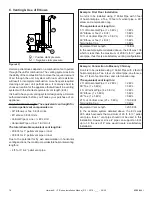
The P-Series is bolted (1/4 x 1" hex head bolts) to the skid
to prevent movement during shipping.
To free the stove from the skid you must remove the hold-
down bolts in the rear of the pedestal base using a 7/16”
socket or wrench. Figure 5.1.
B. Removing Rear Cover Panels
The rear cover panels are secured to the stove with three
screws each. Two of the screws need only be loosened, not
removed, to remove the panels. It is recommended that the
rear covers are installed using a 5/16” socket, wrench or nut
driver after the unit is in place and the vent pipe is installed,
to prevent contact with hot or moving parts.
If needed, install the (2) 5/16-18 X 3/4” leveling bolts located
in the hardware kit. Figure 5.1.
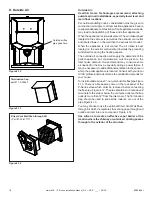
C. Firebrick
The P43-C Pellet Stove has a single (1) firebrick that gets
installed horizontally on the angle bracket above the burnpot.
The P61-C and P68-C have three (3) firebrick that get
installed vertically on the angle bracket. Figure 5.2.
D. Flame Guide
Install the cast iron flame guide on top of the burn pot. Make
sure that the flame guide is fully seated on the vertical sides
of the burn pot and that the back of the guide rests against
the body of the stove. Figure 5.3.
Figure 5.3
Flame guide
Figure 5.2
1 Firebrick
P43-C Pellet Stove
3 Firebrick
P61-C & P68-C
Pellet Stove
Figure 5.1
Rear Cover
Panel
Shipping Bolts
Note: These same holes are used for
securing the stove in mobile home
installation.
Rear Cover
Panel
Leveling
Bolt
Leveling
Bolt


