background image

12 


VENTING 

PLEASE NOTE:   If your specific venting configuration falls in a box in the venting charts (on pages 10 & 
11) that is above the dotted line (            ), you must use one of the approved direct vent venting systems 
that utilizes a stainless steel inner liner.  The dotted line corresponds to a total vent length of 30 feet includ-
ing vertical rise and horizontal run.  This requirement is part of the ANSI standards and is based on testing 
conducted to determine where the exhaust gas temperature drops to the point where condensation might oc-
cur in the vent pipe.  The standards require the use of corrosion resistant liner materials if that specific total 
vent length is exceeded. 

VENTING INTO AN EXISTING MASONRY OR CLASS A CHIMNEY 

The FireLuxe has been tested and found to be in compliance when using an existing chimney as the air con-
duit for the direct venting system.  This type of installation is used when replacing an existing wood-
burning stove with a FireLuxe direct vent gas stove.  Check with the venting manufacturer to see if they 
have the needed components or kits for this type of installation.  Also, check the vent manufacturer’s instal-
lation instructions for the specific details and requirements for this type of installation.  The chimney must 
be in good condition with no cracks or leaks for this type of installation and  the venting components must 
be sealed where they meet the existing chimney.  Also, check with the local authority having jurisdiction to 
see if this type of installation is allowed in your area. 

RESERVED FOR FUTURE VENTING CONFIGURATION INFORMATION


Summary of Contents for FireLuxe

Page 1: ... the fire department Installation and service must be performed by a qualified installer service agency or the gas supplier INSTALLER Leave this manual with the appliance CONSUMER Retain this manual for future reference This appliance may be installed in an after market permanently located manufactured home USA only or in a mobile home where not prohibited by local codes This appliance is for use ...

Page 2: ...ut être installé dans une maison préfabriquée mobile déjà installée à demeure si kes règlements locaux le permettent Cet appareil doit être uniquement avec las type de gaz indiqué sur la plaque signalétique Cet appareil ne peut être converti à d autres gaz sauf si une trousse de conversion est utilisée Ne pas utiliser cet appareils il a été plongé meme partiellement dans l eau Appeler un technicia...

Page 3: ...ORTANT SAFETY INFORMATION 4 SPECIFICATIONS 5 INSTALLATION 6 MASSACHUSETTS REQUIREMENTS 7 VENTING 8 ASSEMBLY 14 LIGHTING AND OPERATION 23 REMOTE CONTROL HANDSET OPERATION PROGRAMMING 26 MAINTENANCE 28 PARTS LIST 30 WARRANTY 31 ...
Page 4: ...h of the appliance A commercially available hearth pad meets this requirement The appliance area must be kept clear and free from combustible materials gasoline and other flammable vapors and liquids The flow of combustion and ventilation air must not be obstructed Do not use this appliance if any part has been under water Immediately call a qualifed service technician to inspect the appliance and...

Page 5: ...appliance is equipped for use with the fuel type indicated on the rating plate Fuel conversion kits that include the necessary parts and instructions are available from your installer dealer or Harman Stove Co This appliance has been certified by OMNI Test Laboratories Inc to ANSI Z21 88 2005 CSA 2 33 2005 Vented Gas Fireplace Heaters and CAN1 2 17 M91 Gas Fired Appliances for Use At High Altitude...

Page 6: ...u must also insure that your installation provides adequate accessibility clearance for servicing and proper operation When the appliance is installed directly on carpeting or tile or other combustible material other than wood flooring the appliance shall be installed on a metal or wood panel extending the full width and depth of the appliance Installation and repair should be done by a qualified ...

Page 7: ...sed professionals for the installation of hard wired carbon monoxide detectors In the event that the horizontally vented appliance is installed in a crawl space or attic the hard wired carbon monoxide detector with alarm and battery back up may be installed on the next adja cent floor level In the event that this requirement cannot be met at the time of completion of the installation of the applia...

Page 8: ...he numbers 0 8 indicate the position of the exhaust restrictor When or is added to the number designation this indicates that the position is fractionally between adjacent numbers For example 5 is one fourth the way between 5 and 6 To use the charts determine the horizontal run length and vertical rise length in feet for your installation If more than one elbow is used add 4 feet to the actual hor...

Page 9: ...3 EXHAUST INLET AIR E 7 Example 3 Fuel Natural Gas Vertical Rise 22 feet Horizontal Run 0 feet Elbows 0 Equiv Horizontal Run 0 feet Air Restrictor Setting E Exhaust Restrictor Setting 7 EXHAUST INLET AIR E 6 Example 4 Fuel Propane LP Vertical Rise 12 feet Horizontal Run 4 feet Elbows 1 Equiv Horizontal Run 4 Air Restrictor Setting E Exhaust Restrictor Setting 6 EXHAUST INLET AIR ...

Page 10: ...10 VENTING VERTICAL RISE IN FEET HORIZONTAL RUN IN FEET NATURAL GAS VENTING IF YOUR VENTING CONFIGURA TION FALLS ABOVE THIS DOT TED LINE SEE PAGE 12 ...

Page 11: ...11 VENTING VERTICAL RISE IN FEET HORIZONTAL RUN IN FEET PROPANE LP GAS VENTING IF YOUR VENTING CONFIGURA TION FALLS ABOVE THIS DOT TED LINE SEE PAGE 12 ...
Page 12: ...EXISTING MASONRY OR CLASS A CHIMNEY The FireLuxe has been tested and found to be in compliance when using an existing chimney as the air con duit for the direct venting system This type of installation is used when replacing an existing wood burning stove with a FireLuxe direct vent gas stove Check with the venting manufacturer to see if they have the needed components or kits for this type of ins...

Page 13: ...13 VENT TERMINAL CLEARANCES VENTING Venting terminals shall not be recessed into a wall or siding ...

Page 14: ...t near to its installation position Like any cast iron stove it is best to pick the stove up while adjusting its position rather than dragging it on its legs This reduces the chances of damaging a leg or chipping enamel or of damaging the hearth surface This is the best time to install the optional blower kit if being used See the instructions in cluded with the blower kit The legs have leveling s...

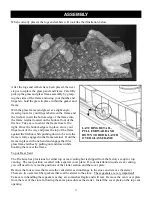
Page 15: ...burner The burner and log system is designed to facilitate correct placement of the logs Flat recessed areas on the burner top are keyed to each of the four main logs The rear logs also have locating pins with corresponding sockets in the logs The following illustration highlights these features Place the left rear log first There is recessed area in the burner top as well as a locating pin in and...

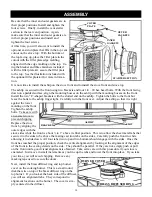
Page 16: ... last Again place the flat base of the log in the corresponding recess in the burner top per the illustration below LEFT FRONT LOG RIGHT FRONT LOG There are three loose ember pieces Each ember piece has a specific location on the burner Refer to the illustration below to get the proper placement and orientation for each ember piece If you look carefully you will see that each ember has features th...

Page 17: ...the frame against the firebox while pushing down to be sure the frame is fully engaged in the frame retainer Hold the frame in place with one hand and engage the three glass frame latches by pulling out and down while hooking them over the frame Top or Rear Vent The FireLuxe has provisions for either top or rear venting but is shipped from the factory set up for top venting The rear position is se...

Page 18: ... alignment is obtained Take extra care with this procedure if your stove is enameled Just move in small increments as you line up the tabs and lower the front into place If you take your time you will avoid chipping Remove any masking tape used to secure the doors Be sure that the inner and outer gaskets are in their proper positions Install and tighten the four screws Finally install the vent sta...

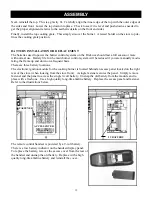
Page 19: ...oking burner is located behind an access panel located on the right rear of the stove when looking from the stove front A single fastener secures the panel Simply remove fastener and the panel to access the single 9 volt battery Unsnap the old battery from the module and re place with a fresh one Use a high quality long life alkaline battery Replace the access panel and fastener Refer to the illus...

Page 20: ...ng from the control module and be sure to place the module back it its original posi tion after the batteries and cover are installed CONTROL MODULE COVER AA BATTERIES VALVE ACCESS PANEL CONTROL MODULE VALVE GAS CONNECTION The FireLuxe is shipped from the factory with a flexible gas connector that has a 1 2 NPT female connec tion The gas supply piping should have a separate gas shut off valve and ...

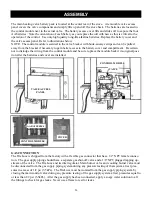
Page 21: ... heat shield as needed and remove Refer to the illustrations below PRIMARY AIR ADJUSTER Your FireLuxe gas stove was shipped from the factory equipped for the fuel type indicated on the rating plate that is attached to the rear of the stove and the pri mary burner air adjuster was set at the factory at the rec ommended position for that fuel If you will be using the alternate fuel please see the in...

Page 22: ...an one full increment of adjustment should be used If no change in the flame appearance is noted after that consult with a Harman Stove Company rep resentative If after 20 30 minutes at high fire the flames are short or blue the fire is probably getting too much air You should first reduce the primary burner air by loosening the adjuster screw locknut and turning the ad juster screw in one turn Se...

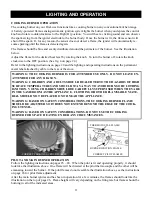
Page 23: ...age 2 This appliance is equipped with an ignition device that automatically lights the pilot When using the remote handset do not try to light the pilot by hand 3 Push the OFF button on the remote handset to insure the appliance is off 4 Wait five 5 minutes to clear out any gas Then smell for gas including near the floor If you smell gas STOP Follow A in the safety information above If you don t s...

Page 24: ...cate the valve on the back of the stove Turn the main valve knob to the OFF full clockwise position 3 Wait five 5 minutes to clear out any gas Then smell for gas including near the floor If you smell gas STOP Follow A in the safety information on page 23 If you don t smell gas proceed to Step 4 4 Visually locate the pilot at the center rear of the firebox Refer to Fig 3 below 5 With the MAN knob i...

Page 25: ... FOR ANY REASON WARNING CHILDREN AND ADULTS SHOULD BE ALERTED TO THE HAZARDS OF HIGH SURFACE TEMPERATURES AND SHOULD STAY AWAY TO AVOID BURNS OR CLOTHING IGNITION YOUNG CHILDREN SHOULD BE CAREFULLY SUPERVISED WHEN THEY ARE IN THE SAME ROOM AS THE APPLIANCE CLOTHING OR OTHER FLAMMABLE MATE RIAL SHOULD NOT BE PLACED ON OR NEAR THE APPLIANCE WARNING BASED ON SAFETY CONSIDERATIONS THE COOKING BURNER F...

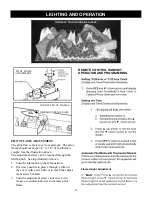
Page 26: ...tration above The adjustment screw can be reached through the MAN knob See top illustration above 1 Turn the Man knob to the ON position 2 It is now possible to pierce through a film on the cover with a screwdriver to reach the adjust ment screw beneath 3 Turn the adjustment screw clockwise to de crease or counterclockwise to increase pilot flame CORRECT PILOT FLAMES PILOT FLAME ADJUSTMENT CORRECT...

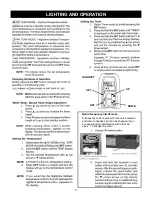
Page 27: ...ATION SET OFF UP DOWN Radio Frequency Interference A frequency code is preset for the valve receiver and remote handset but can be changed if you are experiencing interference with other de vices To change the code HANDSET ...

Page 28: ... glass and frame aside on a padded surface If the glass is broken do this over spread out newspaper to catch all loose material The outside of the frame should be facing down to give ac cess 5 Carefully remove the old glass and gasket material If the glass is broken wear gloves and eye protec tion 6 Be sure to remove any broken glass from the burner and logs 7 Install the new glass gasket onto the...

Page 29: ...ove It is important that air flows freely through the convection air system and out the front and side air grills Do not place objects under the stove that will block the convection air inlet flow or in front of any air grill If the optional convection air blower is installed check the blower during the annual service appointment for any build up of dust lint or pet hair COOKING BURNER SYSTEM As w...

Page 30: ...30 PARTS LIST This is a quick response thermocouple Replace it only with Part No 3 40 09906 ...

Page 31: ...htning acts of God power failures and or surges rust corrosion and venting problems are not covered Damage and or repairs including but not limited to remote controls filters fuses knobs glass ceramic brick panels ceramic fiber afterburners combustion packages door packing tile ceramic burner and log sets paint batteries or battery backups and related duct work are not covered Also excluded from t...

Page 32: ...32 For replacement parts and customer service contact your Harman Stove dealer Manufactured by HARMAN STOVE COMPANY 352 MOUNTAIN HOUSE ROAD HALIFAX PA 17032 Ver 04 09 06 ...

Reviews: