background image

19

INSTALLATION 

Video 2 Source

The Video 2 source is used only for playback. Since the remote is prepro-
grammed to operate a Harman Kardon DVD player when the Video 2
source is selected, we recommend that you connect a DVD player to
the Video 2 Inputs.

You may have observed that the HK 3485 is not equipped with digital
audio inputs or surround sound decoding. If you prefer the complete
home theater experience, you may wish to consider purchasing a full-
featured Harman Kardon AVR Series audio/video receiver. However, we
hope you will find that using a DVD player with the HK 3485 in smaller
settings, such as a bedroom or den, surpasses the audio performance
of most televisions, including those with onboard stereo speakers.

Connect the left and right analog audio outputs of the DVD player to 
the Video 2 Audio Inputs on the HK 3485. Then connect the composite
video output of the DVD player, usually colored yellow, to the Video 2
Video Input. See Figure 16.

Figure 16 – Video 2 Audio and Video Inputs

NOTE:

If you receive your television programming using your TV

with an antenna or direct cable connection, then you will need
to connect the analog audio (if available on your TV) outputs to
the Video 2 Analog Audio Inputs. Do not connect any video 
output on the television set to any Video Input on the receiver.
See Step Five for information on connecting the receiver’s Video
Monitor Outputs to the television.
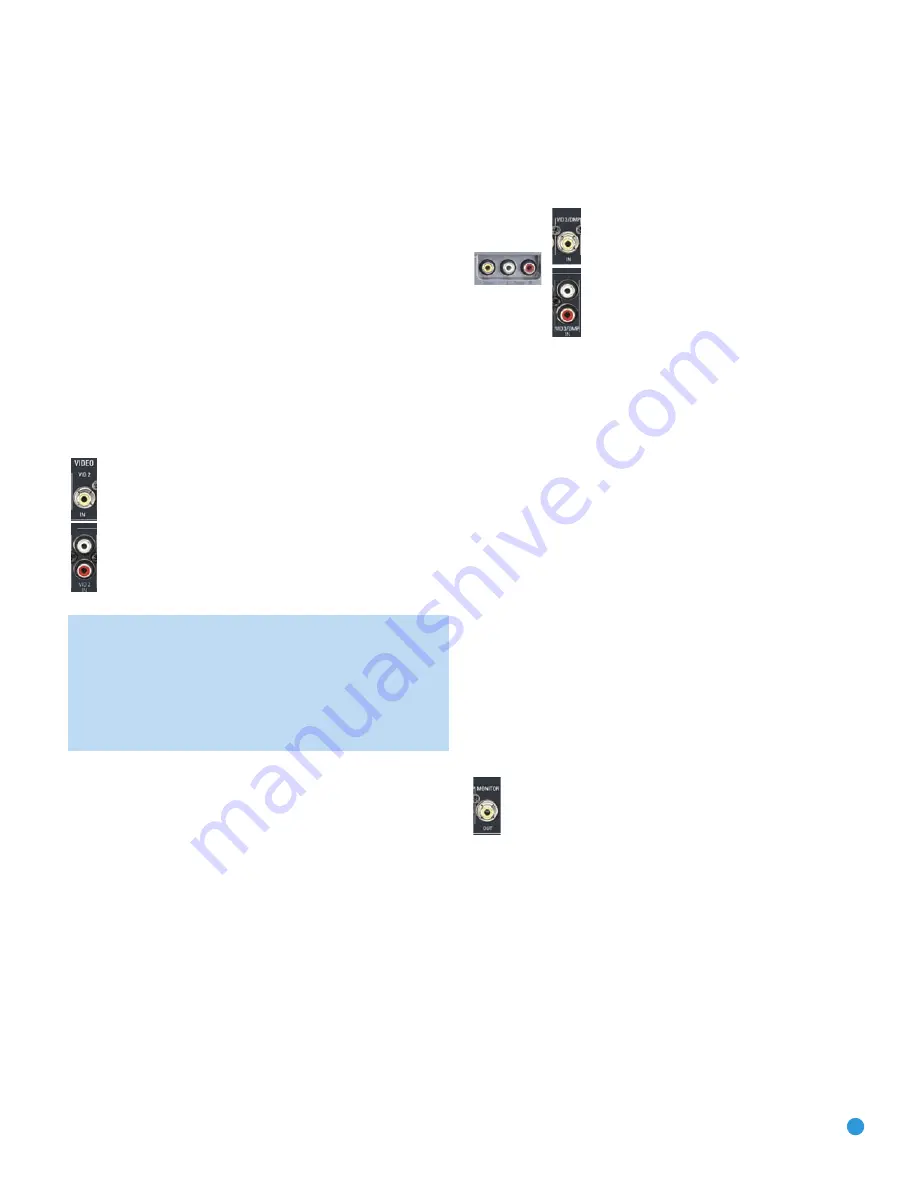
Video 3 Source

The Video 3 source is used only for playback. The Video 3 source 
has two sets of input jacks, one located on the HK 3485’s rear panel
and one set on the front panel. If you wish to connect a video device
more or less permanently, you may prefer to connect it to the rear-panel
inputs for a neater appearance. You may prefer to reserve the front-
panel inputs for devices connected on a temporary basis, such as a
video-capable iPod (not included), a camcorder, a game console, or
another type of media player with analog audio and/or video outputs.

You may connect devices to both the front- and rear-panel inputs simul-
taneously. To select either device, press the Video 3 Source Selector on
the HK 3485’s front panel or remote repeatedly. When the dot to the
left of the Video 3 Input Indicator (on the front panel of the HK 3485) 
is lit steadily, the rear-panel inputs are active. When the dot flashes, the
front-panel inputs are active.

Connect the left and right analog audio outputs of your device to the
corresponding Video 3 Inputs on either the front or rear panel, and if
available, connect the composite video output of the device to the 
Video 3 Video Input on the same panel. See Figure 17.

Figure 17 – Front- and Rear-Panel Video 3 A / V Inputs

To connect an iPod to the Video 3 Inputs, insert the 1/8" mini plug on
the A / V cable included with the HK 3485 into the iPod’s headphone
jack. Insert the left and right analog audio plugs on the other end of 
the A / V cable into the Video 3 Audio Inputs on the front of the receiver.
If the iPod is capable of playing videos or displaying images, insert the
composite video plug of the A / V cable into the Video 3 Video Input.

Since the remote is preprogrammed to operate a Harman Kardon DVD
player when the Video 3 source has been selected, use the original
remote to control other components, or operate an iPod using its own
controls.

Step Five – Connect the Video Display

Only video connections should be made between the receiver and 
your video display (TV), unless your TV is the source for your television
programming (see note above).

To view video or images played by your source devices, connect the
Video Monitor Output of the HK 3485 to a Composite Video Input on
your television or video display. See Figure 18. Consult the manual for
your TV so that you understand how to select and display the correct
Video Input.

Figure 18 – Video Monitor Output

Step Six – Connect the Remote IR Input and
Output (Optional)

The HK 3485 is equipped with a Remote IR Input and a Remote IR
Output to facilitate use of your system with a remote control in a variety
of situations.

When the HK 3485 is placed in such a way that aiming the remote at
the front-panel IR sensor is difficult, such as inside a cabinet or facing
away from the listener, you may connect an external IR receiver, such 
as the optional Harman Kardon HE 1000, to the Remote IR Input jack.

If any of your source devices are equipped with a compatible Remote IR
Input, you may use a 1/8" mini-plug interconnect cable (not included) to

HK 3485 OM  2/15/07  4:20 PM  Page 19

Summary of Contents for HK 3485

Page 1: ...HK 3485 STEREO RECEIVER OWNER S MANUAL...

Page 2: ...s and built up static charges Article 810 of the National Electrical Code ANSI NFPA 70 provides information with regard to proper grounding of the mast and supporting structure grounding of the lead i...

Page 3: ...terials that may be damaged by heat or heavy objects Some surface finishes may be particularly sensitive to absorbing such marks due to a variety of factors beyond Harman Kardon s con trol including t...

Page 4: ...4 NOTES...

Page 5: ...ATION 21 Turning On the HK 3485 21 Sleep Timer 21 Volume Control 21 Mute Function 21 Tone Controls 22 Headphones 22 Speaker 1 2 22 Source Selection 22 Using the Tuner 23 Recording 24 Dim Function 24 P...

Page 6: ...product its installation or its operation please contact your retailer or customer installer or visit our Web site at www harmankardon com Please register your product on our Web site at www harmanka...

Page 7: ...Analog Audio and Video Inputs Connect a source component that will only be used temporarily to these jacks such as a camera or game console or connect an iPod using the supplied audio video cable Bala...

Page 8: ...witch Volume Control CD Source Selector Tape Source Selector Phono Source Selector Video Source Selectors Message Display Dimmer Sleep Treble Control Balance Control NOTE To make it easier to follow t...

Page 9: ...tion is in use The numbers in the Preset Number Sleep Timer Indicators will show the minutes remaining before the HK 3485 turns off Preset Indicator This indicator lights when the tuner is in use to s...

Page 10: ...Outputs Use two conductor speaker wire to connect each set of terminals to the correct speaker Remember to observe the correct polarity positive and negative connections Always connect the positive l...

Page 11: ...reamp Outputs Subwoofer Outputs Main Amp Inputs Speaker 2 Outputs Switched AC Accessory Outlets Speaker 1 Outputs Phono Inputs and Ground CD Inputs Tape Inputs Tape Outputs NOTE To make it easier to f...

Page 12: ...f the Video 3 Indicator in the Message Display lights steadily rear panel connections selected or flashes front panel connections selected Preset Stations Selectors Track Skip Press these buttons to s...

Page 13: ...a with a single button press To start the process make sure the FM tuner has been selected as the source Press and hold this button The Memory and Preset Indicators will flash as the HK 3485 tuner sca...

Page 14: ...gh hole in the collar is revealed 2 Insert the bare end of the wire into the hole 3 Screw the cap back into place until the wire is held snugly Figure 2 Binding Post Speaker Terminals With Bare Wires...

Page 15: ...looks like an analog audio jack although it is important never to confuse the two Do not plug a com posite video cable into an analog audio jack and vice versa Both the chrominance color and luminanc...

Page 16: ...er The subwoofer s location is less critical since low frequency sounds are omnidirectional Placing the subwoofer close to a wall or in a corner will reinforce the low frequencies and may create a boo...

Page 17: ...er or both pairs of speakers simultaneously See Figure 9 Figure 9 Speaker Connections Step Two Connect the Subwoofer Connect the Subwoofer Outputs on the HK 3485 to the line level inputs on your subwo...

Page 18: ...s Use one of the other available audio input sources on the HK 3485 Compact Disc CD Player Connect the analog audio outputs of your CD player or another audio only device to the CD Audio Inputs See Fi...

Page 19: ...85 s front panel or remote repeatedly When the dot to the left of the Video 3 Input Indicator on the front panel of the HK 3485 is lit steadily the rear panel inputs are active When the dot flashes th...

Page 20: ...n nect the processor s analog audio outputs to the Main Amp Inputs on the HK 3485 Alternatively you may connect the external processor to the HK 3485 s Tape Monitor Loop See Figure 14 Step Eight Plug...

Page 21: ...the sleep timer and the SLEEP OFF message will appear Volume Control The volume may be adjusted either by turning the knob on the front panel clockwise to increase volume or counterclockwise to decre...

Page 22: ...a DVD player to the HK 3485 remember to select two channel audio in the DVD player and disc menus The HK 3485 does not switch the last selected video source when an audio only source such as Phono CD...

Page 23: ...uto Preset You may automatically program all FM radio stations in your area that are received with acceptable signal strength into the HK 3485 s presets Press and hold the Auto Preset Button until the...

Page 24: ...off and unplug the AC power cord for at least three minutes Plug the cord back in and turn the receiver back on If this doesn t help you may want to try a system reset NOTE A system reset erases all u...

Page 25: ...nterference Move unit or antenna away from computers fluorescent lights motors or other electrical appliances Audio sources sound distorted CD player or other audio device Only plug a device into the...

Page 26: ...ECAM Signal Format Composite Input Level 1Vp p Input Impedance 75 Ohms unbalanced Sync Polarity Negative Output Level 1Vp p Output Impedance 75 Ohms unbalanced Video Frequency Response 10Hz 10MHz Gene...

Page 27: ...Search Reverse Tuning Down Tuning Down Tuning Up DVD Search Forward DVD Search Forward DVD Search Forward CDR Search Forward CD Search Forward Tuning Up Tuning Up Record Pause DVD Pause DVD Pause DVD...

Page 28: ...250 Crossways Park Drive Woodbury New York 11797 www harmankardon com 2007 Harman International Industries Incorporated All rights reserved Part No CQX1A1187Z...

Reviews: