background image

Operation

While the disc is playing, the track being
played will show both as a large number
in the middle of the display and as a
smaller, flashing number at the bottom
of the display. The elapsed time of the
track being played will also appear in the
display. As a disc plays, the track num-
bers will change, and the time will reset
to

at the start of each new track.

To momentarily pause the play of a disc,
press the 

Pause

button 

6 l

. Note

that a Pause indication 

±

will appear in

the display to remind you that the disc is
paused. Press either the 

Play

button 

4

j

or the 

Pause

button 

6 l

to

resume normal play.

To stop the disc, press the 

Stop/Clear

button 

5 k

. When the Stop button is

pressed the display again will show the
total number of tracks and total running
time of the disc.

To remove a disc from the player, press
the 

Open/Close

button 

&

. To prevent

dirt and dust from entering the unit, do
not leave the disc tray open.

To place the unit in a Standby mode,
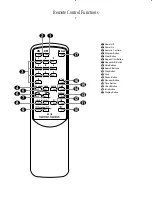
press the 

Power Off

button 

a

on 

the remote. The 

Status Mode

Indicator

2

will glow amber, indicat-

ing that the unit is off, but ready to
accept a Power On command from the
remote. If the disc drawer is open, it will
automatically close when the unit is
placed in the Standby mode. This ensures
that the unit will not be harmed from
dust, dirt or inadvertent damage to the
drawer mechanism.

Note that the unit is not removed from
AC main power when it is in the Standby
mode. During long periods of inactivity,
it is recommended that the 

Main Power

Switch

1

be used to turn the unit off.

The Status Mode indicator will not be lit
when the unit is totally turned off.
Remember to turn the unit back on with
the 

Main Power Switch

1

in order to

use the remote control.

Disc-Handling Notes

When loading or unloading discs, it is
best to hold them by the edges.

While Compact Discs are very reliable,
rough handling may damage them. Avoid
scratching the bottom (non-printed) side
of discs, or any handling which will leave
fingerprints.

To avoid damage to the disc and player,
always seat discs so that they are centered
in the tray.

Do not lift the player while the disc tray 
is opening or closing, as this may cause
the disc to unseat from the tray and 
possibly jam.

Headphone Listening

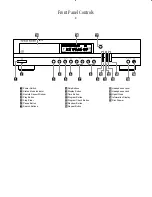
You may listen to the output of the
HD720 through headphones by plugging
a set of standard headphones with a 

1

4

"

headphone plug into the front panel

Headphones Jack

^

. The volume of

the headphone output may be adjusted
with the 

Headphones Level

knob 

%

. Note that changing the headphone

level will not change the volume for the
main audio output. This is a fixed out-
put, and it is changed using the volume
control on your receiver, preamplifier or
surround processor.

Display Dim

In some instances, it may be desirable to
reduce the brightness of the display or to
turn it off completely. To do this, press
the 

Display

button 

9 q

once to dim

the display to half brightness. Press it
again to turn the display off. A third press
will return the display to normal level.

Time Display

The HD720’s time display is capable of
showing a wide range of information
about a CD.

In normal operation the display will
show the total running time of a CD after
the disc is first put in the unit. When the
disc is played, the display will show the
running time of a track in play. Each
time the track changes, the time display
will reset to

and begin to

increase again as the disc plays.

To view the time remaining on an indi-
vidual track, press the 

Time

button 

)

n

once. The display will now show the

time left in the track in play, and the

REMAIN

indicator will light next to the

time display as a reminder of the dis-
play’s status.

To view the total time remaining to play
on the disc, press the time button twice.
The 

REMAIN

and 

TOTAL

indicators will

light to remind you of the function in
use.

NOTE:

When a disc contains more than

thirty (30) tracks, the time display may
read “–  –  :  –  –”. This is normal and
it does not indicate any problem with the
disc or the HD720.

11

HD720 –120V  Owner's Manual   9/17/98 9:54 AM  Page 11

Summary of Contents for HD720

Page 1: ...Compact Disc Player Owner s Manual op Clear Search Pause Phones Phones Level Display Time Random Program Program Check Repeat Skip Open Close TOTAL OVER MIN SEC TRACK 1 2 3 4 5 6 7 8 9 10 11 12 13 14...

Page 2: ...Staple or clip original invoice here...

Page 3: ...1 Normal Play 10 11 Disc Handling Notes 11 Headphone Listening 11 Display Dim 11 Time Display 11 Program Search 12 Search 12 Skip 12 Intro Search 12 Programmed Play Operation 13 14 Programmed Play 13...

Page 4: ...asure If you have any questions about this product its installation or operation please contact your dealer as they are your best source of local information Description and Features Digital Output fo...

Page 5: ...ension Cords We do not recommend that extension cords be used with this product As with all electrical devices do not run power cords under rugs or carpets or place heavy objects on them Damaged power...

Page 6: ...io TV technician for help This device complies with Part 15 of the FCC Rules Operation is subject to the following two conditions 1 this device may not cause harmful interference and 2 this device mus...

Page 7: ...heck Button Random Button Repeat Button Headphones Level Headphones Jack Open Close Information Display Disc Drawer HD 720 Power Stop Clear Search Play Pause Phones Phones Level Display Time Random Pr...

Page 8: ...ess of the button will return the display to normal brightness Time Button Press this button to select the time display In normal operation the display will show the running time of a track being play...

Page 9: ...essor or preamplifier Autoplay Switch When this switch is in the ON position the HD720 will automatically go into the Play mode whenever the power is turned on and a disc is in the CD drawer To disabl...

Page 10: ...DISPLAY SKIP SEARCH h b a j k l m n o p q c e g i f d a Power Off b Power On c Numeric Controls d Program Button e Clear Button f Repeat 1 All Button g Repeat A B Button h Skip Buttons i Search Butto...

Page 11: ...ton Press this button to repeat a segment of the disc Press the button once to mark the start of the portion to be repeated Press it again at the end of the desired sequence The marked passage will no...

Page 12: ...holding the bottom side up Press lightly on the embossed arrow on the cover and gently slide the cover towards you in the direction of the arrow Insert the batteries inside the com partment being car...

Page 13: ...disc The number of tracks will be shown in a large number within the display and all of the available tracks will light in the smaller boxed number indicators at the bottom of the display NOTE When th...

Page 14: ...void scratching the bottom non printed side of discs or any handling which will leave fingerprints To avoid damage to the disc and player always seat discs so that they are centered in the tray Do not...

Page 15: ...track at a time The Skip buttons may be used when the HD720 is either playing or stopped If the unit is stopped the Skip buttons may be used to locate the first track to be played The Play button 4 j...

Page 16: ...acks that you wish to program press the Play button 4 j to begin playback of the programmed sequence The tracks will now play back in the order in which they were programmed When the complete set of p...

Page 17: ...rogram the unit for A B play first locate the point on the disc where you wish to begin the repeated section At that point press the Repeat A B button g The REPEAT and A indicators will light in the I...

Page 18: ...ertain AC power cord is plugged into a live outlet Turn on Main Power Switch Install fresh batteries observing polarity indications Remove obstructions from the front panel sensor or connect a remote...

Page 19: ...System Frequency Response 8Hz to 20kHz 1dB Total Harmonic Distortion THD 0 006 Dynamic Range 96dB Signal to Noise Ratio 105dB Channel Separation 92dB Line Output Level 2 0V RMS General Power Requireme...

Page 20: ...HD 720 Power Stop Play fl Printed in China Part 1111 HD720 CEC6P10068030...

Reviews: