background image

C

ONFIRM

A

DDRESS

S

CREEN

O

PTIONS

Besides touching the G

O

button to begin navigation, the C

ONFIRM

A

DDRESS

screen (see page 12) also gives you these options:

V

IEW

M

AP

:

Touch to see a map showing your destination. You can change the

map view and zoom the view in and out (see

Map Screen Options

, on page 14).

NOTE: Touching the V

IEW

M

AP

button does not begin navigation.

S

IMULATE

:

Touch to have the GPS-410/510 simulate the trip. The simulation

includes all map movements and voice-guidance turn prompts, and takes
place at high speed. To abort the simulation, touch anywhere on the screen.

S

AVE

:

Touch to save the address in the GPS-410/510’s address book. If you 

want to, you can add a name to the address.

Navigating to Your Destination

Once you have entered your destination, touching the G

O

button on any of

the GPS-410/510’s C

ONFIRM

A

DDRESS

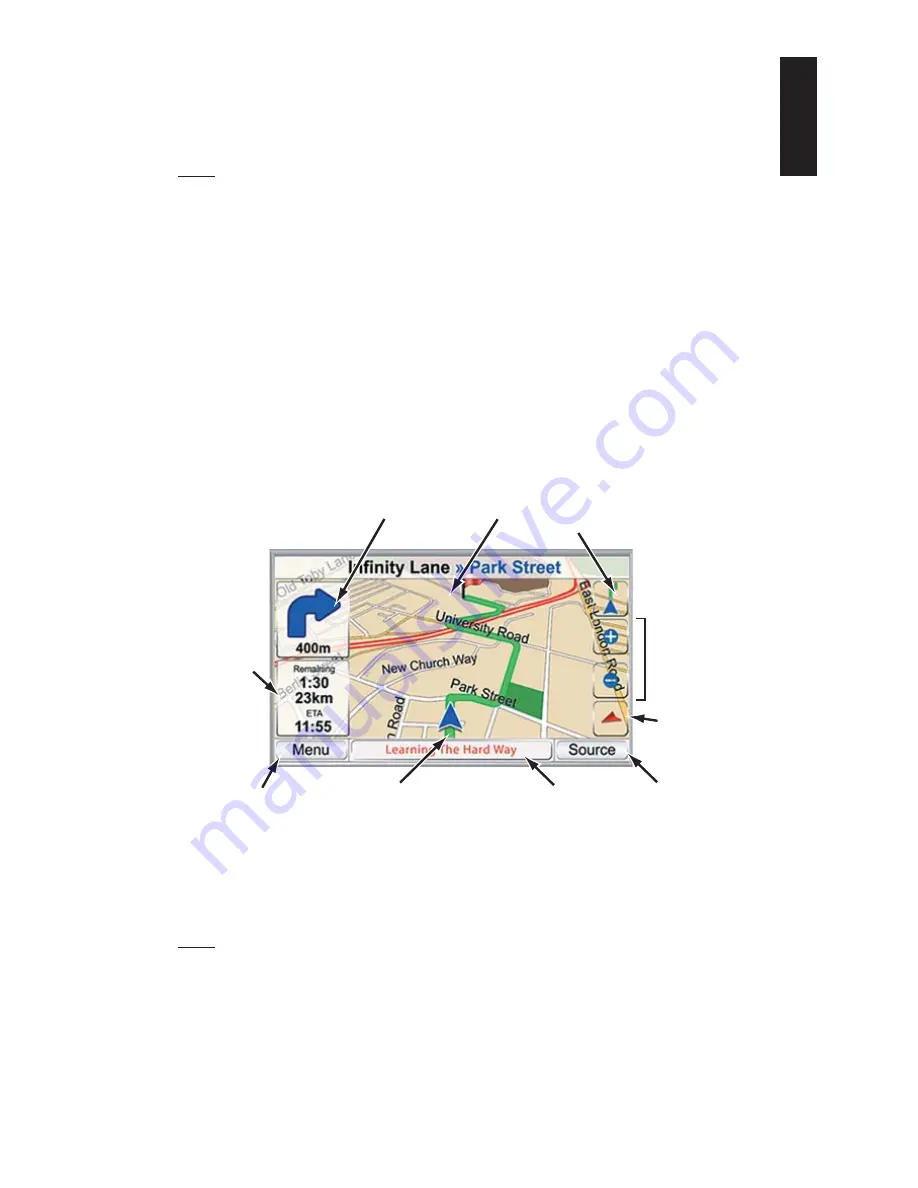
screens will begin navigation. The Map

screen  (

below

) will appear. The blue arrowhead indicates your present loca-

tion and your direction of travel. The route that the GPS-410/510 has calculat-
ed is indicated by the green line. 

The map shows the distance to and direction of your next turn, and also
shows the remaining time and distance of your trip and your estimated
arrival time.

NOTE: If you are playing music on the GPS-410/510’s Music Player (see page 22), the M

AP

screen will also display the title of the currently playing song.

As you drive, the GPS-410/510 keeps track of your position via GPS, will issue
voice-guidance commands through the built-in speaker, telling you when
and where to turn, and the map will continually update your position along
your route. If you make a wrong turn, the GPS-410/510 will automatically 
calculate a new route and will continue to guide you to your destination. 

U

ser Manual

e

d

i

u

g

+

y

a

l

p

GPS-410/510

13

ENGLISH

Distance Until Next Turn

and Direction of Next Turn

Remaining

Time & Distance

and Estimated

Arrival Time

Your Current Location

and  Direction of Travel

(Blue Arrowhead)

Title of Currently Playing Song

Calculated

Route (Green)

Map Screen

L

OCK

/U

NLOCK

 Button 

(shown Locked)

Map

Zoom

Buttons

Map

View

Button

N

AVIGATION

 M

ENU

 B

UTTON

Source Button 

(Back to Main Menu)

Summary of Contents for GPS-510

Page 1: ...Portable Touchscreen Navigation System and A V Media Player User Manual ENGLISH e d i u g y a l p GPS 410 510 ...

Page 2: ...lymer battery Under normal operating conditions this battery will provide superior service with a lifespan that is superior to those of other battery types To protect the performance of your GPS 410 510 and its battery please observe the following guidelines Do not operate the GPS 410 510 in ambient temperatures outside of the following range 14 F 10 C to 131 F 55 C Do not store the GPS 410 510 ev...

Page 3: ...should contain these items GPS 410 510 Unit Wall Charger Car Charger USB Cable Fold Flat Mounting Bracket Mounting Base Disc for Dash Mounting Adhesive Pad for Mounting Base Disc Alcohol Cleaning Pad for Dash Surface Carrying Case Quick Start Guide TMC Wire Antenna If anything is missing notify the dealer where you purchased your GPS 410 510 right away Unpack your GPS 410 510 carefully and save th...

Page 4: ... LEFT SIDE FRONT TOP BOTTOM BACK RIGHT SIDE Lock Switch Volume Brightness Control Headphone Jack Mini USB Connector Charger Port GPS Antenna ON OFF Button SD Card Slot Reset Button Speaker Mounting Slot Mounting Slot Touchscreen External GPS Antenna TMC Antenna Jack ...

Page 5: ...tion that you have entered such as your home location etc MOUNTING SLOT Lets you lock the GPS 410 510 onto the included fold flat mounting bracket for use in a vehicle Left Side LOCK SWITCH Locks the GPS 410 510 s touchscreen and all of its contols This prevents accidental operation without your having to turn the unit s power off so you can carry it in your pocket or purse TMC ANTENNA JACK Connec...

Page 6: ...ct the GPS 410 510 s Mini USB Connector Charger port to the wall charger After the battery has charged for at least 6 hours 1 Make sure the LOCK switch is in the DOWN unlocked position 2 Go outdoors to obtain GPS reception 3 Hold down the ON OFF button until the unit turns on 1 Unlock Switch 3 Turn Power ON 2 Go Outside to Receive GPS Signal TMC Antenna Jack 1 2 User Manual 6 e d i u g y a l p GPS...

Page 7: ... will not reappear To change any of these settings see CHANGING NAVIGATION SETTINGS on page 16 User Manual e d i u g y a l p GPS 410 510 7 ENGLISH 1 Touch the button for the screen language you want to use Nederlands English Français Deutsch Italiano Espagñol Touch the NEXT button 2 Touch the button for the distance units you want to use km m miles feet or miles yards Touch the NEXT button 3 Touch...

Page 8: ...the appropriate button for the city you want to travel to If you select one of the city buttons the ENTER CITY NAME screen below appears Changing the country by pressing SELECT COUNTRY The ENTER CITY NAME screen right appears 3 Spell the name of the desired city When you have finished touch the DONE button The ENTER STREET NAME screen right appears User Manual 8 e d i u g y a l p GPS 410 510 The g...

Page 9: ...map screen will appear Once you start driving the GPS 410 510 will guide you to your destination See Navigating To Your Destina tion on page 13 PLEASE NOTE WHEN ENTERING STREET AND CITY NAMES Special characters may not appear on the screen This is no problem as your GPS 200 300 translates the necessary characters As an example Enter ü as a u enter ö or ø as o Along these lines enter special charac...

Page 10: ...e place you want to go The CONFIRM ADDRESS screen right appears 5 TouchGO tobeginnavigation The map screen will appear Once you start driving the GPS 410 510 will guide you to your destination See Navigating to Your Destina tion on page 13 SELECTING A CITY CENTER INTERSECTION OR POSTAL CODE TheGPS 410 510canguideyoutoacitycenter totheintersectionoftwostreets or to a specific postal code NAVIGATING...

Page 11: ...right appears 5 Touch the GO button to begin navigation The map screen will appear Once you start driving the GPS 410 510 will guide you to the intersection you selected See Navigating to Your Destination on page 13 NAVIGATING TO A POST CODE CODE 1 Touch the Post Code CODE button on the WHERE WOULD YOU LIKE TO GO screen The FIND A POSTAL CODE screen right appears 2 Select the country and enter the...

Page 12: ...et set your home address the GPS 410 510 will have you do so NAVIGATING TO RECENTLY VISITED OR SAVED LOCATIONS The GPS 410 510 stores a list of your recently visited locations in a HISTORY page and also lets you save locations to a special list You can easily select your destination from either of these lists 1 Touch the RECENT PLACES or HISTORY button on the WHERE WOULD YOU LIKE TO GO screen see ...

Page 13: ...f travel The route that the GPS 410 510 has calculat ed is indicated by the green line The map shows the distance to and direction of your next turn and also shows the remaining time and distance of your trip and your estimated arrival time NOTE If you are playing music on the GPS 410 510 s Music Player see page 22 the MAP screen will also display the title of the currently playing song As you dri...

Page 14: ...cles the map view between 2D 2D north oriented and 3D See illustrations below right MAP ZOOM BUTTONS Repeatedly touching the and MAP ZOOM buttons zooms your view from a distance of just a few yards off the ground all the way to a view from thousands of miles in space See illustrations below left User Manual 14 e d i u g y a l p GPS 410 510 Map Screen Option Buttons Map Screen Lock Unlock Button Sh...

Page 15: ...proaching a turn the map will automatically zoom in and switch to 2D mode in order to give a better view on the upcoming maneuver Thereafter it will return to the default zoom settings Overview mode When the distance to the next maneuver is longer than 5km the map will automatically zoom out Please click on the map view button to disable overview mode temporarily ...

Page 16: ...ight The list shows the direction of each turn and how far to drive on each leg of the journey Touching the button for one leg of the journey will display a map showing that particular leg of the trip Touching the button for a par ticular turn or leg on the detailed list screen will open a new screen showing the route detail on the map You can avoid a maneuver by touching Change route by avoiding ...

Page 17: ...ance units to kilome ters meters miles feet or miles yards This affects the units shown on the screen and the units given during voice navigation prompts ROUTE PRIORITY When the GPS 410 510 calculates navigation routes you can set it to give priority to either the SHORTEST DISTANCE or the SHORTEST TIME GPS DATA This screen displays the following information NOTE Your GPS 410 510 will lose contact ...

Page 18: ...map by touching it Simply hit Back on the map view to go back to this screen The TMC Settings Menu Normally the GPS 410 510 will automatically tune to the best FM station If you experience problems with proper TMC reception you can make manu al adjustments by touching Radio Frequency Settings On the following screen you can make all kinds of adjustments If the display shows no TMC and there is no ...

Page 19: ...e Types In order to play on your GPS 410 510 audio and video files must be in one of the following formats AUDIO SUPPORTS ID3 TAGS V1 AND V2 1 2 3 MP3 16 bit VBR CBR 44kHz 64kbps up to 320kbps 2 channel WMA 16 bit 44kHz stereo 32kbps up to 160kbps VBR and 32kbps up to 256kbps CBR 2 channel GPS 510 only VIDEO MPEG 4 ASP up to 624x352 24fps does not support GMC or Opel with MP3 audio VBR CBR to 192k...

Page 20: ...the GPS 410 510 to your computer s USB hub right 5 Launch Windows Media Player 6 Locate the files you want to transfer 7 Select Windows Media Player s SYNC mode see below 8 Drag the files you want to transfer into the Windows Media Player SYNC LIST see below 9 Select START SYNC and wait for the process to finish see below NOTE Your Windows Media Player screen may look different from the example On...

Page 21: ...o USB MASS STORAGE see page 19 4 Connect the GPS 410 510 to your computer s USB hub see page 20 5 Launch Windows Explorer not Internet Explorer on your computer Find it at Start Programs Accessories Windows Explorer 6 Find the folder with your media in Windows Explorer s left hand window 7 Double click the folder Its contents will appear in the right hand window 8 Drag the files you want to transf...

Page 22: ...enre you want then touch the button for the song you want to hear The GPS 410 510 will play the song then play through the rest of the songs in that genre NOTE Genre classifications are predetermined and cannot be changed by the GPS 410 510 BY PLAYLIST Touching the PLAYLIST button displays an alphabetical list of all the playlists stored on the SD card Touch the button for the playlist you want th...

Page 23: ... videos stored on your SD card will be displayed in the order in which they were put on the SD card with the first one at the top To view a video use the SCROLL UP DOWN buttons to find it then touch its button When the video is finished playing the MY VIDEOS screen will reappear During playback you can browse within the video by hitting the screen The video will pause and a window with a scroll ba...

Page 24: ...er light There is also an AUTO button which auto matically changes the color mode according to the time of day Language The LANGUAGE button lets you set the GPS 410 510 s screen and voice guid ance languages to ne out of 17 available languages Volume Mixer The Volume Mixer lets you adjust the relative volume levels of the music and the navigation voice guidance Touch the shaded volume bars on the ...

Page 25: ...Flat Mounting Bracket NOTE Do not mount the bracket in such a way that the GPS 410 510 will interfere with your driving or your view of the road On the Windshield On the Console On the Dashboard The installation of this device on the windshield between the driver and the windshield or otherwise in any manner that obstructs the driver s clear view of the road or traffic conditions is dangerous and ...

Page 26: ...e adhesive covering 3 Attach the mounting base to the mounting location 4 Hold the mounting bracket s base against the mounting base 5 Push the mounting bracket lever towards the base to lock the bracket to the dashboard 1 Clean Mounting Location on Dashboard 3 Attach Mounting Base to Dashboard 4 Attach Bracket to Mounting Base 2 Peel Covering From Mounting Base Adhesive 5 Push Lever Towards Base ...

Page 27: ...10 510 s built in speaker or connect its headphone jack to your vehicle s audio system connecting cable not supplied The installation and use suggestions provided by the manufacturer may be subject to restrictions or limitations by federal state or local laws The user should determine whether the installation and use of this device is governed by any law prior to installation or use User Manual e ...

Page 28: ...Your SD Card on pages 19 21 Screen is too bright or too dim Adjust the screen brightness using the volume control see Volume Brightness Control on page 5 or adjust the screen brightness in the SETTINGS menu see Changing Settings on page 24 Volume is too low for navigation voice guidance prompts Adjust the volume control see Volume Brightness Control on page 5 adjust the VOLUME MIXER see Changing S...

Page 29: ...tries Guide Play and Atlas are trademarks of Harman International Industries Incorporated Windows and Windows Media are registered trademarks of Microsoft Corporation in the United States and other countries Due to continuous product improvement all features and specifications are subject to change without notice User Manual e d i u g y a l p GPS 410 510 29 ENGLISH Problem Solution Screen color un...

Page 30: ...We Harman Consumer Group Inc 8500 Balboa Boulevard Northridge CA 91329 USA declare in own responsibility that the product described in this manual is in compliance with technical standards EN 55022 2006 Class B EN 55024 1998 A1 2001 A2 2003 EN 61000 4 2 1995 A1 1998 A2 2000 EN 61000 4 3 2002 A1 2002 EN 61000 4 4 2004 EN 61000 4 6 1996 A1 2000 EN 61000 4 8 1993 A1 2000 Klaus Lebherz Harman Consumer...

Reviews: