background image

20

TEST SCREEN

Test Screen

Test Screen

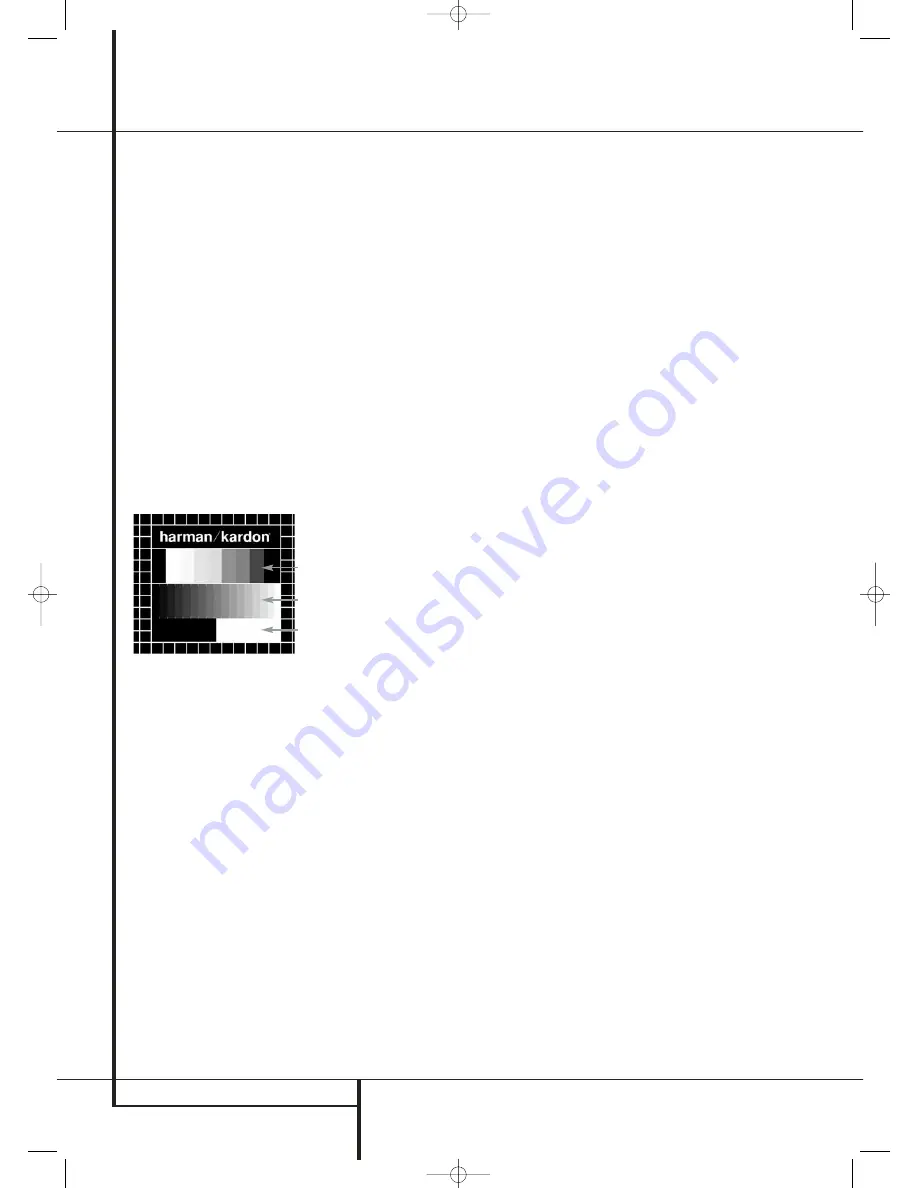
When you activate the Test Screen via the OSD
you can activate a still image to test all settings
and the video performance of your TV. With the
vertical color bars you can test the following:

proper color intensity setting on your TV,

the proper color of each bar, showing if the
proper video standard is turned on: the colors
should be (left to right): black, white, yellow,
cyan (turquoise), green, magenta (purple), red,
blue, black.

proper color transition, seen as sharp 
separation of the bars, S-Video will be better
than Video, RGB and Components (YUV) best
of analog outputs, HDMI output best of all.

the performance of the color filter in your TV
(with ”Video” signals), bar edges should show
no vertical crawling dots. Here S-Video and
RGB formats usually give no problems.

With the grey scale and the black/white fields
below the color bars the brightness and contrast
of your screen can be adjusted optimally, see
chapter ”TV Picture Adjustment” below.

TV Picture Adjustment with 
Test Screen

These adjustments may be done now, but you
can also make them after setup has been 
finalized.

Brightness adjustment:

1. Turn down the color control on your TV until

the color bars are visible in black and white.

2. Adjust the contrast to the lowest level where

you still can see all bars within the grey scale
in the test picture separately and clearly.

3. Adjust the Brightness so that the bars in the

grey scale are all visible. The bar furtherst to
the left has to be as black as possible rather
than grey but the next aside must clearly be
differable. All the bars in the grey scale have to
be gradually and evenly changing from black
to whiter, going from left to right.

Contrast adjustment:

1. Adjust the contrast on your TV until you see a

bright white bar in the right low corner of the
screen and a deep dark black bar at the left.
The optimal contrast setting will depend from
your preference and the surrounding light in
the TV room.

2. If the brightness of the white bar will no more

increase while turning up the contrast or when
the borders of the white ”harman/kardon” text
letters on top will bloom (overlight) into the
black areas, what drasticly will decrease the
sharpness of the script, then the Contrast has
been turned up too much. Reduce the contrast
until these effects will disappear and the video
still looks realistic.

3. If you are watching TV with a usual surround-

ing daylight, adjust the Contrast so that a nor-
mal video picture has about the same looking
as the surroundings in your room. By that way
the eye is relazed when watching the TV pic-
ture. This contrast setting may be reduced
when the surrounding light is dimmed, usually
improving the sharpness of a video a lot 
thereby.

4. The grey scale in the middle line needs to have

the same clear difference between each bar as
before the contrast adjustment. If not, go back
to the brightness adjustment and repeat step 3
and then the contrast adjustments, making
only minor adjustments each time for 
optimisation.

Color adjustment.

1. When the Brightness and the Contrast are set

optimally, turn up the color control to the level
of your perference. Adjust to the level where
the colors look strong but still natural, not
overdone. If the color level is too high,
depending from the TV used some of the bars
will seem wider or the color intensity will not
increase while the control is turned up. Then
the color control must be reduced again. At the
end you should test the color intensity also
with a video, e.g. pictures of natural faces,
flowers, fruit and vegetables and other well
known natural articles of our life most usefull
for an optimal setting of the color intensity.

2. If your TV has a Tint option (with most

European TVs this is available or effective only
with NTSC signals, not with PAL), use the large
white bar below the Greyscale to tweak the
warmth of the picture. Every viewer has a 
difference in preference as how the glow of
the picture should be. Some prefer a little 
colder picture, some a warmer glow. The Tint
function on your TV and the white bar can be
used to control this. Adjust the Tint to the level
where you feel the white color has the tone
you prefer.

Color Bars

Grey Scale

100%
Black/White
fields

Sharpness Adjustment

Contrary to intuition, the picture will appear
sharper and clearer with the sharpness, or Edges,
setting backed off from the maximum setting.
Reduce the sharpness setting on your television,
and the Edges setting on the DVD 47 video
adjustments menu if necessary, to minimize the
appearance of any white lines between the bars
in the gray scale portion of the test screen.

Convergence and Edge Focus

The crosshatch pattern that surrounds the test
screen may be used to evaluate edge focus and
convergence in front- or rear-projection video
displays. However, the controls used to adjust
these parameters are often not user-accessible. In
any event, these adjustments are extremely com-
plex, and require proper training and experience
to avoid worsening the situation. Therefore, it is
recommended that if you are unable to improve
the picture using the available controls, contact
the video display manufacturer’s authorized
service representative for assistance.

When all desired setup and configuration entries
have been made, use the 

KL

Navigation

Buttons

9

until “Done” is highlighted at the

bottom of the Video Adjustments submenu. Press
the 

Enter Button

6

to select it to return to

the on-screen menu system. Then, press the

Setup Button

8

to remove the menu displays

from the screen. The unit will return to normal
operation and you are ready to enjoy the finest in
DVD or CD playback! 

30016_DVD47_ENG  20/11/06  15:52  Side 20

Summary of Contents for DVD 47

Page 1: ...ENGLISH Open Close DVD 47 AUDIO VIDEO DVD 47 Digital Versatile Disc Player OWNER S MANUAL ENGLISH 30016_DVD47_ENG 20 11 06 15 52 Side 1...

Page 2: ...Selecting a Track 23 Repeat Play 23 Random Play 23 Video Off Feature 23 SACD Discs 24 MP3 Windows Media and JPEG Playback 26 Troubleshooting Guide 27 Specifications Table of Contents 2 NOTE This play...

Page 3: ...nual please contact your dealer as he is your best source of local infor mation Plays a Wide Range of Video and Audio Formats Including DVD Video Discs DVD Audio discs SACD VCD Standard CD Audio Discs...

Page 4: ...h definition image with absence of visible scanlines and motion artifacts WMA Files WMA Windows Media Audio is an audio compression format that was developed by the Microsoft Corporation for use with...

Page 5: ...is capable of playing back both Dolby Digital and DTS sound tracks but the number and types of tracks available will vary from disc to disc To make certain that a specific feature or soundtrack optio...

Page 6: ...ill continue from the same point on the disc when the Play Button is pressed again Resume will also work if the unit was turned off To stop a disc and have play start from the beginning press the butt...

Page 7: ...nt track time time remaining in the current track or the total remaining time on the disc NOTE The Indicators DEF will also display text messages about the DVD s status including LOADING when a disc i...

Page 8: ...M N O P Q POWER ON POWER OFF SUBTITLE TITLE ANGLE AUDIO ENTER OPEN CLOSE SETUP ARROWS INFO MENU PAUSE STATUS SKIP PREVIOUS SKIP STEP NEXT PLAY SEARCH SLOW REVERSE STOP SEARCH SLOW FORWARD DIMMER PROG...

Page 9: ...ng if you press STOP and PLAY the disc will resume play i e it will start from the same point on the disc where the unit was stopped If you press STOP twice and the PLAY button the disc will start pla...

Page 10: ...ed video quality The SCART cable carries both audio and video You can select Composite Video or RGB video for that SCART connector s video output signal Remote Control Output Connect this jack to the...

Page 11: ...connect both outputs Video and S Video to your TV or AV Receiver only one of them Most European TV s are equipped with SCART connectors rather than with a normal video input yellow cinch In that case...

Page 12: ...eiver or processor NOTES FOR ANALOG AUDIO If you wish to use the DVD 47 as the input for a multiroom system the Analog Audio Outputs should be connected to the standard analog left right DVD or CD inp...

Page 13: ...stall new batteries If leakage should come into contact with parts of your body wash it off thoroughly with water Batteries contain chemical substances and we recommend that you dispose of them proper...

Page 14: ...D analog outputs for full 96 kHz fidelity with these discs Caution for the optical coaxial digital audio outputs When connecting an amplifier with an optical coaxial digital input which does not conta...

Page 15: ...n pause or freeze frame mode you may move slowly forward or back ward through the program being played at one of the speeds by pressing the Play Buttons on the remote Each press of the buttons will mo...

Page 16: ...nter Button 6 and a drop down menu will appear that contains the available options for that setting Press the KL Navigation Buttons 9 until the desired option is highlighted then press the Enter Butto...

Page 17: ...ting to activate the DVD 47 s closed captioning decoder so that these messages may be viewed Audio Settings The Audio Setting Submenu contains the following settings Follow the explanations in the Ins...

Page 18: ...or processor does not have 6 channel analog inputs make sure to select Stereo for the Bass Management setting in the AUDIO SETUP menu Then connect the Analog Audio Outputs to any 2 channel analog inp...

Page 19: ...gressive scan video using the Component Y Pr Pb Video Outputs and you have inadvertently changed the Video Output Setting to Component and the Scan Type setting to Progressive you may reset the scan t...

Page 20: ...rey scale in the middle line needs to have the same clear difference between each bar as before the contrast adjustment If not go back to the brightness adjustment and repeat step 3 and then the contr...

Page 21: ...e lower line of this bar The Time Search function enables you to start playback at any point in the program Use the M N Navigation Buttons 9 to highlight this display You may then use the Numeric Keys...

Page 22: ...sc type Audio This line displays the type of audio recorded on the disc usually Stereo Playlist With this line highlighted press the Enter Button 6 to change the order in which the tracks are played f...

Page 23: ...play to indicate the begin ning of the passage to be repeated 2 Press the A B Repeat Button P again to choose the end point Repeat A B has been set and the A B section will be played contin uously 3 P...

Page 24: ...ack MP3 and WMA discs may contain 200 tracks or even more To get the best overview about all tracks on the disc and their names and to select them comfortably use the on screen display rather than the...

Page 25: ...PEG still image files and displaying them When a disc or folder containing JPEG files is loaded the JPEG Disc Type Indicator A will light in the Main Information Display The disc will immediately begi...

Page 26: ...fast or slow mode There is no audio playback on DVD discs during fast or slow modes Surround receiver not compatible Use analog audio outputs with 96kHz PCM audio DVD Audio or SACD disc is loaded Use...

Page 27: ...atts Max Dimensions WxHxD 440 x 50 x 285 mm Weight 4 0 kg Depth measurement includes knobs and connectors Height measurement includes feet and chassis All specifications subject to change without noti...

Page 28: ...k Drive Woodbury New York 11797 www harmankardon com Harman Consumer Group Inc 2 Route de Tours 72500 Ch teau du Loir France 2006 Harman Kardon Incorporated Partnumber CQX1A1053Z 30016_DVD47_ENG 20 11...

Reviews: