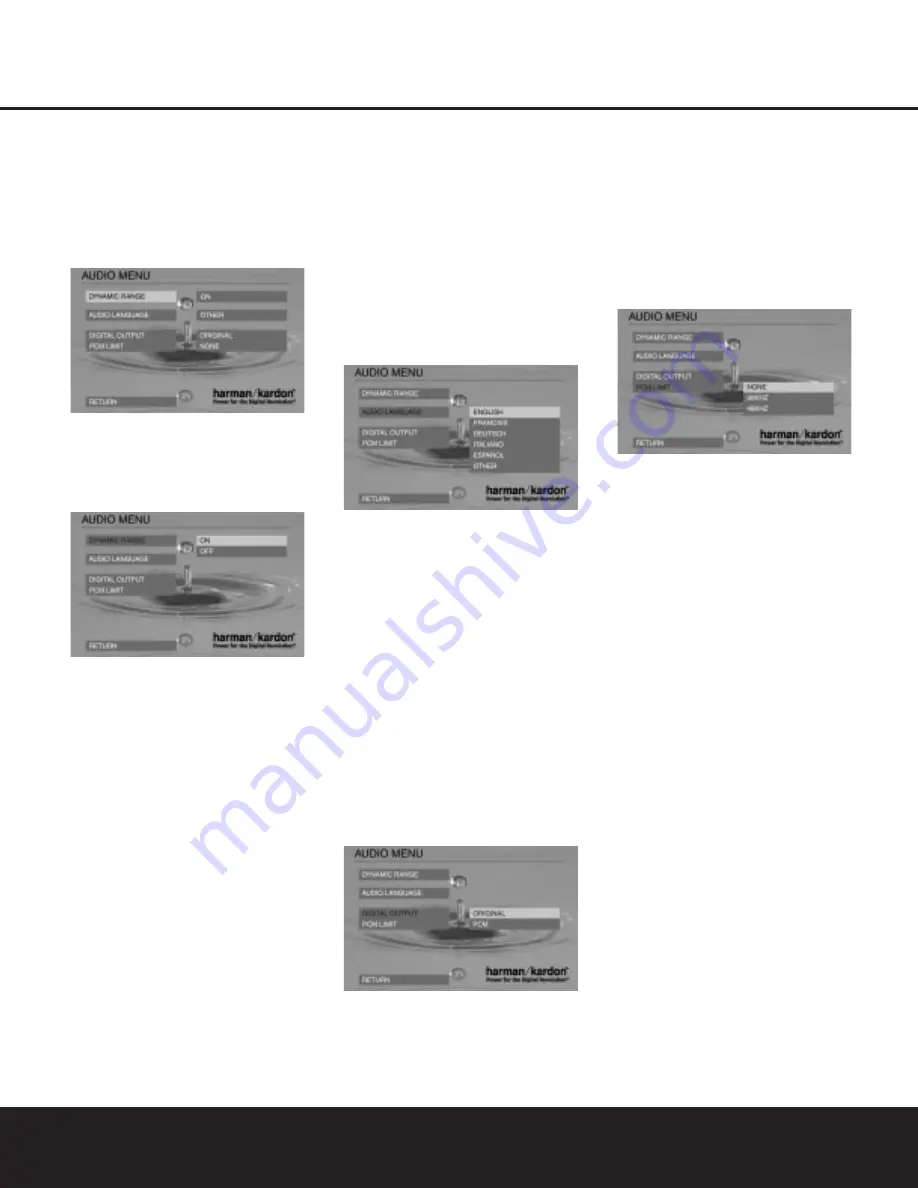
background image

Audio Menu

In the Main menu, use the 

K

/

L

Navigation

Buttons

9

to highlight the Audio menu; press the

N

Navigation Button 

9

or 

Enter Button

9

to

access the Audio submenu. The left column shows the
items in the Audio menu. The right column shows the
current setting for each item.

Dynamic Range

Select the Dynamic Range menu with the 

K

/

L

Buttons 

9

, if it is not already highlighted; press the

N

Navigation Button 

9

or 

Enter Button

9

to

access the Dynamic Range submenu.

This setting enables Dolby Digital recordings to be
played back with full dialogue intelligibility while 
reducing peak levels. This smooth level compression
prevents abrupt loud transitions from disturbing 
others without reducing the impact of the digital
source perceptibly.

To change the Dynamic Range setting, use the 

K

/

L

Navigation Buttons

9

to highlight DYNAMIC

RANGE and then press the 

N

Navigation Button

9

. Press the 

K

/

L

Navigation Buttons

9

to

select ON or OFF, and then press the 

M

Navigation

Button

9

to enter the setting and return to the

Audio menu.

NOTE:

If selected, Dynamic Range compression is

only active when a Dolby Digital signal is detected and
only for the analog outputs.

Audio Language

This step will define the default audio language (if the
disc contains different language tracks). The option
default will select the audio language originally encoded
as the default language on the disc; most times this
will be English. Choosing an audio language by pressing
the 

Audio Button

5

on the remote control (see

page 25) will change this setting only temporarily.

Select AUDIO LANGUAGE with the 

K

/

L

Buttons

9

, if it is not already selected; press the 

N

Navigation 

9

or 

Enter Button

9

to access the

Audio Language submenu. The right column displays
the current setting (highlighted) and the options.

If you are playing a disc with a language other than
English, French, German, Italian or Spanish, press the

L

Navigation Button

9

until the word OTHER is

highlighted. Next, press the 

N

Navigation Button

9

and note the word OTHER will be replaced by

four dashes. Using the chart on page 33, press the

Numeric Keys

to enter the number corresponding

to the desired language. When the entry is complete, the
menu screen will display the word OTHER, but the
appropriate language will be selected as long as it is
present on the disc being played.

Digital Output

If your system includes 5.1 digital audio surround
decoding (Dolby Digital and/or DTS), select ORIGINAL
as the digital output. In that case all audio signals will
be outputted with their original format. If your system
only includes stereo and/or Dolby Pro Logic, select
PCM. When PCM is selected you will not be able to
use DTS soundtracks.

Select the Digital Output menu with the 

K

/

L

Navigation Buttons 

9

, if it is not already selected;

then press the 

N

Navigation Button 

9

or 

Enter

Button

9

to access the Digital Output submenu.

The right column displays the current setting (high-
lighted) and one option.

PCM Limit

Select the 

PCM Limit

menu by pressing the 

K

/

L

Navigation Buttons 

9

until PCM LIMIT is high-

lighted. At this menu you will be able to select the
sample rate for the digital output of the DVD 25 so
that it is compatible with the circuitry in your receiver
or processor. Before making this setting you may want
to consult the Owner’s Manual for the receiver or
processor to determine which type of digital signals 
it is compatible with.

With that information in hand, select one of these options:

• If your receiver or processor is not capable of

resolving digital inputs over 48kHz, or if you are
uncertain of the capabilities of your receiver, select
the 

48kHz

option. In this case, the DVD 25 will

down-sample any program material with higher
sample rates so that it is compatible with your
equipment.

• If your receiver or processor is capable of resolving

digital inputs up to 96kHz, select the 

96kHz

option.

Many, but not all, receivers manufactured within the
last two years are compatible with these signals.

• If your receiver or processor is capable of resolving

all digital inputs, up to 192kHz, select 

NONE.

In 

this case, all signals will be passed through at their
native rate without down-sampling.

NOTE:

If you play a disc that is recorded with a 

sample rate higher than 48kHz with either the 

NONE

or 

96kHz 

setting when your receiver or processor is

not compatible with those types of signals you will not
hear any output even though the disc is playing 
properly. In that case, change the setting to 48kHz 
to complete compatibility with all receivers and 
processors, particularly older ones.

When all adjustments to the Audio menu are done,
press the 

L

Navigation Button

9

until RETURN

is highlighted and then press the 

Enter Button

9

or simply press the 

M

Navigation Button

9

.

SYSTEM SETUP

18  SYSTEM SETUP

Summary of Contents for DVD 25

Page 1: ...DVD 25 DVD 25 DIGITAL VERSATILE DISC PLAYER OWNER S MANUAL Power for the Digital Revolution...

Page 2: ...he Audio Track 25 Changing the Subtitle Language 25 Changing the Camera Angle 25 Repeat Play 26 A B Repeat Play 26 Zoom Playback 26 Information Menus 27 Programmed Play With DVD 28 CD Playback 28 Audi...

Page 3: ...tage of all the power and flexibility the DVD 25 has to offer we encourage you to review this manual That small investment of your time will pay major dividends in the enjoyment you will get from prop...

Page 4: ...ng the carton down to a more two dimensional appearance Other cardboard inserts may be stored in the same manner Packing materials that cannot be collapsed should be saved along with the carton in a p...

Page 5: ...cm disc 3 8cm disc 5 12cm disc 5 12cm disc The DVD 25 will also play most discs recorded in the DVD RW or DVD RW formats but we cannot guaran tee complete playback compatibility of DVD recordable disc...

Page 6: ...any chapters within a title as the producers decide to include Most discs include only one title but some may have more than one to give you a Double Feature presentation or to include other special f...

Page 7: ...place the disc in the Resume mode which means that playback will stop but as long as the tray is not opened or the disc changed DVD playback will continue from the same point on the disc when the Pla...

Page 8: ...event anyone from changing the rating level without a code E Progressive Scan Indicator Lights when Progressive Scan component video output is selected in the setup menu F Test Indicator This indicato...

Page 9: ...Stop J Search Forward K Dimmer L Slow Forward M Zoom N Slow Reverse O Random P Step Forward Q Video Off Step Reverse Numeric Keys Program Check Clear Repeat Light A B Repeat ON OFF PREV NEXT STOP POW...

Page 10: ...When a CD is playing there are two fast play speeds R SEARCH 5x R SEARCH 15x I Stop Stops playing a disc When a disc is playing if you press the Stop Button 5I and the Play Button 3G the disc will res...

Page 11: ...ut switching Component Video Outputs These outputs carry the component video signals for connection to display monitors with component video inputs For standard analog TVs or projectors with inputs ma...

Page 12: ...connect both outputs video and S Video to your TV or A V receiver use only one of them When the audio signal is to be fed to an analog receiver rather than to the TV connect the audio out jacks to any...

Page 13: ...ete system this connection must be made then you can turn up the TV s volume as needed The analog audio jacks may also be connected to the standard analog left right DVD or CD inputs on your receiver...

Page 14: ...d to Progressive See page 17 VIDEO OUT COMPONENT CLASS 1 LASER PRODUCT KLASSE 1 LASER PRODUKT LUOKAN 1 LASER LAITE KLASS 1 LASER APPARAT 20 Y Y Pb Cb Pr Cr 120V 60Hz 1 TV or Monitor To power outlet AC...

Page 15: ...n Do not mix old and new batteries Wipe away any leakage inside the remote control unit and install new batteries If leakage should come into contact with your skin immediately wash it off thoroughly...

Page 16: ...ll benefit of Pro Logic from the same DVD movies that provide full 5 1 channel Dolby Digital soundtracks as well as from titles encoded with Dolby Surround The DVD 25 is designed to digitally output 9...

Page 17: ...is set to Progressive but connected to a display device that cannot process a progressive signal there will be nothing on the TV screen If this happens you can restore the player to Interlaced mode Pr...

Page 18: ...s it is present on the disc being played Digital Output If your system includes 5 1 digital audio surround decoding Dolby Digital and or DTS select ORIGINAL as the digital output In that case all audi...

Page 19: ...will be lost Enter Password and Setting Level For disabling the playback of rated DVDs a password consisting of four digits must be entered Select PARENTAL CONTROL in the Player Setup menu then press...

Page 20: ...d to select and change subtitles during playback Press the K L Navigation Buttons 9 to select the desired choice for the subtitle In the event the disc provides subtitle language options other than En...

Page 21: ...p dark black bar at the left The optimal contrast setting will depend on your preference and the surrounding light in the TV room 2 If the brightness of the white bar no longer increases when the cont...

Page 22: ...s the Status Button D Basic playback with the DVD 25 involves functions similar to those you may be familiar with for conven tional CD players or changers Turn the DVD 25 on by first pressing in the M...

Page 23: ...disc to decide which of those features and functions are available on any given disc For that reason not all discs will function identically and some discs will not have many of the features of the DV...

Page 24: ...cted title will be played at once after the last title number was entered NOTE Some discs have only one title Selecting a Chapter Because DVDs use digital technology a title can be divided into indivi...

Page 25: ...you to become the director selecting the view of a scene that you wish However this feature does not appear on many discs and when it does appear it will typically be for only certain scenes and not...

Page 26: ...cessing circuits include a Zoom feature which allows you to enlarge the image for closer examination of the picture Four steps of enlargement are available To zoom in on the picture press the Zoom But...

Page 27: ...in the list will replace the deleted one and will be selected automatically The program can be deleted completely by moving the cursor to the top of the play list and pressing the Enter Button 9 for e...

Page 28: ...of tracks recorded on a CD below the TRACK indicator and the total time on disc Using Bookmarks Bookmarks are a feature of the DVD 25 that allows you to mark up to nine different points on a disc and...

Page 29: ...c A B Repeat Play The Repeat A B function allows you to select any portion of a CD and have it repeat continually until the unit is manually stopped To initiate a Repeat A B playback sequence follow t...

Page 30: ...each value programmed or by turning the unit off completely by the Main Power On Off Button or opening the tray see Cancel Program Play Insert Tracks Inserting tracks is possible only if tracks are al...

Page 31: ...lay options are not available with MP3 playback The DVD 25 is only compatible with standard MP3 encoded discs Other compressed audio formats used for Internet audio downloads will not play on the DVD...

Page 32: ...playing VCD discs it is possible to access the disc s features using the On Screen Banner Display as shown for CD playback on page 28 Press the Status Button D on the remote to see the Banner Display...

Page 33: ...i 7185 Hausa 7265 Hebrew 7387 Hindi 7273 Hungarian 7285 Icelandic 7383 Indonesian 7378 Interlingua 7365 Interlingue 7369 Iunpiak 7375 Irish 7165 Italian 7384 Japanese 7465 Javanese 7487 Kannada 7578 K...

Page 34: ...VD disc is in fast or slow mode There is no audio playback on DVD discs during fast or slow modes Surround receiver not compatible Use analog audio outputs with 96kHz PCM audio Picture is distorted or...

Page 35: ...atts On 20 Watts Max Dimensions W x H x D 17 3 10 x 3 7 16 x 12 440mm x 87mm x 305mm Weight 15 4 lb 7kg Depth measurement includes knobs and connectors Height measurement includes feet and chassis All...

Page 36: ...250 Crossways Park Drive Woodbury New York 11797 www harmankardon com 2003 Harman International Industries Incorporated Part No WLD8 810 084 1A...

Reviews: