Harman Kardon CP 65 Owner'S Manual Download Page 10

10

PROGRAMMING SOURCES

Programming Sources

The RCP 7 remote is capable of controlling not only the receiver and
DVD player included in your CP system, but it may also be programmed
to control many brands and models of VCRs, CD players, cable boxes,
satellite receivers, cassette decks and TVs, as well as an iPod device
(not included) docked in Harman Kardon’s optional The Bridge.

It may help to think of the remote as a book with pages. Each page 
represents the button functions for a different device. In order to access
the functions for a particular device, you first need to turn to that page,
that is, switch the remote to that device mode. This is done by pressing
the AVR Button to access the codes that control the receiver, or the
Input Selectors to access the codes for the devices programmed into
the remote.

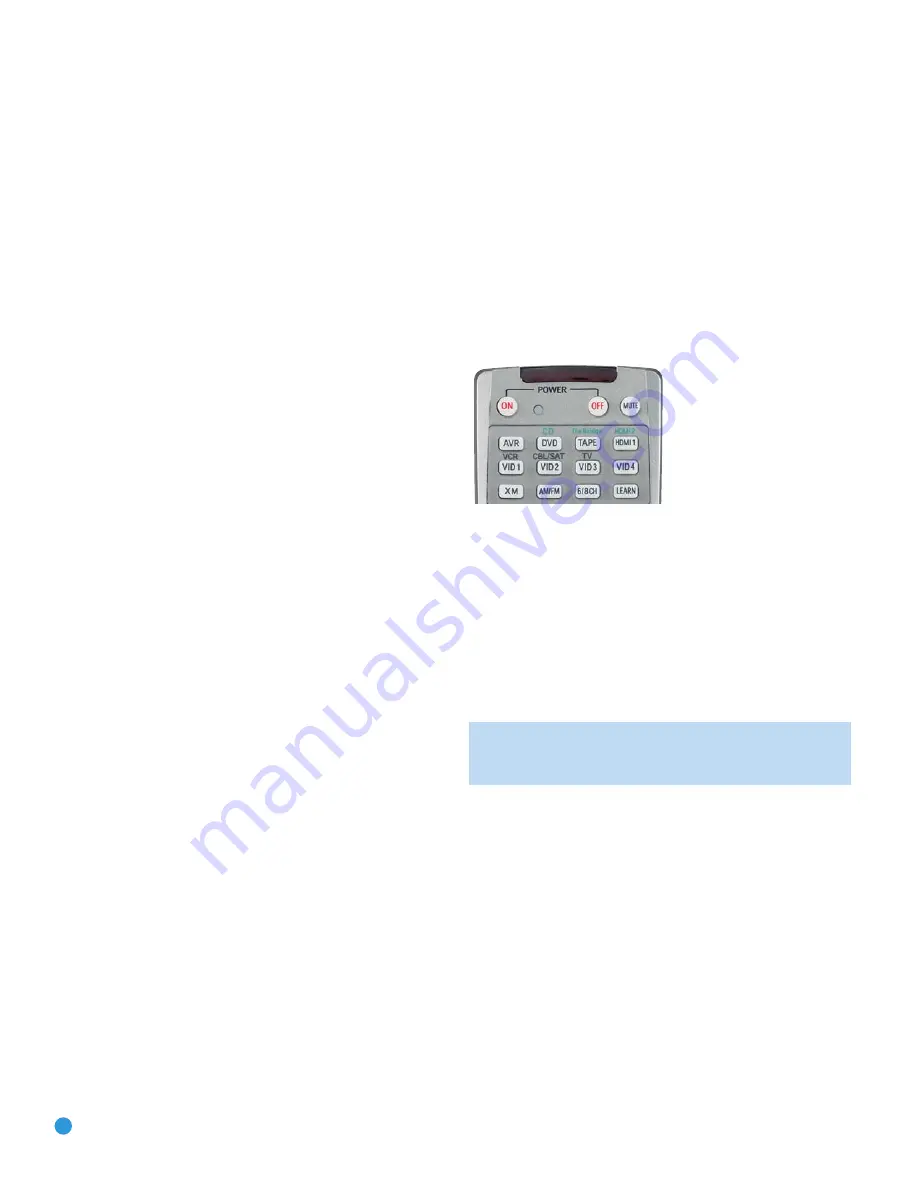
You may have noticed that three of the Input Selectors look different
from the others (see Figure 2). For the DVD/CD, TAPE/The Bridge and
HDMI 1/HDMI 2 Selectors, there is a primary source, whose name is
printed on the button, and a secondary source, whose name is printed
above the button.

When the remote is in the device mode for the primary source (e.g.,
DVD) pressing the device selector will cause it to light in red. When the
remote is in the secondary source’s device mode, the selector will light
in green when pressed.

To switch between the primary and secondary device modes, press the
selector twice quickly in succession. The selector will retain this selection
until the next time you toggle between the primary and secondary
device modes. That is, if you press the DVD/CD Selector twice quickly
so that the CD source is activated, then press another source selector,
such as Video 1, the next time you press the DVD/CD Selector, the
remote will return to the CD device mode.

The RCP 7 remote is factory-programmed to control the AVR 347, the
DVD 48 and an iPod docked in The Bridge. If you have other source
devices in your system, such as a VCR, or a cable or satellite television
set-top box, follow these steps to program the correct codes into 
the remote:

1. Using the codes in Tables A2–A9 of the Appendix, look up the 

product type (e.g., cable TV box) and the brand name of your source.
The number(s) listed are potential candidates for the correct code set
for your particular device.

2. Turn on your source device.

3. This step places the remote in Program mode and varies slightly,

depending on which Input Selector is being programmed. Refer to
Figure 2.

a) DVD, Tape, Video 1, Video 2, Video 3 

and

Video 4 Sources:

Press and hold the Input Selector until the Program Indicator LED
starts to flash, then release it. Follow the directions in Step 4.

b) CD Source:

Press the DVD/CD Input Selector twice quickly so 

that it turns green. Then press and hold it until the selector relights
and the Program LED flashes. Follow the directions in Step 4.

c) HDMI 1 Source:

Press and hold the Input Selector until the

Program Indicator flashes, then release it. Next, press the Input
Selector that corresponds to the device type you want to program
into the HDMI 1 mode, i.e., DVD, VCR or CBL/SAT. Then follow 
the directions in Step 4.

d) HDMI 2 Source:

Press and release the Input Selector once,

quickly press the Input Selector again so that it turns green, then
release it. Now press and hold the Input Selector until the Program
Indicator flashes, then release it. Next press the Input Selector 
that corresponds to the device type you want to program into 
the HDMI 2 mode, i.e., DVD, VCR or CBL/SAT. Then follow the
directions in Step 4.

Figure 2 – Input Selectors

4. Enter a code from Step 1 above.

a) If the device turns off, then press the Input Selector again to accept

the code; the selector will flash. The remote will exit the Program mode.

b) If the device does not turn off, try entering another code. If you 

run out of codes, you may search through all of the codes in the
remote’s library for that product type by pressing the 

or 

¤

Button repeatedly until the device turns off. When the device turns
off, enter the code by pressing the Input Selector, which will flash.
The remote then exits Program mode.

NOTE:

When you enter a valid three-digit code, the Program

Indicator LED will change in color to green. However, entering an
invalid code changes the color of the LED to red.

5. Once you have accepted a code, it’s a good idea to try using some

other functions to control the device. Sometimes manufacturers 
use the same power code for several different models, while other
codes will vary. You may wish to repeat this process until you’ve 
programmed a satisfactory code set that operates most of the 
functions you frequently use.

6. You may find out which code number you have programmed by

pressing and holding the Input Selector to enter Program mode. Then
press the Set Button, and the LED will flash in the code sequence.
One flash represents “1”, two flashes for “2” and so forth. A series of
many fast flashes represents “0”. Record the codes programmed for
each device in Table 1.

RCP7 OM.qxd  3/23/07  4:15 PM  Page 10

Summary of Contents for CP 65

Page 1: ...RCP 7 SYSTEM REMOTE OWNER S MANUAL FOR USE WITH CP 65 SYSTEM ...

Page 2: ...SOURCES 12 LEARNING INDIVIDUAL KEY CODES 13 ADVANCED FUNCTIONS 13 Punch Through Programming 13 Macros 14 Resetting the Remote 15 APPENDIX 16 Remote Control Function List 18 Remote Control Product Codes 18 TV 19 VCR 20 CD 20 DVD 21 SAT 21 TAPE 21 CBL 22 The Bridge DMP TABLE OF CONTENTS ...

Page 3: ...ll the way up to the latest digital cable or satellite television set top box or even products that may be released in the future The single RCP 7 remote replaces the original remotes supplied with the AVR 347 receiver and DVD 48 DVD player Although the RCP 7 operates both products along with a host of other products you may have added to your system this manual describes a few differences from th...

Page 4: ... you would like to skip ahead three tracks but you then find that the volume is too loud you would follow this procedure 1 Press the CD Input Selector to switch to the codes that control your CD player If the remote is in DVD mode press the selector twice quickly to switch to CD mode indicated by the selector turning green 2 Press the Play Button in the Transport Controls section if the disc is no...

Page 5: ...port Controls Power Off Mute Input Selectors 6 8 Channel Input Selector Learn TV Video Video Off Volume Controls Multiroom HDMI Speaker Setup DVD Setup Set Enter Numeric Keys Delay DVD Status Memory Program Clear Preset Stations Page Disc Skip Audio Mode Macros DTS Neo 6 Surround Stereo Modes Repeat Dim Backlight Logic 7 Surround Random Record Navigation NOTE To make it easier to follow the instru...

Page 6: ...r off It has the opposite effect on the DVD 48 s Component Video Outputs See the DVD 48 s manual for more information Channel Level Disc Menu Press this button to set the output levels for each channel so that all speakers sound equally loud at the listening position This may be done while playing an audio selection such as a favorite CD after you have calibrated the levels using the EzSet EQ proc...

Page 7: ...scroll through the images The availability of this function depends on how the DVD Audio disc was authored Tone Mode Return Press this button to access the tone controls bass and treble Use the Navigation Buttons to make your selections When the DVD player has been selected press this button to return to the previous setup menu or to clear the display if the top level menu is on screen Disc Skip A...

Page 8: ...s of this button will select the last used Stereo mode which may be Surround Off or Two Channel Processing Each additional press will change the mode to Surround Off 5 Channel Stereo or 7 Channel Stereo When an analog audio source is in use and the AVR 347 s Tone Mode control has been set to Out you may also select Analog Bypass mode which passes the analog input signal to the volume control bypas...

Page 9: ...el of the AVR 347 or DVD 48 Make sure no objects such as furniture are blocking the remote s path Bright lights fluorescent lights and plasma video displays may interfere with the remote s functioning The remote has a range of about 20 feet depending on the lighting conditions It may be used at an angle of up to 30 degrees to either side of the component If the remote seems to operate intermittent...

Page 10: ...d varies slightly depending on which Input Selector is being programmed Refer to Figure 2 a DVD Tape Video 1 Video 2 Video 3 and Video 4 Sources Press and hold the Input Selector until the Program Indicator LED starts to flash then release it Follow the directions in Step 4 b CD Source Press the DVD CD Input Selector twice quickly so that it turns green Then press and hold it until the selector re...

Page 11: ...o the Remote Control Function List Table A1 in the Appendix for a list of each button s functions with the various product types If you wish you may program macros which are preprogrammed code sequences that execute many code commands with a single button press You may also program punch through codes which allow the remote to operate the volume channel or transport controls of another device with...

Page 12: ...the Input Selector To erase a single learned code 1 Make sure the RCP 7 is in the device mode containing the learned code you wish to erase by pressing the Input Selector which should light in red or green if the secondary source on a dual source selector is active 2 Press and hold the Learn Button until the Input Selector lights and the Program Indicator flashes amber then release it 3 Press the ...

Page 13: ...me Input or AVR Selector in Steps 1 and 3 NOTE As mentioned earlier the AVR VID2 and VID3 devices are factory programmed with transport control punch through to operate the DVD player You may reprogram these selectors following the instructions in Steps 1 through 3 to operate another device such as a CD player If you wish to reprogram these selectors to have no transport control punch through the ...

Page 14: ...n containing the macro until the Program LED flashes 2 Press the Surround Button to erase the macro Resetting the Remote To reset the remote to its factory defaults simultaneously press and hold any Input Selector and the 0 Numeric Key When the LED flashes amber enter the code 333 When the green LED goes out the remote will have been fully reset ADVANCED FUNCTIONS ...

Page 15: ...1 14 17 20 23 26 28 30 32 35 37 36 38 40 39 41 42 44 43 45 46 47 48 49 50 52 51 54 55 56 58 57 59 60 61 53 62 64 65 66 68 67 69 70 71 63 72 Refer to the numbered buttons in this drawing when using the Function List Figure 5 Remote Control Function List Reference APPENDIX ...

Page 16: ... Select TV Select TV Select TV Select TV Select TV Select TV Select TV Select TV Select 11 VID 4 Video 4 Select Video 4 Select Video 4 Select Video 4 Select Video 4 Select Video 4 Select Video 4 Select Video 4 Select Video 4 Select Video 4 Select Video 4 Select Video 4 Select 12 XM XM Select XM Select XM Select XM Select XM Select XM Select XM Select XM Select XM Select XM Select XM Select XM Sele...

Page 17: ...ct 60 Night Subtitle Night Mode Select Subtitle On Off CDP Select 61 Logic 7 Random Logic 7 Select Random 62 Stereo Repeat Stereo Mode Select Repeat 63 Skip Down Skip DVD Step Skip Scan Thumbs Down Skip DVD Skip DVD Skip DVD 64 Skip Up Skip DVD Step Skip Scan Thumbs Up Skip DVD Skip DVD Skip DVD 65 Dim Dimmer Dimmer 66 Rewind R Search DVD R Search Slow R Search Rewind Rewind R Search R Search DVD ...

Page 18: ... Brand Setup Code Number LODGENET 069 LOGIK 069 LUXMAN 128 LXI 077 145 148 MAGNAVOX 030 123 128 132 145 148 MARANTZ 115 123 148 MATSUI 148 MEMOREX 069 128 METZ 084 MGA 115 123 128 MINERVA 084 MITSUBISHI 077 115 123 128 160 167 168 MTC 175 176 NATIONAL 148 177 179 180 181 182 NEC 115 121 123 125 NIKEI 045 ONKING 045 ONWA 045 OPTONICA 077 ORION 207 208 209 210 211 PANASONIC 087 148 169 PHILCO 045 11...

Page 19: ...U 045 ZENITH 069 090 ZONDA 122 APPENDIX Table A3 Remote Control Product Codes VCR Table A2 continued VCR Manufacturer Brand Setup Code Number MARANTZ 018 MEMOREX 017 020 040 052 053 054 076 MGA 049 MITSUBISHI 049 131 MULTITECH 040 NAD 139 NATIONAL 140 NEC 018 048 NORDMENDE 048 OPTIMUS 159 ORION 147 PANASONIC 125 150 167 172 PHILCO 040 PHILIPS 040 075 PORTLAND 094 PULSAR 076 QUASAR 001 125 RADIO SH...

Page 20: ...1 162 215 PROTON 210 QUASAR 109 RADIO SHACK 126 166 213 RCA 024 081 093 150 CD Manufacturer Brand Setup Code Number RCX 169 REALISTIC 058 093 095 104 105 108 164 166 SANSUI 047 081 134 157 172 SANYO 033 082 095 SCOTT 108 SHARP 058 105 114 151 159 167 180 181 SHERWOOD 003 041 058 105 133 SONY 103 115 116 118 132 139 163 205 206 207 208 212 217 SOUNDSTREAM 124 SYMPHONIC 059 110 TAEKWANG 177 TEAC 011...

Page 21: ...347 SUPER GUIDE 327 423 TEECOM 330 333 390 391 393 409 TOSHIBA 302 426 460 461 462 UNIDEN 323 332 348 349 350 351 354 355 381 383 389 403 466 479 480 ZENITH 384 385 387 394 419 488 Table A8 Remote Control Product Codes CBL CBL Manufacturer Brand Setup Code Number ABC 001 011 ALLEGRO 111 AMERICAST 212 ARCHER 112 BELCOR 113 CABLE STAR 033 113 CITIZEN 111 COLOUR VOICE 085 090 DIGI 114 EAGLE 186 EASTE...

Page 22: ...mark of Apple Inc registered in the U S and other countries TiVo is a registered trademark of TiVo XM is a registered trademark of XM Satellite Radio Inc CBL Manufacturer Brand Setup Code Number SCIENTIFIC ATLANTA 183 203 221 222 SEAM 121 SIGNATURE 001 188 SPRUCER 053 081 177 189 STARCOM 002 011 163 STARGATE 120 TANDY 024 TELECAPATION 028 TEXSCAN 036 TFC 122 TIMELESS 123 TOCOM 170 205 UNITED CABLE...

Page 23: ...NOTES ...

Page 24: ...250 Crossways Park Drive Woodbury New York 11797 www harmankardon com 2007 Harman International Industries Incorporated All rights reserved Part No CQX1A1211Z ...

Reviews: