background image

17

INITIAL SETUP

S

etting Wide

s

creen (1

6

:

9

) picture 

S

tandard-width (4:3) 


picture

1

6

:

9

 Full 

Fill

s


s

creen Fill

s


s

creen, 

b

ut 

s

tretche

d


an

d


d

i

s

torte

d

1

6

:

9

 Pillarbox 

Fill

s


s

creen Bar

s

 on left an

d

 right of 


picture; 

no 

d

i

s

tortion

4:3 Letterbox 

Full picture 

s

hown with  

Fill

s


s

creen


b

ar

s

 a

b

ove an

d


b

elow 

4:3 Pan 

S

can 

Fill

s


s

creen, 

b

ut crop

s


Fill

s


s

creen

 portion

s

 of picture 

Step One – Turn On the BDP 1

IMPORTANT NOTE:

When the HDMI Output is used, turn on the

system components in this order: the video display (TV) first, any
receiver or processor, and the BDP 1 last.

Turn on the Master Power Switch, placing the BDP 1 in Standby mode.
See Figure 10.

Figure 10 – Master Power Switch

The Power Indicator will turn amber. Press the Power Button on either
the front panel or the remote to turn on the BDP 1. See Figure 11.

Figure 11 – Power Indicator and Switch

NOTE:

The BDP 1 Blu-ray Disc player may take longer to start

up and load discs than earlier optical disc players. This is due 
to its design features, such as random-access memory, which
enable innovations such as popup menus and simultaneous
playback of secondary videos (e.g., director’s commentary) with
the main program.

Step Two – Display the Setup Menu

The first time the system is used, the Setup menu should be configured.
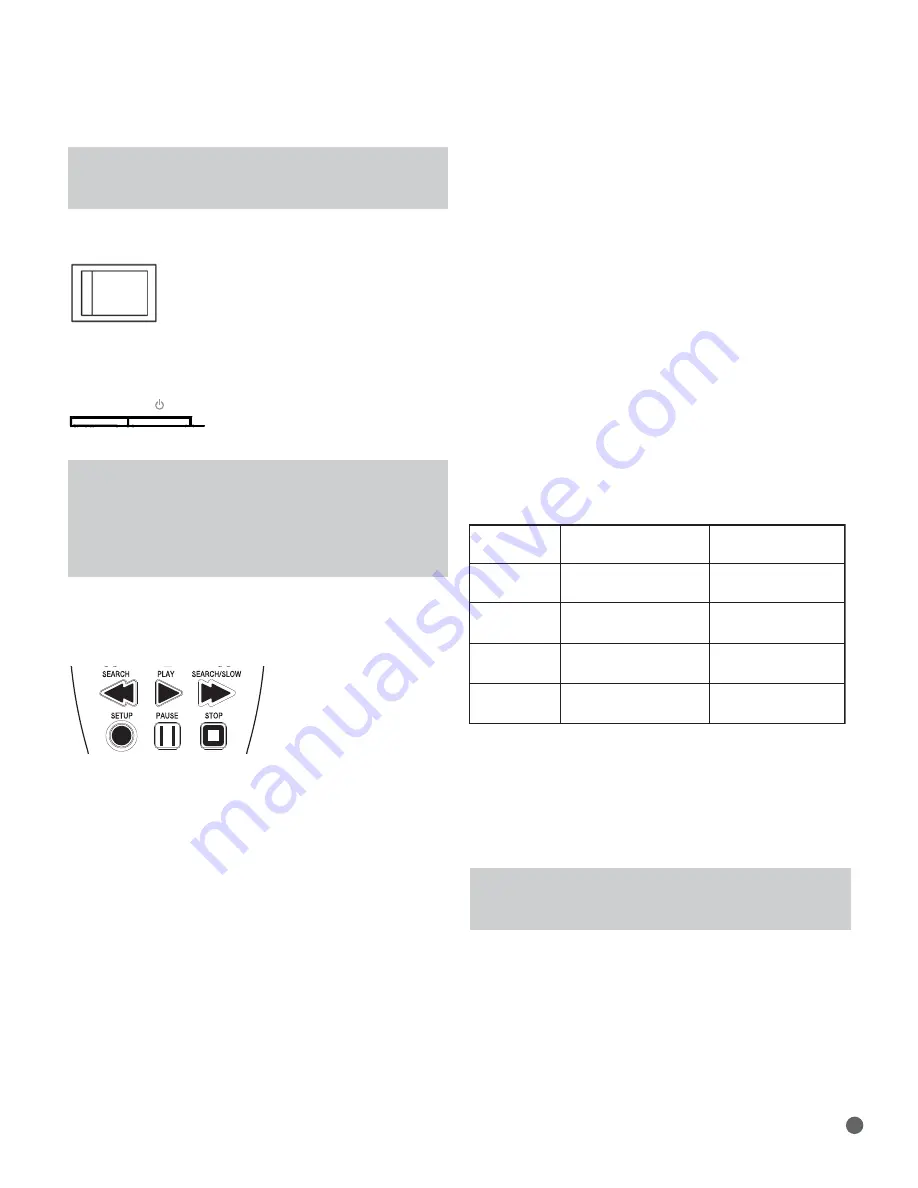
Press the Setup Button (see Figure 12) to display the Setup menu.

Figure 12 – Setup Button

The Setup menu, as with all menus on the BDP 1, is navigated using
the

/

¤

/

/

Navigation Buttons. Press the OK Button to select 

an item highlighted on screen.

There are five Setup menus: Language, Display, Audio, System and
Network.

Step Three – Language Setup

The Language Setup menu allows you to specify the default language
for the BDP 1 player menus, audio content, subtitles and disc menus. If
you are satisfied with the factory defaults (see Table A1 in the appendix),
then skip to Step Four.

To change the default language for any of the four settings, use the

/

¤

/

/

Buttons to highlight the setting. The available languages

will appear in the right column with the current language option checked.
Press the 

or OK Button to move the cursor to the languages column,

and use the 

/

¤

Buttons to highlight the desired setting. Press the 

OK Button to select it, then use the 

/

¤

/

/

Buttons to navigate 

to the next setting.

The Audio and Disc menu settings offer an Auto setting, in addition 
to several specific languages. Select the Auto setting if your desired
language does not appear, and the BDP 1 will use the disc’s default
language.

The Subtitle setting adds the option “None”, to turn off subtitling.

When you have finished setting the languages, use the 

/

¤

/

/

Buttons to navigate to another Setup menu, or press the Setup or Clear
Button to clear the menus from view.

Step Four – Display Setup

The Display Setup menu contains the aspect ratio, video output
resolution, color space, film mode and screen saver settings. These
settings depend on the capabilities of the video display, and enable the
BDP 1 to deliver the incredibly detailed high-definition video performance
that is one of the main benefits of the Blu-ray Disc format.

Aspect Ratio:

Select one of the 16:9 settings if using a widescreen 

TV, or one of the 4:3 settings if using a standard-width TV.

Resolution:

When the HDMI Output is used, leave this setting at the

default “HDMI Auto”, and the BDP 1 will communicate with the TV and
select the highest video output resolution that the TV can display. For
component video displays, select the highest resolution that allows you
to view a picture. Match the TV’s native resolution for best performance.
The 1080p setting is available only with the HDMI Output, when the TV
is compatible. This setting has no effect on composite video displays.

NOTE:

For non-HDMI applications, adjust this setting by pressing

the front-panel Resolution Button until the correct setting
appears in the Message Display.

Color Space:

This setting only affects the HDMI Output. Leave it at the

default “x.v.Color” setting for optimal color performance.

Film Mode:

Allows display of movies at their native rate of 24 frames

per second for superior performance. Requires a BD disc recorded at
1080/24p, an HDMI connection to the audio/video receiver or TV and 
a TV capable of displaying images at a resolution of 1080/24p. If all of
these conditions apply and the Resolution setting has been adjusted to
either “HDMI Auto” or “1080p”, select “On”. Otherwise, change this
setting to “Off”.

ON   OFF

Summary of Contents for BDP 1

Page 1: ...BANNER HEAD BDP 1 BLU RAY DISC PLAYER OWNER S MANUAL...

Page 2: ...essories specified by the manufacturer 12 Use only with a cart stand tripod bracket or table specified by the manufacturer or sold with the apparatus When a cart is used use caution when moving the ca...

Page 3: ...er Wipe it dry immediately with a dry cloth NEVER use benzene aerosol cleaners thinner alcohol or any other volatile cleaning agent Do not use abrasive cleaners as they may damage the finish of metal...

Page 4: ...JPEG Playback 26 TROUBLESHOOTING GUIDE 27 GLOSSARY 29 APPENDIX 32 TECHNICAL SPECIFICATIONS 32 Trademark Acknowledgements TABLE OF CONTENTS WARNING For Canadian model Mod le pour les Canadien Cet appar...

Page 5: ...nal features updates and news of live events Even older DVD Video discs will deliver outstanding picture quality when they are upscaled to 1080p video resolution Yet with all of its sophistication the...

Page 6: ...CD CD R RW DTS CD MP3 WMA MP3 bit rates 32kbps 320kbps JPEG files 10 megapixels 5MB file size up to 250 files per disc no fixed limit to number of files on a USB drive General Playback Features Video...

Page 7: ...D and HD DVD discs the SD DVD side of dual format HD DVD DVD discs may be played SACD discs CD I discs CD G discs Kodak Photo CD and Picture CD discs Discs intended for use in video game consoles Disc...

Page 8: ...Output Resolution Power Open Close Skip Step Forward Stop Remote IR Sensor NOTE To make it easier to follow the instructions throughout the manual that refer to this illustration a copy of this page...

Page 9: ...n or close the disc drawer Play Pause II Press to start pause or resume playback Stop n Press to stop playback When a video is playing press it once for Resume mode and twice to fully stop playback Sk...

Page 10: ...disc is paused Lights when the disc is in the Fast Search Reverse mode with the speed shown on screen Time These positions show the running time of the current media Track Chapter When a video disc i...

Page 11: ...a copy of this page may be downloaded from the Product Support section at www harmankardon com ON OFF Composite Video Output Coaxial Digital Audio Output Master Power Switch Analog Audio Outputs Remot...

Page 12: ...V receiver or surround processor is capable of decoding audio from the HDMI stream no further audio connection is needed NOTE If your A V receiver or video display uses DVI connections use an optiona...

Page 13: ...ar Stop Search Slow Forward Next Step Find Navigation Pop up Title Menu Status Power Off Open Close IR Transmitter Lens Pause Soft Keys Audio A B Repeat Play NOTE To make it easier to follow the instr...

Page 14: ...ress changes the speed 2x 4x 8x 16x 32x 64x or 128x The slow motion function is not available in reverse Play Press to begin playback Search Slow Forward Press to scan forward through the current prog...

Page 15: ...kip to Step Four Step Three Connect the BDP 1 Directly to a Television Alternate If an A V receiver or processor was used you may skip this step or you may make a second connection from the BDP 1 dire...

Page 16: ...he battery cover located on the back of the remote lift the tab until the latch releases and lift the battery cover up To replace the cover insert the two small tabs at the top of the cover into the r...

Page 17: ...es column and use the Buttons to highlight the desired setting Press the OK Button to select it then use the Buttons to navigate to the next setting The Audio and Disc menu settings offer an Auto sett...

Page 18: ...f the BDP 1 is connected directly to a TV or if it is connected by the HDMI or Analog Audio Outputs leave this setting at the default 48kHz as it has no effect If the BDP 1 is connected via the Coaxia...

Page 19: ...n the USB Function Select menu Select the Test Connectivity line If the test runs successfully leave the other settings as is BD Live Internet access will be available when you play a compatible disc...

Page 20: ...with a Region Code of 0 Playback capability for recordable discs may vary depending on how the disc was recorded and some discs may not play at all Always install the latest PC software before record...

Page 21: ...nd Random functions depends on the type of disc n BD and DVD discs Repeat play is available on some discs Random play is not available n Audio CD discs Repeat Track Repeat Disc and Repeat A B are avai...

Page 22: ...to make your selection The Audio Button only overrides the language setting for the current disc The unit will revert to its default setting with the next disc BonusView Picture in Picture and BD Live...

Page 23: ...press of the Repeat A B Button selects the beginning of the passage Press it again to select the end of the passage The third press turns off the Repeat mode MP3 Windows Media and JPEG Playback The BD...

Page 24: ...n an unchecked file is selected to add it back to the playlist Shuffle playlist random play Press the Disc Menu Button to display the playlist dropdown menu Highlight the Set Play Mode option then pre...

Page 25: ...must be playing Press the Disc Menu Button Select the Slideshow Duration option and press the Button then select the desired duration time 3 5 10 or 30 seconds or 1 5 or 30 minutes Press the OK Button...

Page 26: ...ompatible Change PCM Downsampling setting in Audio Setup menu with 96kHz PCM audio to Off Picture is distorted or jumps MPEG 2 decoding It is a normal artifact of DVD playback for pictures to jump dur...

Page 27: ...or stored on a USB device Multiple Angle Blu ray Disc and DVD media have the capability to show up to four different views of the same scene in a program When a disc is encoded with multiple angle inf...

Page 28: ...r WMA files may be created with greater compression than MP3 without sacrificing audio quality so that even more songs may be recorded on a disc There have been a number of versions of Windows Media a...

Page 29: ...PCM Downsampling 48kHz Dynamic Range Ctrl Off Table A4 System Setup Menu Setting Default Your Settings Auto Play On Auto Standby On Change Password 0000 Parental Control Off Parental Control Level N...

Page 30: ...eo PCM Stereo PCM 2 channel 48kHz PCM 2 channel 48kHz Stereo DTS 5 1 Channel 48 96kHz Bitstream Native DTS 5 1 DTS 5 1 Stereo DTS Transcoded DTS 5 1 DTS 5 1 Stereo PCM 7 1 PCM 5 1 channel 48kHz PCM 2...

Page 31: ...Audio Main Feature only Mixed Main Features Secondary content e g Director s Dolby TrueHD DTS HD DTS Commentary Remote control button sound effects LPCM Mixed Table A8 Video Output Resolutions Video O...

Page 32: ...don and Logic 7 are trademarks of Harman International Industries Incorporated registered in the United States and or other countries Designed to Entertain is a trademark of Harman International Indus...

Page 33: ...BANNER HEAD 250 Crossways Park Drive Woodbury New York 11797 www harmankardon com 2008 Harman International Industries Incorporated All rights reserved Part No 72 00BDP1 US0B1 2 09...

Reviews: