background image

23

ENGLISH

INSTALLATION

Step tWeLVe – plug in ac power cords

Before plugging the AVR into an unswitched electrical outlet, make sure 
the Main Power Switch behind the front-panel door is off, to prevent the 
possibility of damaging the AVR in case of a transient power surge. When 
pressed in, the switch is on. When pressed again to unlatch it, the switch pops 
out. 

You may plug one device that draws no more than 50 watts into the AC 
Switched Accessory Outlet on the rear panel. Turn on the device’s mechanical 
or master power switch, and that device will power on any time the AVR 760/
AVR 660 is turned on (some devices may require additional steps to power 
on from their standby mode). If the device has a clock or must always be on 
(such as a cable set-top box programmed to make recordings), do not plug it 
into this outlet.

The AVR 760/AVR 660 is equipped with a detachable power cord, allowing 
you to fully wire your system before installing the AVR. Plug the male end of 
the cord into an unswitched AC outlet, and the female end into the AVR 760/
AVR 660.

The Advanced Manual available for download from the harman/kardon web 
site contains a Table A5 designed for you to enter the information from Table 
2 for future reference.

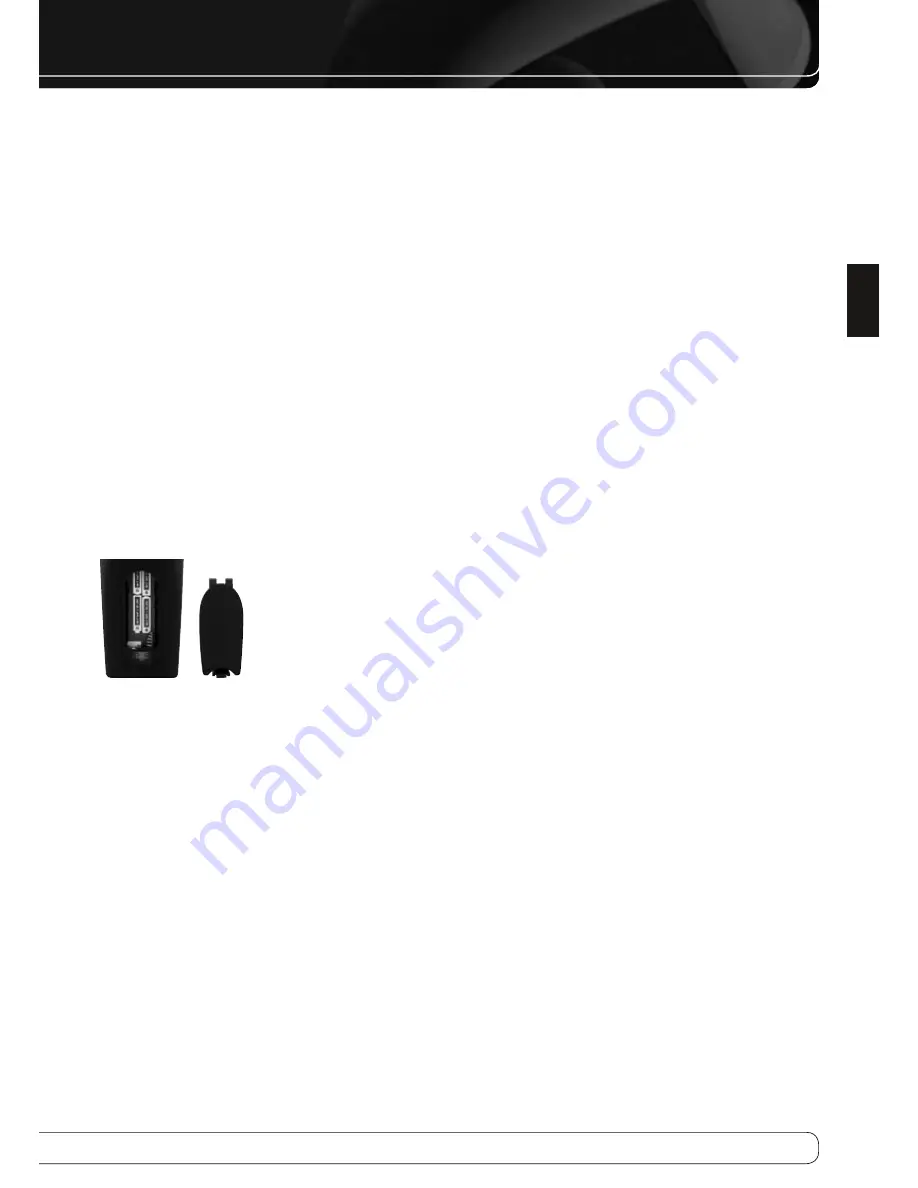
Step tHIrteen – Insert Batteries in remote

The AVR 760/AVR 660 remote control uses four AAA batteries (included). 

To remove the battery cover located on the back of the remote, squeeze the 
tab and lift the cover. 

Insert the batteries as shown in Figure 18, observing the correct polarity.

Figure 18 –  Remote Battery Compartment

Point the remote’s lens toward the front panel of the AVR 760/AVR 660. 
Make sure no objects, such as furniture, are blocking the remote’s path to 
the receiver. Bright lights, fluorescent lights and plasma video displays may 
interfere with the remote’s functioning. The remote has a range of about 7 
meter, depending on the lighting conditions. It may be used at an angle of up 
to 30 degrees to either side of the AVR.

Leave the Zone Selector Switch at the bottom in the Zone 1 position for 
normal use. 

If the remote seems to operate intermittently, or if pressing a button on the 
remote does not cause the AVR Settings Button or one of the Source Selectors 
to light, check or replace the batteries. 

Step fourteen – program Sources Into the 

remote

The AVR 760/AVR 660 remote may be programmed to control many brands 
and models of DVD players, cable boxes, satellite receivers, the Harman 
Kardon DMC 1000 digital media center and TVs. It is also preprogrammed to 
operate your iPod when docked in The Bridge II. 

To access the functions for a particular device, switch the remote’s device 
mode. Press the AVR Settings Button to access the codes that control the 
receiver, or the Source Selector Buttons to access the codes for the devices 
programmed into the remote.

To program the codes for a source device into the remote:

Turn on the source device.

1. 

Access the remote’s menu system by pressing and holding the AVR 

2. 

Settings Button for 3 seconds, until the “Main Menu” and “Program 
Device” messages appear in the LCD Display.

Press the OK Button to select the Program Device function.

3. 

Use the 

4. 

KL

 Buttons to select the Source Selector (or device) to program, 

and press the OK Button when the desired device appears on the lower 
line of the LCD Display.

For two of the Source Selectors and for sources A, B, C and D, the next step 

5. 

requires you to specify the device type. For the other Source Selectors, 
proceed to step 6.

Cable/SAT


: Use the 

KL

 Buttons to select either a cable television 

or satellite television set-top box, and press the OK Button.

AUX


: Use the 

KL

 Buttons to select a CD player, HDTV set-top box, 

PVD (personal video device, such as a DVR), TiVo system or VCR. Press 
the OK Button when the desired device appears.

A, B, C, D


: Select any desired device type.

Select whether to program the device manually or use the remote’s Auto 

6. 

Search capability. Manual programming simply requires you to select the 
brand name of your device and try a handful of possible codes. There is no 
need to look up numeric codes; the AVR 760/AVR 660 does the work for 
you. It is recommended that you select Manual programming first.

• Manual Programming

: Use the 

KL

 Buttons to scroll through the 

list of brands for which the remote has codes stored in its library. When your 
brand appears on the lower line, press the OK Button.

The remote will look up the brand in its library and display the number of 
codes available. Press the “1” Alphanumeric Key first. The remote will transmit 
the Power Off command associated with the first code set to the device. If 
the device turns off, then a compatible code set has been found. Press the OK 
Button to accept it. 

If the device remains powered on, press the “2” Alphanumeric Key. Proceed 
in this fashion until either a compatible code set is found, or you run out of 
codes for that brand. 

If you run out of codes, press the Back/Exit Button to end the process, and 
repeat steps 2 through 5. At step 6, select Auto and follow the instructions in 
the next bullet.

Summary of Contents for 660

Page 1: ...AVR 760 AVR 660 AUDIO VIDEO RECEIVER OWNER S MANUAL Basic Functions...

Page 2: ...er supply cord shall remain readily operable 17 Do not expose batteries to excessive heat such as sunshine fire or the like 18 The lightning flash with arrowhead symbol within an equilateral triangle...

Page 3: ...e finish cleaning materials used and normal heat and vibration caused by the use of the product or other factors We recommend that caution be exercised in choosing an installation location for the com...

Page 4: ...30 Dolby Volume 31 Mute Function 31 Sleep Timer 31 Audio Effects 31 Video Modes 31 Headphones 31 Source Selection 32 Using the Tuner 32 RDS Functions 33 USB Playback 33 Internet Radio 34 Network Play...

Page 5: ...nd their operation If you have any questions about this product its installation or its operation please contact your Harman Kardon retailer or custom installer or visit the Web site at www harmankard...

Page 6: ...o composite AVR 760 only A BUS port Headphone Ease of Use EzSet EQ II automated setup microphone supplied Full color user interface and setup menu generated in high definition video Text based on scre...

Page 7: ...n to access the AVR s main menu Info Settings Button Press this button to directly access the AVR s Source Info submenu which contains the settings for the current source Resolution Press this button...

Page 8: ...type of audio and one type of video connection Note The AVR s menus refer to these jacks as the Optical Front Coaxial Front Composite Front S Video Front and Analog Front inputs EzSet EQ II Microphone...

Page 9: ...erial Port This bi directional port may be used to control the AVR 760 AVR 660 using an RS 232 serial control link to a compatible computer or programmable remote control system Due to the complexity...

Page 10: ...1 2 and 3 Video Inputs Use these jacks to connect your video capable source components e g VCR DVD player cable TV box to the receiver Use only one type of video connection for each source Composite...

Page 11: ...te s LCD Display NOTE Four of the sources do not have dedicated Source Selectors Source A Source B Source C and Source D To select one of these sources first press the AVR Settings Button then press t...

Page 12: ...eo display or TV See the Advanced Functions Manual for more information Surround Modes Press to directly access the Surround Modes submenu Scroll to the lines for the Surround Mode categories Auto Sel...

Page 13: ...1 mode the Zone Indicator will turn green the power volume and mute controls will only affect the main listening area To control operation for the remote zone press the Zone Selector so that the Zone...

Page 14: ...ne system where the surround back channels power loudspeakers located in another room Many people expect the surround speakers to play as loudly as the front speakers Although all of the speakers in t...

Page 15: ...ed subwoofers that contain their own amplifier Usually a line level nonamplified connection is made from the receiver s Subwoofer Output to a corresponding jack on the subwoofer as shown in Figure 3 T...

Page 16: ...digital audio cable Figure 6 Optical Digital Audio Analog Audio Analog connections require two cables one for the left channel white and one for the right channel red These two cables are often attach...

Page 17: ...igure 11 S Video Component video separates the video signal into three components one luminance Y and two sub sampled color signals Pb and Pr that are transmitted using three separate cables See Figur...

Page 18: ...back left and right speakers are placed 150 degrees from the center speaker or directly facing the opposite side front speaker See Figure 16 C 90 150 90 150 30 30 SBR SBL FR FL SL SR SUB 1 SUB 2 Green...

Page 19: ...type NOTE You may match any device type to any source The device type is only relevant for programming control codes into the handheld remote and as explained on page 25 you may reassign any Source Se...

Page 20: ...ital audio recordings To make analog recordings assign either the Analog 3 or 4 Audio Inputs to the recorder as both have recording outputs It is not necessary to connect TiVo or Video Recorder device...

Page 21: ...ht Speaker Outputs then connect the front left and right main speakers to the subwoofer s left and right speaker output terminals Consult the owner s manual for the subwoofer for specific installation...

Page 22: ...ltaneously with multizone operation However the benefit is achieved with the expense of an additional component i e the amplifier Connect the remote room s speakers directly to the B Surround Back Zon...

Page 23: ...te receivers the Harman Kardon DMC 1000 digital media center and TVs It is also preprogrammed to operate your iPod when docked in The Bridge II To access the functions for a particular device switch t...

Page 24: ...emote to time out then the device type reassignment will not take effect To learn individual key codes If some functions do not work correctly you may reprogram individual keys from the device s origi...

Page 25: ...to rename a device or a key and press the OK Button Use the 4 KL Buttons to select the device either to rename the device itself or a key function used by that device and press the OK Button The curr...

Page 26: ...rtant steps in setting up a home theater system is to calibrate the receiver to match the loudspeakers optimizing sound reproduction Until recently most receivers required manual calibration and confi...

Page 27: ...position These settings affect each source independently Leave this submenu at its default settings and return to it later if your system requires fine tuning See the Advanced Functions Manual for mo...

Page 28: ...Output the two devices will communicate with each other and the AVR will automatically select the best available video output resolution If the display is connected to the AVR s Component Video Outpu...

Page 29: ...e AVR will automatically switch to the analog audio input This can be useful for older cable television systems that broadcast channels in both analog and digital audio If an analog audio connection w...

Page 30: ...tening volumes One concern of the typical home theater listener is that volumes can vary widely for different programs played by a source e g television commercial advertisements are often much louder...

Page 31: ...play It is recommended that you leave the settings at their defaults See the Advanced Functions Manual for detailed information Headphones Plug the 1 4 inch plug on a pair of headphones into the jack...

Page 32: ...system is capable of transmitting a wide variety of information in addition to the initial station call sign that appears when a station is first tuned In normal RDS operation the display will indica...

Page 33: ...the Slideshow Speed setting Each press of the OK Button changes the speed Slow Medium or Fast Internet Radio With its network connection the AVR 760 AVR 660 opens a world of MP3 and WMA format stream...

Page 34: ...l audio signals are available for recording Proprietary 2 formats such as Dolby Digital and DTS may not be recorded using the digital audio connections Use the analog audio connections to make an anal...

Page 35: ...e System Settings menu described in the Advanced Functions Manual Restore the Now Playing screen to view by pressing either of the M N Buttons NOTE It is strongly recommended that you use the screen s...

Page 36: ...uses only two speakers As described in the Advanced Functions Manual you may select Analog Bypass mode for a pure analog signal when analog audio inputs are in use Turn off the Tone Control setting in...

Page 37: ...Input is monaural There is no surround information from mono sources Incorrect configuration Check speaker configuration Stereo or Mono program material The surround decoder may not create center or r...

Page 38: ...UX Coax Front Analog Front Composite Front not used for audio only devices Recorder Source D Coaxial 2 input and Coaxial Output Analog 4 inputs and outputs Composite OR S Video 2 input and output iPod...

Page 39: ...Medium Low Medium Medium Medium Medium Low Medium Record Out Analog Analog Analog Analog Analog Analog Analog Analog Video output resolution may vary for HDMI connections Table A2 Source Setting Defa...

Page 40: ...istortion Mono Stereo 0 2 0 3 Stereo Separation 40dB 1kHz Selectivity 400kHz 70dB Image Rejection 80dB IF Rejection 90dB AM Tuner Section Frequency Range 520 1720kHz Signal to Noise Ratio 45dB Usable...

Page 41: ...r U S Patent s 5 451 942 5 956 674 5 974 380 5 978 762 6 226 616 6 487 535 7 212 872 7 333 929 7 392 195 7 272 567 and other U S and worldwide patents issued and pending DTS is a registered trademark...

Page 42: ...8500 Balboa Blvd Northridge CA 91329 www harmankardon com 2009 Harman International Industries Incorporated All rights reserved Part No CQX1A1393Z...

Reviews: