background image


CUS-012-0101-01


Page 1 of 1 

CHICKEN PREPARATION PROCEDURE 

Inferno GC

 - C


Cross contamination is very dangerous. Do not load fresh product into rotisserie until 
cooking cycle is complete and all cooked product is removed from rotisserie. 


Tools Required: 

Latex/vinyl gloves, skewer rack marked ‘Raw’, skewers.


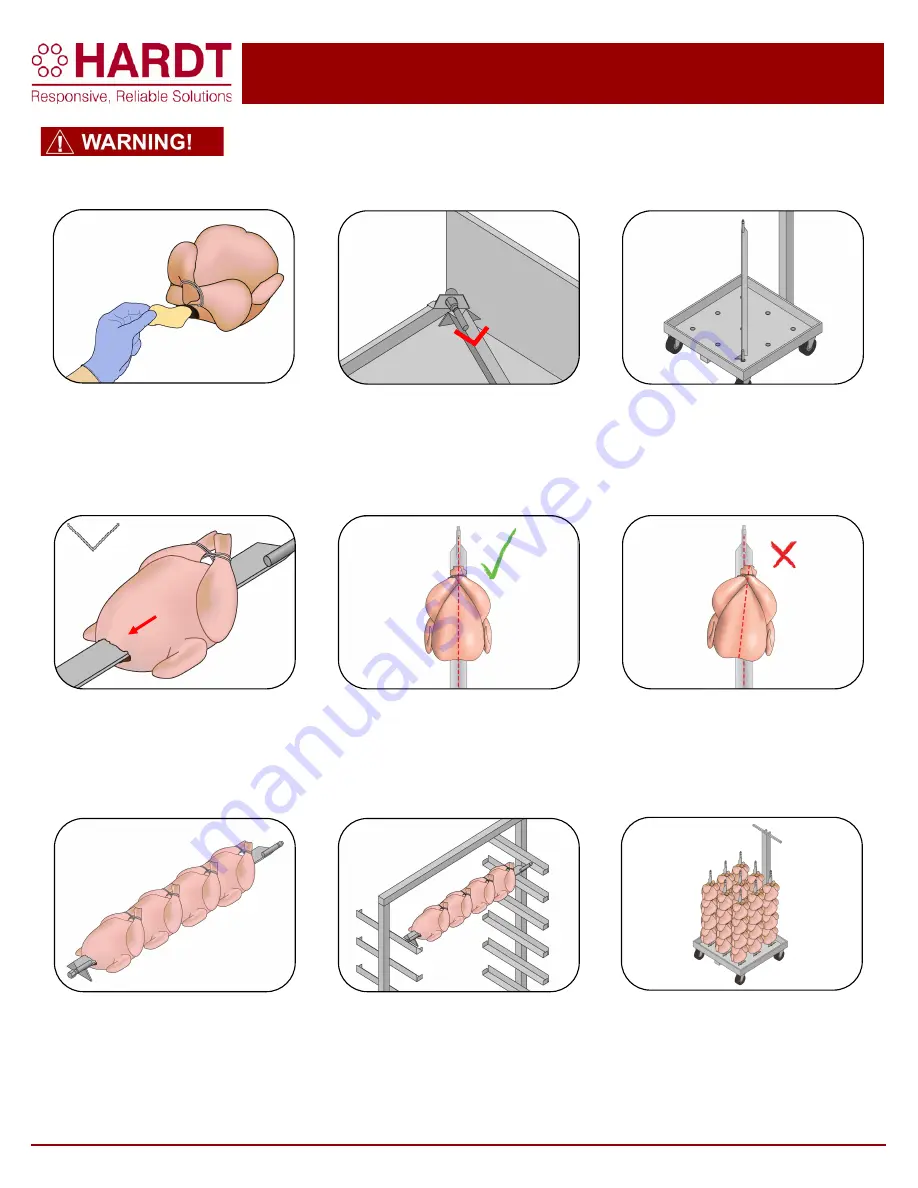
1. Bring the required number of boxes 
to the raw product workstation.  
Wearing gloves at all times, take out a 
chicken and drain any excess liquid 
back into the box.  Tear away and 
remove excess fat from the cavity of the 
chicken. 

2. If using the horizontal skewer rack 
and skewering table; take a skewer and 
place the hex end into the hole at the 
back left corner of the prep table.  The 
skewer should be positioned with the 
“V” pointing up. 

3. If using the vertical skewer rack, take 
a skewer and place the hex end into 
one of the holes in the base of the cart. 


4. Take a chicken, neck first, breast up 
and place the pointed tip of the skewer 
into the cavity.   With the midpoint of the 
breastbone aligned with the middle of 
the skewer, push the bird on.  The tied 
legs should be above the skewer. 

5. There should be some resistance as 
the bones open up to lock the chicken in 
place.  The middle of the chicken must 
align with the middle of the skewer as 
shown by the dotted line. 

6. If it is not aligned properly, remove 
chicken from the skewer and try again.   


7. Place 4 chickens per skewer. 
Ensure that all wings and legs are 
tucked in/trussed properly to prevent 
them from flopping around. 

8a. Place the prepared skewers on the 
rack designated for raw product and 
bring it to the rotisserie for loading. 

8b. If using a vertical skewer rack, 
simply bring it to the rotisserie for 
loading. 


Horizontal  
Skewer 
Rack 

Vertical 
Skewer 
Rack 

Skewer 

Orientation 

Summary of Contents for Inferno GC

Page 1: ...replace the bottle 5 Switch the rotisserie on by pulling out the red main ON OFF switch Follow instructions on the display and then press ENTER 6 Make sure the drain valve is set to cook 7 Press the...

Page 2: ...r rack take a skewer and place the hex end into one of the holes in the base of the cart 4 Take a chicken neck first breast up and place the pointed tip of the skewer into the cavity With the midpoint...

Page 3: ...appropriate cooking program for the number of skewers being used For pre cooked ribs press the down arrow until you see rib program on the screen 5 After loading wipe the door handle control panel swi...

Page 4: ...t will drop out of the socket into your hand Remove the skewer from the rotisserie 11 As products are unloaded place them on the skewer cart designated for cooked product 12 Wipe the inside of the doo...

Page 5: ...display 6 The display should read CHECKING OVEN TEMP WAIT TIME SEC as the automatic cleaning process starts Once completed the rotisserie will shut off by itself Weekly Drain Flushing 1 Once every 7 d...

Page 6: ...will be full of water and will need to be emptied before starting the first cook program Lift the handle of the reservoir as shown above and pull the unit to the floor drain with the rear of the unit...

Page 7: ...to remove any buildup or accumulation 5 Close the door and switch on the rotisserie by pulling out the red main ON OFF switch Start a preheat cycle and verify the burner has flames across its entire...

Page 8: ...button will flash 2 Push in the red main ON OFF switch to switch the rotisserie OFF 3 Verify that the gas supply to the rotisserie and the main gas valve are both open Try to start the unit again by...

Page 9: ...d will only spread it around the kitchen Equipment Safety ALWAYS Always read all documentation Always check for gas leaks vacate the area and call the gas supply company if any are detected Always cle...

Reviews: