background image

2 2

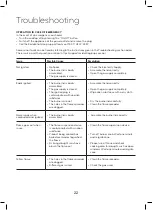
Troubleshooting

OPERATION IN CASE OF EMERGENCY

In the event of an emergency you should:

 • Turn the cooktop off by pressing the “On/Off” button.

 • Switch off the appliance at the power outlet and remove the plug.

 • Call the Residentia Group support team on 1300 11 HELP (4357).


Some minor faults can be fixed by referring to the instructions given in the Troubleshooting section below. 

There is also a self-help section online at https://support.residentiagroup.com.au/

Issue

Possible Cause

Resolution

Not ignited 

 • No Spark

 • The burner lid is badly 

assembled

 • The gas supply is closed

 • Check the Electricity Supply

 • Assemble the lid correctly

 • Open the gas supply completely

Badly ignited

 • The burner lid is badly 

assembled

 • The gas supply is closed

 • The ignition plug is 

contaminated with an alien 

substance.

 • The burners are wet.

 • The holes in the flame spreader 

are clogged.

 • Assemble the lid correctly 

 • Open the gas supply completely

 • Wipe alien substance with a dry cloth 


 • Dry the burner lids carefully

 • Clean the flame spreader

Noise made when 

combusted and ignited

 • The burner lid is badly 

assembled

•  Assemble the burner lid correctly

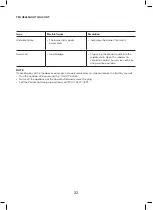
Flame goes out when 

in use

 • The flame suspension device 

is contaminated with an alien 

substance

 • Product being cooked has 

boiled over and extinguished 

the flame

 • A strong draught may have 

blown the flame out

 • Clean the flame supervision device. 


 • Turn off burner knob. Wait one minute 

and reignite zone. 

 • Please turn off zone and check 

cooking area for draught such as open 

windows. Wait one minute and reignite 

zone

Yellow flame 

 • The holes in the flame spreader 

are clogged.

 • Different gas is used

 • Clean the flame spreader. 

 • Check the gas used.

Summary of Contents for HBRCGG905W

Page 1: ...90cm Glass Gas Cooktop I N S T R U C T I O N M A N U A L IM VERSION V1 3 MODEL HBRCGG905W PRODUCT CODE 706143 ISSUE DATE 09 2021 SUPPORT 1300 11 4357 WWW HARBOUR APPLIANCES COM AU...

Page 2: ...to you by Harbour are manufactured to the highest standards of performance and safety and as part of our philosophy of customer service and satisfaction are backed by our comprehensive 3 Year In Home...

Page 3: ...ls 5 General Safety Instructions 9 Product Overview 10 Installation Instructions 18 Operation Instructions 20 Maintenance and Cleaning 22 Troubleshooting 24 Specifications 26 Repair and Refurbished Go...

Page 4: ...ired or replaced if the goods fail to be of acceptable quality and the failure does not amount to a major failure Proof of Purchase This warranty is valid for the original purchase and is not transfer...

Page 5: ...ut of their reach Inspect the power cord and plug for any damage or defects In case of damage do not use this product and contact the Residentia Group support team on 1300 11 HELP 4357 for further adv...

Page 6: ...ndition Otherwise contact the dealer before installing the appliance The adjacent furniture and all materials used in the installation must be able to withstand a minimum temperature of 85 C above the...

Page 7: ...ance is intended for domestic cooking only It is not designed for commercial or industrial purposes Prolonged intensive use of the appliance may call for additional ventilation for example opening a w...

Page 8: ...uct please contact your local council your household waste disposal service or the shop where you purchased the product GENERAL SAFETY INSTRUCTIONS CONT WARNING CLEANING AND MAINTENANCE Never use abra...

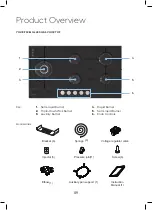
Page 9: ...id Burner 6 Knob Controls Key 1 3 2 4 5 6 A How to Use the appliance ccessories Description of the appliance Bracket 4 Sponge 4 Screw 4 Elbow 1 Auxiliary pan support 1 5 Instruction Manual 1 Voltage r...

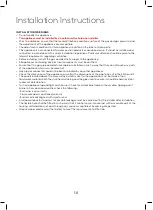
Page 10: ...arts of the appliance which may become hot Gas pipe or connector shouldn t be bent or blocked by any other appliances Check the dimensions of the appliance as well as the dimensions of the gap to be c...

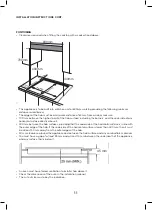
Page 11: ...If the underside of ontal surface is lower than 400 mm then it must be at least 50 mm m the outer edges of the hob earance around the appliance and between the hob surface and any ble materials 45 mm...

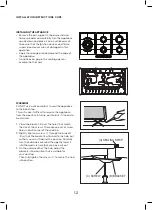
Page 12: ...h the bracket B so that the bracket is attached to the hob but so that you can still adjust the position Carefully turn the hob back over and then gently lower it into the aperture hole that you have...

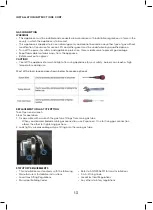
Page 13: ...nd appliance protection Close middle valve to prevent gas leakage Most of the tools that you might need are shown below Some are optional Replacement of gas type fitting Tool Open end wrench Steps for...

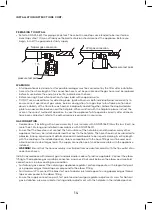
Page 14: ...t gas standards and or codes of practice applicable Connect the elbow fitting to the appliance gas manifold connection and check that seals between the elbow and manifold connection are in place and i...

Page 15: ...NZS s of the may be installed ot be subjected to abrasion to be inspected along its Unions compatible with ed for gas leaks The ppliance installed ed from accidental contact nd installed in ly is used...

Page 16: ...ed by the manufacturer to produce customer service agent or similarly qualified personnel Electrical Connection Green yellow Earth Blue Neutral Brown Live 22 This appliance is designed to be connected...

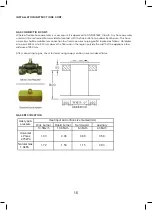
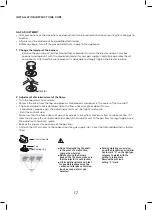
Page 17: ...ove the control knob and make further adjustments to the gas flow testing it again once the adjustment has been made Repeat this process for each one of the gas taps be tightly screwed in Refit the co...

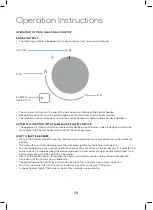
Page 18: ...n the control knob of the burner that you wish to light and turn it anti clockwise to the maximum position If you keep the control knob depressed the automatic ignition for the burner will operate You...

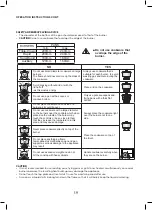
Page 19: ...er as it could tip over Do not use cookware with a large diameter on the burners near the controls which when placed on the middle of the burner may touch the controls or be so close to them that they...

Page 20: ...added Dry the top plate thoroughly after cleaning Thoroughly remove salty foods or liquids from the hob as soon as possible to avoid the risk of corrosion Stainless steel parts of the appliance may be...

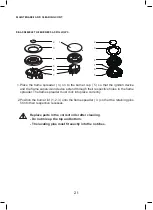
Page 21: ...etaining pins fit into their respective recesses HQWO ZLSH WKH LJQLWLRQ GHYLFH DQG DPH VXSHUYLVLRQ GHYLFH ZLWK D ZHOO ZUXQJ RXW cloth and wipe dry with a clean cloth HIRUH SODFLQJ WKH EXUQHUV EDFN RQ...

Page 22: ...is closed The ignition plug is contaminated with an alien substance The burners are wet The holes in the flame spreader are clogged Assemble the lid correctly Open the gas supply completely Wipe alien...

Page 23: ...ose the middle valve Open the window to ventilate Contact our service centre by using a phone outside NOTE If checking any of the the above causes are not easily resolved or you cannot resolve the fau...

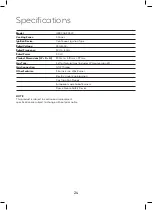
Page 24: ...imensions W D H 900mm 510mm 99mm Gas Type Set for Natural Gas includes LPG conversion kit Gas Connection G1 2 Thread Other Features 5 Burners inc Wok Burner Electric Under Knob Ignition Cast Iron Pan...

Page 25: ...2 5 THIS PAGE IS INTENTIONALLY LEFT BLANK...

Page 26: ...dentiagroup com au Helpline hours of operation Mon Fri 9 00 AM 5 00 PM 27 AFTER SALES SUPPORT 1300 886 649 info tempo org AUS MODEL MDR70 VR031 PRODUCT CODE 61494 06 2018 Repair and Refurbished Goods...

Page 27: ...2 7 For an electronic copy of this manual go to www harbour appliances com au and download a copy...

Page 28: ...AN INITIATIVE BY RESIDENTIA GROUP TEL 1300 11 4357 EMAIL SUPPORT RESIDENTIAGROUP COM AU CERTIFICATE NO SGS 200567 E...

Reviews: